Posts with «motion control» label

Quick and Dirty Microscope Motion Control for Focus Stacking

If you’ve spent much time looking through a microscope, you know that their narrow depth of field can be a bit challenging to deal with. Most microscopes are designed to only have a very thin slice of the specimen in focus, so looking at anything above or below that plane requires a focus adjustment. It’s tedious and fussy, and that makes it a perfect target for automation.

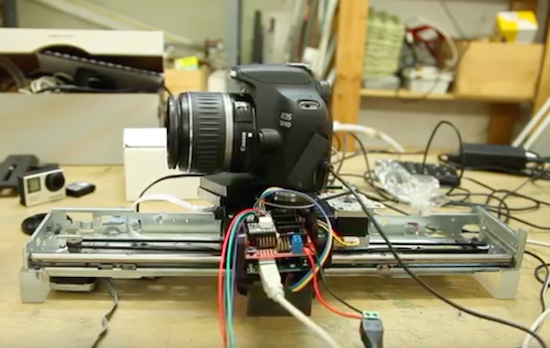
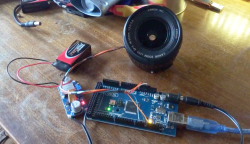
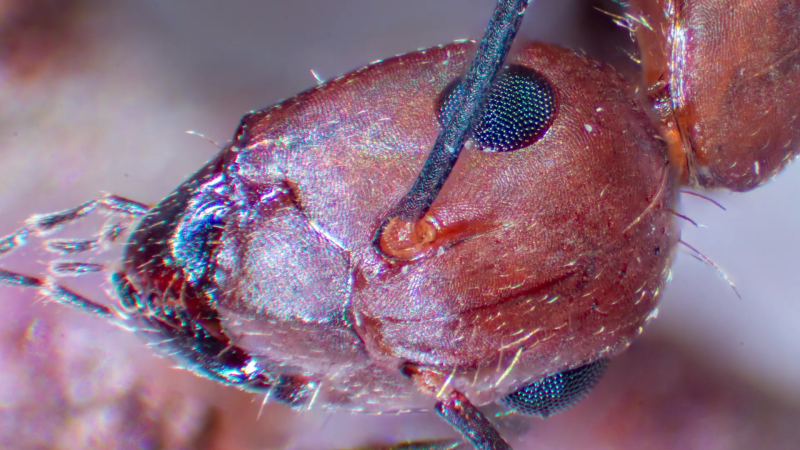
The goal behind [ItMightBeWorse]’s microscope mods is “focus stacking,” a technique where multiple images of the same sample taken at different focal planes can be stitched together so that everything appears to be in focus. Rather than twist knobs and take pictures manually, he built a simpler Arduino-based rig to do the job for him. Focus control is through a small stepper motor connected to the fine focus knob of the scope, while the DSLR camera shutter is triggered through a simple relay board. There’s also lighting control, with an RGB LED ring light that can change both the light level on the sample as well as the tint.

The code is very simple, and the setup is quite temporary looking, but the results are pretty impressive. We could do without the extreme closeup of that tick — nasty little arachnids — but the ant at the end of the video below has some interesting details. [ItMightBeWorse] doesn’t mention how the actual stacking is being done, but this CNC-based focus stacking project mentions a few utilities that take help with the post-processing.

Simple Camera Slider Adds a Dimension or Two to Your Shots

Camera sliders are a popular build, and properly executed they can make for impressive shots for both time-lapse sequences or real-time action. But they seem best suited for long shots, as dollying a camera in a straight line just moves subjects close to the camera through the frame.

This slider with both pan and tilt axes can make moving close-ups a lot easier. With his extremely detailed build log, [Dejan Nedalkovski] shows how he went about building his with only the simplest of materials and tools. The linear rail is simply a couple of pieces of copper pipe supported by an MDF frame. The camera trolley rides the rails on common skateboard bearings and is driven by a NEMA-17 stepper, as are the pan and tilt axes. [Dejan] also provided a barn-door style pivot to tilt the camera relative to the rails, allowing the camera to slide up and down an inclined plane for really interesting shots. The controller uses an Arduino and a joystick to drive the camera manually, or the rig can be programmed to move smoothly between preset points.

This is a step beyond a simple slider and feels a little more like full-blown motion control. We’ve got a feeling some pretty dramatic shots would be possible with such a rig, and the fact that it’s a simple build is just icing on the cake.

Turn your printer into a MOCO slider with Arduino

Product designer Eduard Puertas continues to impress us with his makeshift motion control projects. Recently, the animation enthusiast had come across a broken HP printer on the street; rather than let it be picked up by the garbage truck, he decided to repurpose it into a MOCO slider for stop motion and time-lapse photography.

Aside from the printer’s mechanical parts, Puertas used an Arduino Uno, some stepper drivers, and Dragonframe software to bring his idea to life. You can see the end result below!

Call for reviewers MegaPi motion controller

Hi again dear LMR members!


read more

Call for reviewers MegaPi motion controller

Hi again dear LMR members!


read more

DIY Motion Control Camera Rig Produces Money-Shots On A Budget

Motion control photography allows for stunning imagery, although commercial robotic MoCo rigs are hardly affordable. But what is money? Scratch-built from what used to be mechatronic junk and a hacked Canon EF-S lens, [Howard’s] DIY motion control camera rig produces cinematic footage that just blows us away.

[Howard] started this project about a year ago by carrying out some targeted experiments. These would not only assess the suitability of components he gathered together from all directions, but also his own capacity in picking up enough knowledge on mechatronics to make the whole thing work. After making  himself accustomed to stepper motors, Teensies and Arduinos, he converted an old moving-head disco light into a pan and tilt mount for the camera. A linear axis was added, and with more degrees of freedom, more sophisticated means of control became necessary.

Using the Swift programming language, [Howard] wrote a host program automatically detects the numerous stepper and servo motor based axis and streams the position data to their individual Teensy LC based controllers. To the professional motion graphics artist , these shots aren’t just nice and steady footage: The real magic happens when he starts adding perfectly matched layers of CGI. Therefore, he also wrote some Python scripts that allow him to manually control his MoCo rig from a virtual rig in Blender, and also export camera trajectories directly from his 3D scenes.

On top of the 4-axis camera mount and a rotary stage, [Howard] also needed to find an electronic follow-focus mechanism to keep the now moving objects in focus. Since the Canon EF-S protocol had already been reverse engineered, he decided to tap into the SPI control bus between the camera and the lens to make use of its internal ring motor. Although the piezo motors in autofocus lenses aren’t actually built for absolute positioning, a series of tests revealed that a Canon EF-S 17-55mm IS USM lens can be refocused a few hundred times and still return to its starting position close enough. The caveat: [Howard] had to hack open the £600 lens and drill holes in it. In retrospect, he tells us, it’s a miracle that his wife didn’t leave him during the project.

After several iterations of mechanical improvements, the motion control rig is now finished, and the first clips have already been recorded and edited. They’re stunning. Only the 6-axis robot arm hiding in [Howard’s] basement tells us that he just warming up for the real game. Enjoy the video below, but don’t miss out on the full 3-part video documentary on how this project came to be.


Filed under: digital cameras hacks, video hacks

Ben Heck makes Super Glove mod for Kinect, takes strain out of gestures (video)

Sick of trying to control your 360 using Kinect, semaphore and advanced flailing? Modgod Ben Heck, deciding he wanted to be more Minority Report and less lunatic, has been working on Power Glove 2.0 to improve the console's navigation experience. The prototype glove is tricked out with Arduino, an accelerometer, a gyroscope and some fingertip buttons. With the addition of IR and a little coding magic, the 360's interface can be controlled via subtle gestures, with increased functionality / style points also apparent. Check out the latest episode of The Ben Heck Show after the break for a detailed walkthrough of the project and a demo of the glove in action.

Continue reading Ben Heck makes Super Glove mod for Kinect, takes strain out of gestures (video)

Ben Heck makes Super Glove mod for Kinect, takes strain out of gestures (video) originally appeared on Engadget on Mon, 04 Jun 2012 17:33:00 EST. Please see our terms for use of feeds.

Permalink | Email this | Comments

$150 mural drawing robot kit

Primary image

What does it do?

Draws murals by following GCode instructions and/or etch-a-sketch style commands

Knowing the length of each string and the distance between the servos gives us everything we need to use trigonometry to find the XY coordinates of the pen.  We can also do the reverse, which means we can find how much to change the strings to move from A to B. From there I added gcode support.  Lastly I wrote some Java apps to create a nice GUI.  If your arduino comes with the firmware already loaded then you don't even need to install the Arduino app. :)

Cost to build

$150,00

Embedded video

Finished project

Complete

Number

Time to build

1 hour

Type

URL to more information

Weight

read more