Motion control photography allows for stunning imagery, although commercial robotic MoCo rigs are hardly affordable. But what is money? Scratch-built from what used to be mechatronic junk and a hacked Canon EF-S lens, [Howard’s] DIY motion control camera rig produces cinematic footage that just blows us away.
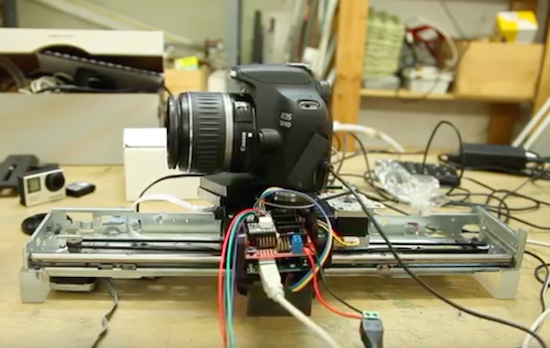
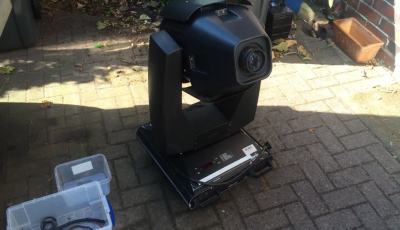 [Howard] started this project about a year ago by carrying out some targeted experiments. These would not only assess the suitability of components he gathered together from all directions, but also his own capacity in picking up enough knowledge on mechatronics to make the whole thing work. After making himself accustomed to stepper motors, Teensies and Arduinos, he converted an old moving-head disco light into a pan and tilt mount for the camera. A linear axis was added, and with more degrees of freedom, more sophisticated means of control became necessary.
Using the Swift programming language, [Howard] wrote a host program automatically detects the numerous stepper and servo motor based axis and streams the position data to their individual Teensy LC based controllers. To the professional motion graphics artist , these shots aren’t just nice and steady footage: The real magic happens when he starts adding perfectly matched layers of CGI. Therefore, he also wrote some Python scripts that allow him to manually control his MoCo rig from a virtual rig in Blender, and also export camera trajectories directly from his 3D scenes.


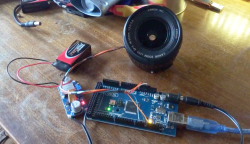
On top of the 4-axis camera mount and a rotary stage, [Howard] also needed to find an electronic follow-focus mechanism to keep the now moving objects in focus. Since the Canon EF-S protocol had already been reverse engineered, he decided to tap into the SPI control bus between the camera and the lens to make use of its internal ring motor. Although the piezo motors in autofocus lenses aren’t actually built for absolute positioning, a series of tests revealed that a Canon EF-S 17-55mm IS USM lens can be refocused a few hundred times and still return to its starting position close enough. The caveat: [Howard] had to hack open the £600 lens and drill holes in it. In retrospect, he tells us, it’s a miracle that his wife didn’t leave him during the project.
After several iterations of mechanical improvements, the motion control rig is now finished, and the first clips have already been recorded and edited. They’re stunning. Only the 6-axis robot arm hiding in [Howard’s] basement tells us that he just warming up for the real game. Enjoy the video below, but don’t miss out on the full 3-part video documentary on how this project came to be.
Filed under:
digital cameras hacks,
video hacks