Learning to play an an instrument well takes a lot of time, which many people don’t have. To address this, Franco Molina — who enjoys MIDI controllers and writing music, but describes himself as being terrible at playing the keyboard — created the Synthfonio.
Molina’s DIY device is vaguely reminiscent of a guitar, with a series of keys on the neck that indicate the chords and key signatures, and another set roughly positioned where you’d strum a guitar to play the notes.
The Synthfonio is assembled from laser-cut MDF sections, and utilizes a MKR WiFi 1010 to take care of I/O and MIDI functions. A second microcontroller in the form of an ATmega328 on a breadboard is used to produce actual synth sounds, though most Arduinos would be suitable either function.
The Synthfonio features 2 sets of keys, one to define chords and key signatures, and another one to actually play the notes. Whatever chord is pressed in the instruments neck keys, will define the pitch of the keys on the instrument handle. Similar to a guitar, violin, and other string instruments; with the added advance that the Synthfonio is a smart device that can deduce the chords being played from a single set of notes. This way, for example, the musician can use the handle keys to play chords, melodies, and arpeggios in the key of A, just by pressing the A key on the neck. In the same way, pressing the A key on the neck in conjunction with the C key (minor third of A) will activate an A minor tonality for the handle keys.
This can allow any player to execute a 4-chord melody, accompaniment, or even improvisation; with no more than one or two fingers in position.
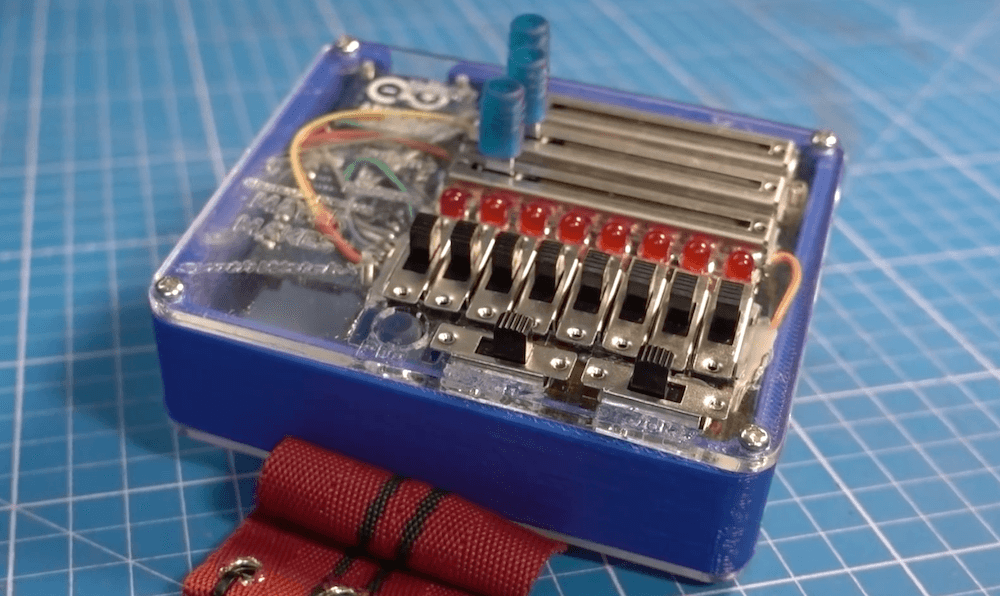
Unless you’re very good, personal synths are fun for you — though often quite annoying for onlookers. After making his own wristwatch-based synth in 2016, Clem Mayer decided to build a new version that’s larger and louder than ever, and programmable via an Arduino controller.
Mayer chose the MKR WiFi 1010 here to take advantage of its LiPo charging abilities. This enables the device to be entirely self-contained in its custom housing, with a variety of switches and sliders for an interface.
Users can program their own “tune” to be played back, or even take advantage of a random sequence generated on startup, then modify the sound as it plays live.
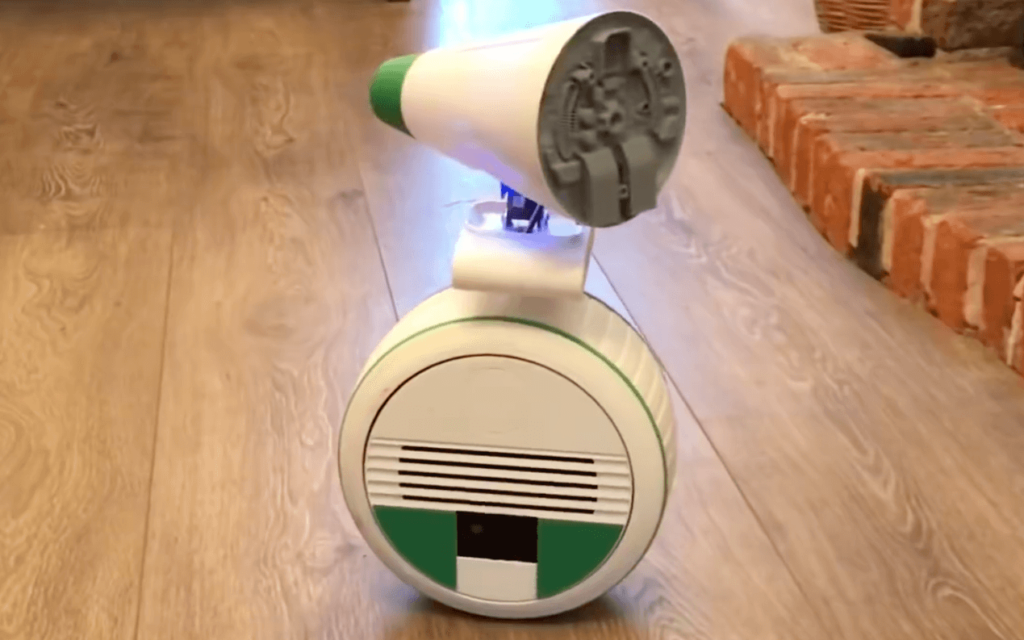
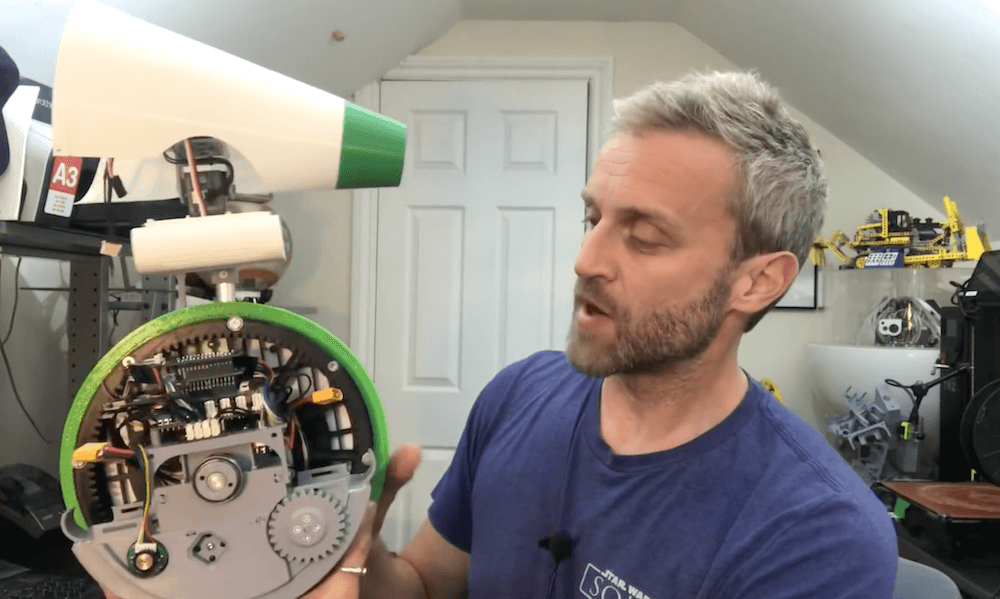
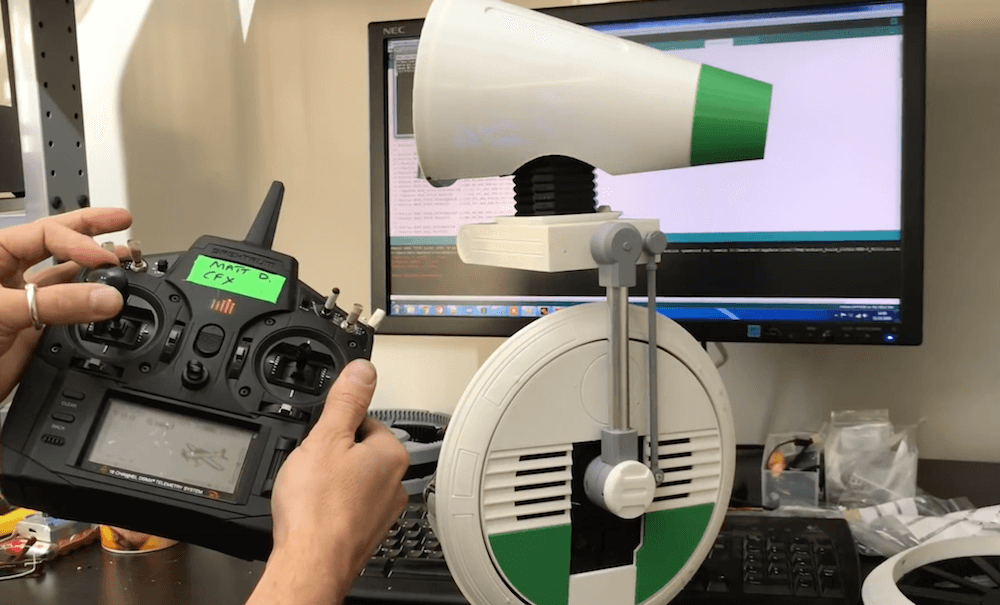
While it’s yet to make its premiere, Matt Denton has already built the D-O droid from Star Wars: The Rise of Skywalker using a MKR WiFi 1010 for control, along with a MKR IMU Shield and a MKR Motor Carrier.
The droid scoots around on what appears to be one large wheel, which conceals the Arduino boards as well as other electronics, batteries, and mechanical components. Denton’s wheel design is a bit more complicated mechanically than it first appears, as its split into a center section, with thin drive wheels on the side that enable differential steering.
On top, a cone-shaped head provides sounds and movement, giving the little RC D-O a ton of personality. The droid isn’t quite finished as of the video below, but given how well it works there, the end product should be amazing!
This post is from Sandeep Mistry, Senior Software Engineer at Arduino.
Today, we are pleased to announce BLE (Bluetooth Low Energy) central support in v1.1.0 of the ArduinoBLE library. This major feature addition allows your Arduino board to scan for and connect to BLE peripheral devices. With one simple library, you can now use BLE to directly connect your Arduino board to:
A smartphone, tablet, laptop or PC
BLE peripherals (e.g. TI SensorTag) – NEW!
Another Arduino board – NEW!
The ArduinoBLE library and new BLE central feature are supported on the following Arduino boards:
Prior to this release, Arduino only officially supported BLE peripheral functionality on these boards. A BLE peripheral is typically used to expose some sensor data or actuators to another device BLE central capable device such as a smartphone or PC. With the new BLE central functionality, you’ll be able to wirelessly connect two boards together for communication or connect to a third party BLE peripheral, such as a TI SensorTag.
We think that the ArduinoBLE library is much easier to use than anything else out there and are excited to see what you build with this new capability!
The development journey
Back in 2015, the Arduino 101 was released, based on the Curie module developed by Intel. It was the first official Arduino board with on-board BLE support. The CurieBLE library initially only supported BLE peripheral mode.
After launch, the Arduino and Intel teams worked together to design an Arduino friendly BLE API that supported both BLE Peripheral and Central functionality. This was released later in 2016 in the v2.0 of the Arduino core for Arduino 101.
The BLE features of the 101 were also incorporated into the CTC 101 kit in many classrooms around the world. Students used smartphones or tablets for exercises in the kit to interact with project based lessons running on the board. Unfortunately, Intel decided to stop producing the Curie module in 2017, bringing the Arduino 101 board to end of life.
Last year, at Maker Faire Bay Area 2018, Arduino launched two new boards: the MKR WiFi 1010 and Uno WiFi Rev.2. Both boards use the u-blox NINA-W102 as a 2.4 GHz wireless module. Initially both boards only supported WiFi using the WiFiNINA library. However, the ESP32 chip inside the u-blox NINA-W102 supports Bluetooth classic and BLE as well.
Later in 2018, the Arduino core team was tasked with adding BLE support to the MKR WiFi 1010 board so that it could be used with the upcoming Arduino Science Kit Physics Lab product. The Science Kit Physics Lab product is another educational kit, targeted for students in the classroom. We had several choices to move forward, including:
Bridging the ESP-IDF’s BLE API’s via RPC to the main MCU that sketches run on
Basing things on the industry standard Bluetooth HCI protocol and investing in a Bluetooth HCI host stack as an Arduino library
The first option above was expected to take an equal amount of time to the second, but also would make the BLE library exposed to users highly dependent on the underlying firmware running on the ESP32. It was also not as portable to other chip sets in the future. Thus, ArduinoBLE was created. The NINA firmware only needed small change to bridge its virtual Bluetooth HCI controller to the UART pins of the module.
Earlier this year, we released the Arduino Nano 33 IoT and Arduino Nano 33 BLE boards. Since the Arduino Nano 33 IoT uses the same chipset as the MKR WiFi 1010, things worked out of the box. For the Nano 33 BLE, which is based on the Nordic nRF52840 chip, a new Arduino core was developed for this board based on mbed OS (see this blog post for more info). mbed OS includes a radio stack called Cordio, which provides both a Bluetooth HCI link controller and HCI host. Creating a single C++ class that interfaced with Cordio’s Bluetooth HCI link layer allowed us to re-use 95%+ of ArduinoBLE on this board.
After the Nano 33 BLE started shipping, there was even more demand for BLE central support. So, development for feature was scheduled and is now available. It combines the API designed for the Arduino 101 in CurieBLE ported on top of ArduinoBLE’s Bluetooth HCI host stack.
Many thanks to Tom Igoe, one of the co-founders of Arduino, for providing feedback on the official Arduino BLE libraries throughout the years.
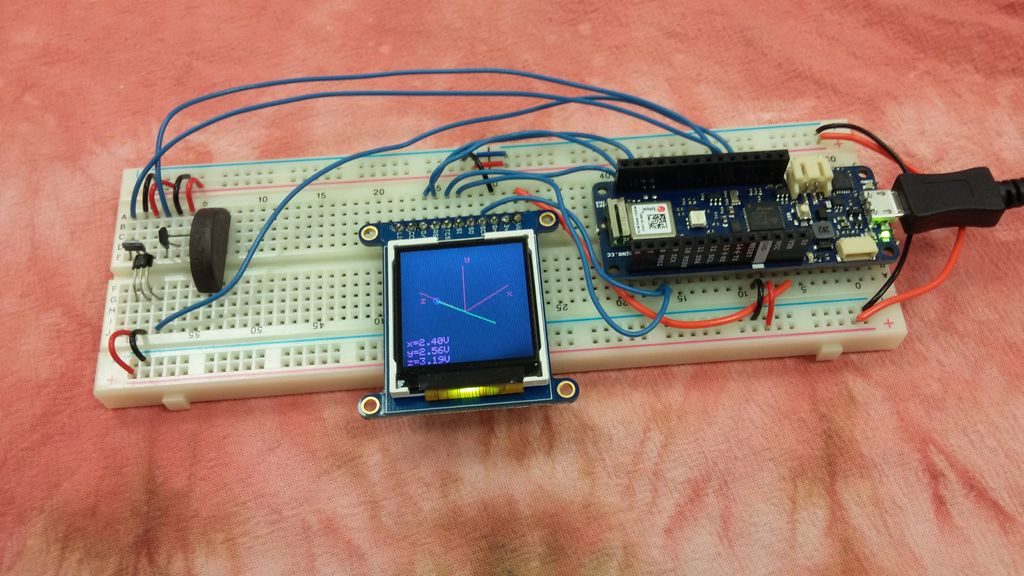
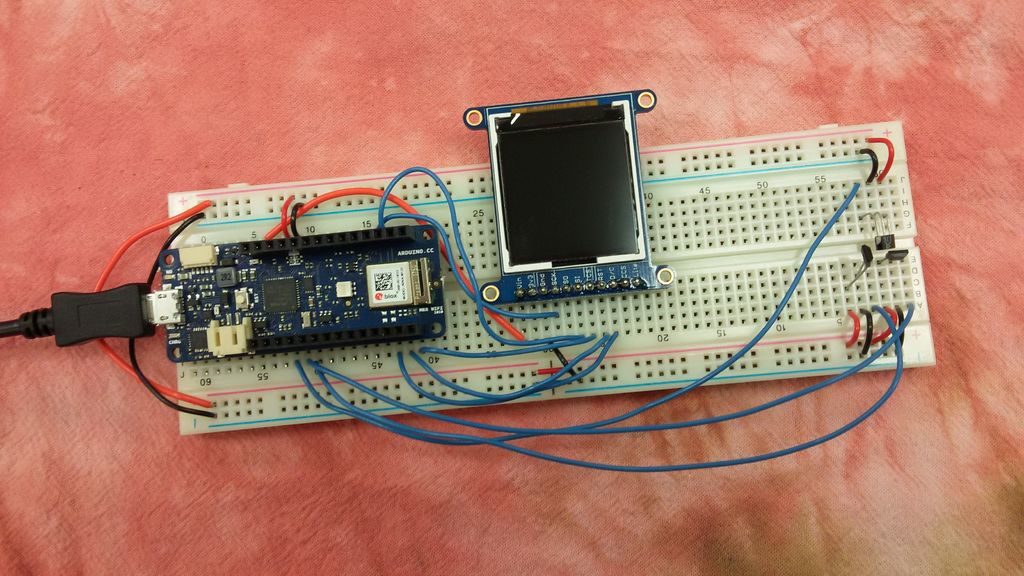
As humans, we can’t detect magnetic fields, but we take advantage of this phenomenon every day in the form of motors and various sensors. Even electrical wire produces a field when current flows through it. You can sense magnetism with a compass, but if you want to visualize it in three dimensions, maker ‘amamitof7’ has a solution in the form of this Arduino magnetometer.
The device uses a trio of analog Hall effect sensors to measure the strength of the magnetic field. This data is fed to a MKR WiFi 1010 (or Uno), which generates an isometric representation of the field on a small TFT display.
One could see this used in a variety of diagnostic applications, or perhaps as an excellent physics teaching tool.
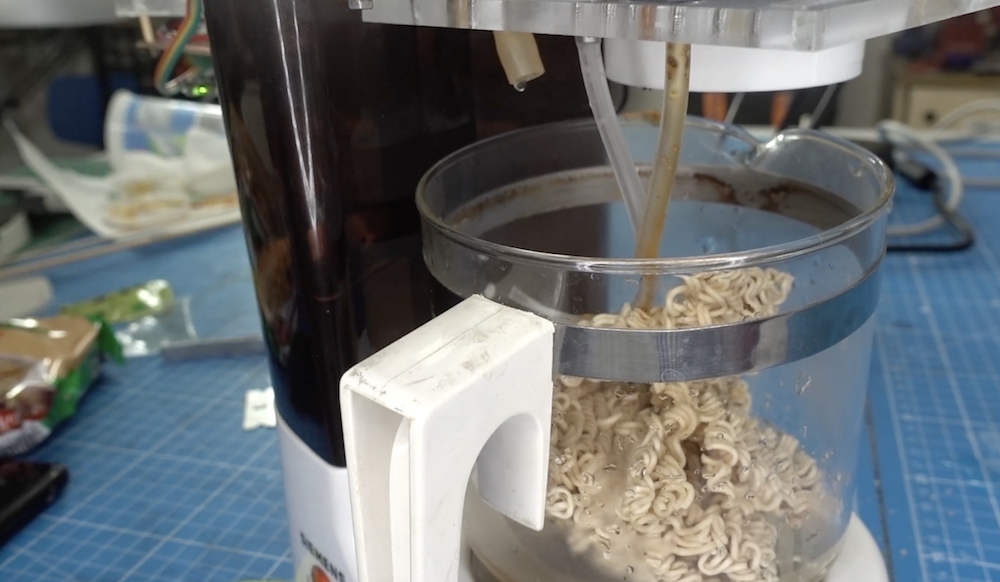
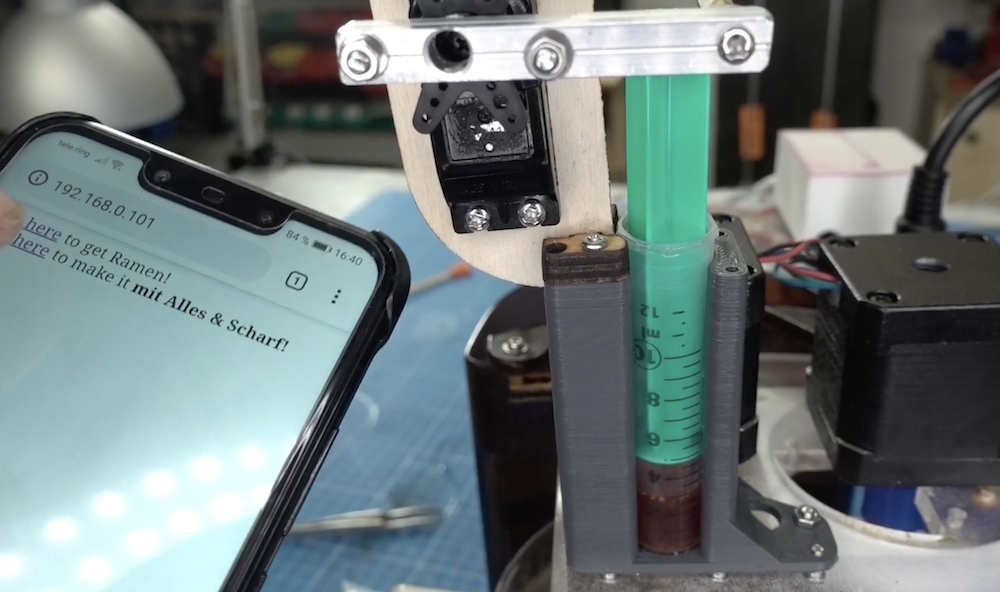
Ramen noodles can be a quick snack or meal, but per this IoT ramen maker by Clem Mayer, you don’t even have to run to the microwave to prepare them.
His project used a vintage electric filter coffee machine to heat and dribble water into the waiting brick-o-food, then a stepper-driven pusher adds flavor powder. More seasoning can be dispensed via a servo-actuated syringe, and another stepper is used to stir everything.
The setup is controlled by a MKR WiFi 1010 board, giving Mayer the ability to start meals/mix in hot sauce from the convenience of his phone via a simple web app. Results are… edible-ish, but if you want to build your own, files and more info can be found here.
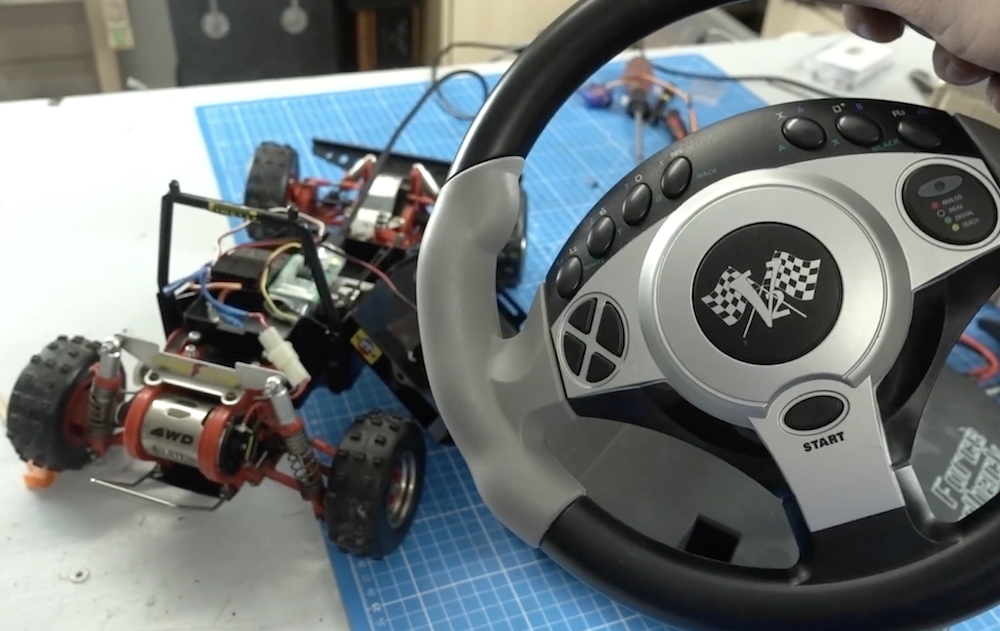
Off-the-shelf remote-controlled cars can be a lot of fun, but Clem decided to take things up several levels with his heavily modified rig.
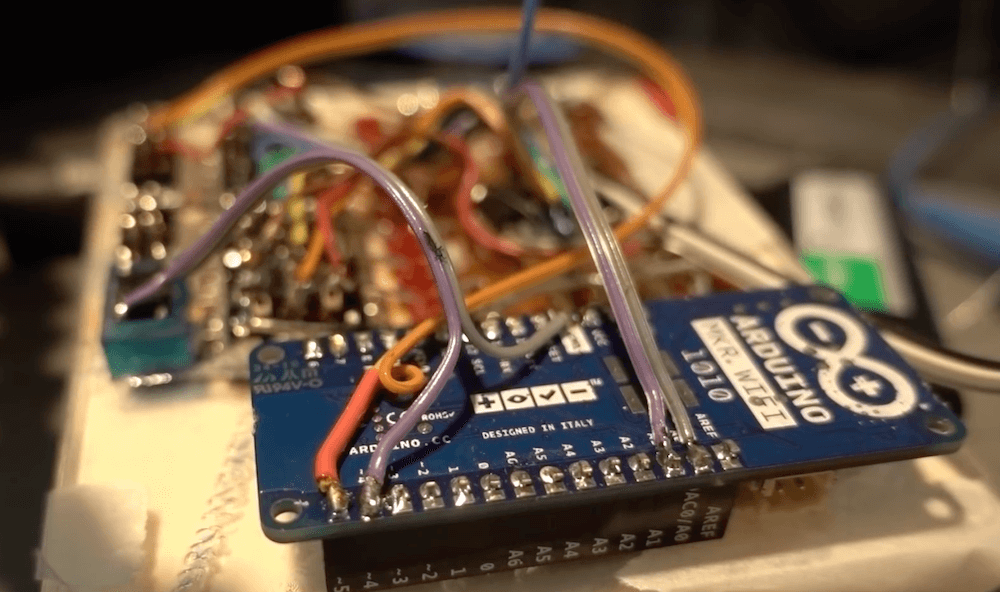
In the hack shown below, he outfitted an RC vehicle from the ’80s with an FPV camera, along with a MKR WiFi 1010. The WiFi-enabled MKR board was linked with a second ‘1010, controlled by a (formerly) broken PS1 racing wheel.
While old technology, this racing wheel is perfect for Arduino use, with steering, brake, and gas handled by potentiometers that are fed into analog inputs. The 2.4 GHz WiFi link between the MKR boards appears to work quite well when driving with an FPV headset, though “somehow” a wheel on the original car did manage to fall off during testing!
Clem scored a broken steering wheel for the PlayStation 1 (yes the first one) at a flea market. Thankfully it is broken so he decided to turn it into an RC transmitter for his old Remote controlled Car! Learn how to use the Arduino MKR WiFi 1010 to make your own transmitter and receiver from scratch! It even supports FPV head tracking! What features would you like to add into the system?