Posts with «batteries» label

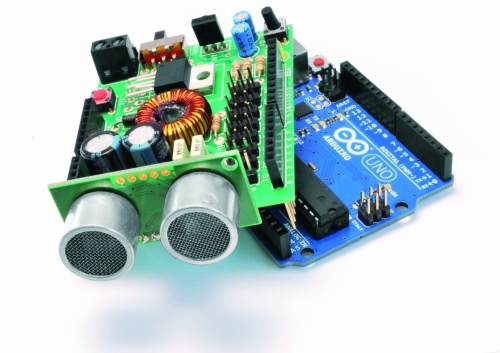
Programmable Lithium Charger Shield for Arduino

Surely you need yet another way to charge your lithium batteries—perhaps you can sate your desperation with this programmable multi (or single) cell lithium charger shield for the Arduino<! Okay, so you’re not><em>hurting</em> for another method of juicing up your batteries. If you’re a regular around these parts of the interwebs, you’ll recall the <a href="http://hackaday.com/2014/09/21/a-li-ion-battery-charging-guide/">lithium charging guide</a> and that <a href="http://hackaday.com/2014/09/05/an-obsessively-thorough-battery-and-more-showdown/">rather incredible, near-encyclopedic rundown of both batteries and chargers</a>, which likely kept your charging needs under control.</p> <p>That said, this shield by Electro-Labs might be the perfect transition for the die-hard-’duino fanatic looking to migrate to tougher projects. The build features an LCD and four-button interface to fiddle with settings, and is based around an LT1510 constant current/constant voltage charger IC. You can find the schematic, bill of materials, code, and PCB design on the Electro-Labs webpage, as well as a brief rundown explaining how the circuit works. Still want to add on the design? Throw in <a href="http://hackaday.com/2014/07/16/finally-an-easy-to-make-holder-for-lithium-ion-batteries/">one of these Li-ion holders</a> for quick battery swapping action.</p> <p>[via <a href="http://embedded-lab.com/blog/?p=9644">Embedded Lab</a>]</p><br />Filed under: <a href="http://hackaday.com/category/arduino-hacks/">Arduino Hacks</a>, <a href="http://hackaday.com/category/microcontrollers/">Microcontrollers</a> <a><img src="http://feeds.wordpress.com/1.0/comments/hackadaycom.wordpress.com/138748/" /></a> <img src="http://pixel.wp.com/b.gif?host=hackaday.com&blog=4779443&post=138748&subd=hackadaycom&ref=&feed=1" />

Using RFID for a DIY Keepsake Box

Mike Buss used an Arduino Duemilanove, Parallax RFID reader, micro servo, and piezo electric speaker to make a personalized, lockable keepsake box for his girlfriend’s birthday:

The outside of the box is really simple: it just contains a button and an RGB LED. When she presses the button, the LED lights up green or red depending on if the box is locked. When she waves one of the three personalized RFID cards over the box, a little tune plays and the box unlocks.

As part of the project I also did some cool trick with a Pololu pushbutton power switch to make the battery last a lot longer. Since the Arduino is only powered for a few seconds when listening for RFID tags, the battery lasts a lot longer. When the box is finished locking or unlocking (or after a small time delay), it sends a signal to the power switch to turn off the power and conserve battery life. The box has been running on the same 9V battery I put in 4 years ago!


Arduino servo

Hi

I tried to build a photovore using and arduino and tested it via usb cable,so far so good the system worked as intended as soon as i plug my battery via the dc connector the servo worked but extremly slow why?

An open robot shield for Arduino

Open Electronics‘ staff were looking for a common and standard hardware platform usable on different robots they were working on. Their goal was to find a single platform that had to provide power supply to the microcontroller, it had to provide stabilized voltage for the servos, and, finally, it had to be equipped with an obstacle detector and with an IR receiver.

Having chosen Arduino as the target core board, they developed an ad-hoc shield meeting all these requirements, whose detailed description can be found here, together with the BOM and a lot of source code.

[Via: Open Electronics]