Posts with «tester» label

LED Tester Also Calculates Resistor For Target Voltage

[mircemk] built a slick-looking LED tester with a couple handy functions built in. Not only can one select a target current to put through an LED, but by providing a target voltage, the system will automatically calculate the necessary series resistor. If for example the LED is destined for 14 V, this device will not only show how the LED looks at the chosen current, but will calculate the required resistor to get the same results on a 14 V system.

The buttons on the left control the target current and the voltage of the destination system. Once an LED is connected it will light up and the display indicates the LED’s forward voltage, the LED current, and the calculated series resistor value to obtain the same result at the selected target voltage. It’s a handy way to empirically dial in LED brightness values without needing to actually set up any particular test environment.

On the inside there’s little more than a handful of passive components, an Arduino, an LCD display, and a few buttons. This kind of tool reminds us of the highly clever component testers that hit the hobbyist scene years ago, showing what kind of advanced tricks a modern microcontroller is capable of with the right programming. (Here’s a look at how those work, if you’re interested in some deeper details.)

[mircemk] demonstrates his tool in the video, embedded below. We particularly like the attention he paid to the enclosure, giving it a very functional layout. It goes to show that when designing something, it’s never too early to consider enclosure and UI layout.

A Dual-purpose Arduino Servo Tester

RC flying is one of those multi-disciplinary hobbies that really lets you expand your skill set. You don’t really need to know much to get started, but to get good you need to be part aeronautical engineer, part test pilot and part mechanic. But if you’re going to really go far you’ll also need to get good at electronics, which was part of the reason behind this Arduino servo tester.

[Peter Pokojny] decided to take the plunge into electronics to help him with the hobby, and he dove into the deep end. He built a servo tester and demonstrator based on an Arduino, and went the extra mile to give it a good UI and a bunch of functionality. The test program can cycle the servo under test through its full range of motion using any of a number of profiles — triangle, sine or square. The speed of the test cycle is selectable, and there’s even a mode to command the servo to a particular position manually. We’ll bet the build was quite a lesson for [Peter], and he ended up with a useful tool to boot.

Need to go even further back to basics than [Peter]? Then check out this primer on servos and this in-depth guide.

[via r/Arduino]


Filed under: Arduino Hacks, misc hacks
Hack a Day 23 Nov 19:31

Easily test and experiment with GSM modules using AT Command Tester

Introduction

Working with GSM modules and by extension Arduino GSM shields can either be a lot of fun or bring on a migraine. This is usually due to the quality of module, conditions placed on the end user by the network, reception, power supply and more.

Furthermore we have learned after several years that even after following our detailed and tested tutorials, people are having trouble understanding why their GSM shield isn’t behaving. With this in mind we’re very happy to have learned about a free online tool that can be used to test almost every parameter of a GSM module with ease – AT Command Tester. This software is a Java application that runs in a web browser, and communicates with a GSM module via an available serial port.

Initial Setup

It’s simple, just visit http://m2msupport.net/m2msupport/module-tester/ with any web browser that can run Java. You may need to alter the Java security settings down to medium. Windows users can find this in Control Panel> All Control Panel Items  > Java – for example:

Once the security settings have been changed, just visit the URL, click ‘accept’ and ‘run’ in the next dialogue box that will appear, for example:

And after a moment, the software will appear:

Once you’re able to run the AT Command Tester software, the next step is to physically connect the hardware. If you’re just using a bare GSM module, a USB-serial adaptor can be used for easy connection to the PC. For Arduino GSM shield users, you can use the Arduino as a bridge between the shield and PC, however if your GSM shield uses pins other than D0/D1 for serial data transmission (such as our SIM900 shield) then you’ll need to upload a small sketch to bridge the software and hardware serial ports, for example:

//Serial Relay – Arduino will patch a serial link between the computer and the GPRS Shield
//at 19200 bps 8-N-1 Computer is connected to Hardware UART
//GPRS Shield is connected to the Software UART

#include <SoftwareSerial.h>

SoftwareSerial mySerial(7,8); // change these paramters depending on your Arduino GSM Shield

void setup()
{
  Serial.begin(19200);
  //Serial.println(“Begin”);
  mySerial.begin(19200);

}

void loop()
{
  if (mySerial.available())
    Serial.write(mySerial.read());
  if (Serial.available())
    mySerial.write(Serial.read());
}

Using the software

Once you have the hardware connected and the Arduino running the required sketch, run the software – then click “Find ports” to select the requried COM: port, set the correct data speed and click “Connect”. After a moment the software will interrogate the GSM module and report its findings in the yellow log area:

 As you can see on the left of the image above, there is a plethora of options and functions you can run on the module. By selecting the manufacturer of your GSM module form the list, a more appropriate set of functions for your module is displayed.

When you click a function, the AT command sent to the module and its response is shown in the log window – and thus the magic of this software. You can simply throw any command at the module and await the response, much easier than looking up the commands and fighting with terminal software. You can also send AT commands in batches, experiment with GPRS data, FTP, and the GPS if your module has one.

To give you a quick overview of what is possible, we’ve made this video which captures us running a few commands on a SIM900-based Arduino shield. If possible, view it in 720p.

Conclusion

Kudos to the people from the M2Msupport website for bringing us this great (and free) tool. It works – so we’re happy to recommend it. And if you enjoyed this article, or want to introduce someone else to the interesting world of Arduino – check out my book (now in a third printing!) “Arduino Workshop”.

Have fun and keep checking into tronixstuff.com. Why not follow things on twitterGoogle+, subscribe  for email updates or RSS using the links on the right-hand column, or join our forum – dedicated to the projects and related items on this website. Sign up – it’s free, helpful to each other –  and we can all learn something.

The post Easily test and experiment with GSM modules using AT Command Tester appeared first on tronixstuff.

Old Kit Review – Silicon Chip Transistor Beta Tester

Introduction

After exploring a quiet , dusty electronics store in the depths of suburbia the other week, I came across this kit from Altronics (K2534) which is the subject of this review. The Transistor Beta tester is the second revision of a tester designed by John Clarke for the March 1991 issue of Silicon Chip magazine, and promises to offer a simple way of measuring the gain of almost any NPN or PNP bipolar transistor. But first some public answers to recent feedback…

John – Why do you publish these “Old Kit Reviews”?

They’re more of  a selfish article, like many electronics enthusiasts I’ve enjoyed kits for decades – and finding kits from days gone by is a treat. From various feedback some of you are enjoying them, so I’ll continue with them for fun and some nostalgia. If you’re not interested, just ignore the posts starting with “Old”!

Where’s the schematic?

After publishing a few kit reviews, people have been asking me for the schematics. For kits that are based on magazine articles from Silicon Chip and the like, the details are Copyright and I can’t legitimately give you a copy. You need to contact the magazine or kit supplier. The surviving electronics magazines often run “on the smell of an oily rag” so in order to support them I promote the idea of paying for copies which are obtainable from the magazine. Plus Australia is a small country, where people in this industry know each other through first or second connections – so I don’t want to annoy the wrong people. However Google is an awesome tool,  and if you want to make your own beta tester there are many example circuits to be found – so have fun.

Back to the review – what is “beta”?

Apart from a letter of the Greek alphabet and a totally-underrated form of VCR format, beta is a term used to define the amount of gain of a transistor. From the guide:

Assembly

Here’s our kit from 1991, rescued from the darkness of the store:

Which contained the nice box, plus all the required components except for an IC socket, and a few screws and mounting nuts that should have been included. The instructions looked to be a photocopy of a photocopy, harking back to the 1980s…

Looks like an off-brand 555 has been used (or substituted), however a bit of research indicated that it is most likely from LG Semiconductor:

The PCB was made to the usual standard at the time, just drilled:

The front panel was well done, and kindly pre-drilled by a previous customer. The kit came with a 3mm LED however this mystery person had drilled the hole out for a 5mm:

… but hadn’t cut the oblong for the slide switch wide enough. But the biggest problem was that the PCB was just a smidge too wide for the included enclosure:

Nevertheless it was time to get started, and the resistors were measured, lined up and fitted:

Then the rest of the components fitted as normal, however they need to stay below the horizontal level of the slide switch bezel:

… which was somewhat successful. Then to fit the potentiometer, battery snap …

and the test leads:

 And we’re finished:

How it works

Operation is quite simple, just wire up the test leads to the transistor’s base, collector and emitter – set the PNP/NPN switch and press test. Then you turn the knob until the LED just turns on – at which point the scale indicates the gain.

“Modern-day” replacements

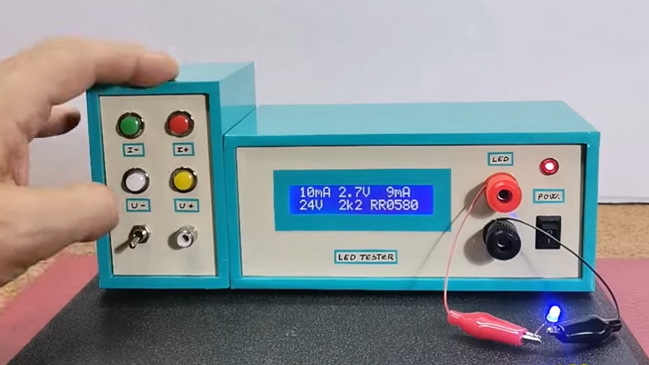
Digital technology has taken over with this regard, and a device such as the one below can not only give the gain, but also the component details, identify legs, and much more:

I’ll be sticking with this one for the time being. Jaycar have discontinued the analyser shown above, but Altronics have the “Peak” unit which looks even more useful.

Conclusion

Well… that was fun. A lot of promise, however with a few details not taken care of the kit was just a bit off. Considering this was around twenty years old and possibly shop-soiled I can’t complain. For the record the good people at Altronics have a great line of kits. Full-sized images and a lot more information about the kit are available on flickr.

And while you’re here – are you interested in Arduino? Check out my new book “Arduino Workshop” from No Starch Press.

In the meanwhile have fun and keep checking into tronixstuff.com. Why not follow things on twitterGoogle+, subscribe  for email updates or RSS using the links on the right-hand column? And join our friendly Google Group – dedicated to the projects and related items on this website. Sign up – it’s free, helpful to each other –  and we can all learn something.

The post Old Kit Review – Silicon Chip Transistor Beta Tester appeared first on tronixstuff.

Tronixstuff 15 Dec 04:15