Posts with «audio» label

Stomping On Microcontrollers: Arduino Mega Guitar Effects Pedal

Effects pedals: for some an object of overwhelming addiction, but for many, an opportunity to hack. Anyone who plays guitar (or buys presents for someone who does) knows of the infinite choice of pedals available. There are so many pedals because nailing the tone you hear in your head is an addictive quest, an itch that must be scratched. Rising to meet this challenge are a generation of programmable pedals that can tweak effects in clever ways.

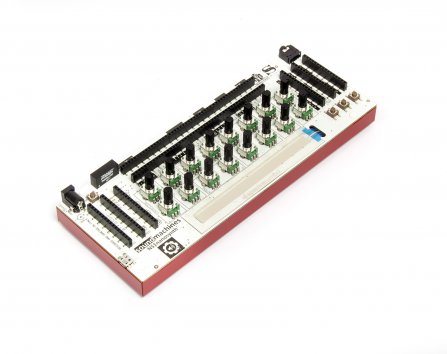
With this in mind, [ElectroSmash] are back at it with another open source offering: the pedalSHIELD MEGA. Aimed at musicians and hackers who want to learn more about audio, DSP and programming, this is an open-hardware/open-software shield for the Arduino MEGA which transforms it into an effects pedal.

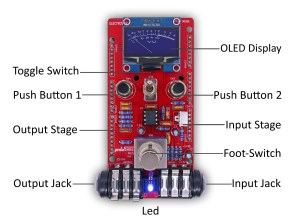
The hardware consists of an analog input stage which amplifies and filters the incoming signal before passing it to the Arduino, as well as an output stage which does the DAC-ing from the Arduino’s PWM outputs, and some more filtering/amplifying. Two 8-bit PWM outputs are used simultaneously to make pseudo 16-bit resolution — a technique you can read more about in their handy forum guide.

The list of effects currently implemented covers all the basics you’d expect, and provides a good starting point for writing custom effects. Perhaps a library for some of the commonly used config/operations would be useful? Naturally, there are some computational constraints when using an Arduino for DSP, though it’s up to you whether this is a frustrating fact, or an opportunity to write some nicely optimised code.

[ElectroSmash] don’t just do pedals either: here’s their open source guitar amp.

Chest of Drawers Stores Audio Memories

Some people collect stamps, some collect barbed wire, and some people even collect little bits of silicon and plastic. But the charmingly named [videoschmideo] collects memories, mostly of his travels around the world with his wife. Trinkets and treasures are easy to keep track of, but he found that storing the audio clips he collects a bit more challenging. Until he built this audio memory chest, that is.

Granted, you might not be a collector of something as intangible as audio files, and even if you are, it seems like Google Drive or Dropbox might be the more sensible place to store them. But the sensible way isn’t always the best way, and we really like this idea. Starting with what looks like an old card catalog file — hands up if you’ve ever greedily eyed a defunct card catalog in a library and wondered if it would fit in your shop for parts storage — [videoschmideo] outfitted 16 drawers with sensors to detect when they’re opened. Two of the drawers were replaced by speaker grilles, and an SD card stores all the audio files. When a drawer is opened, a random clip from that memory is played while you look through the seashells, postcards, and what-have-yous. Extra points for using an old-school typewriter for the drawer labels, and for using old card catalog cards for the playlists.

This is a simple idea, but a powerful one, and we really like the execution here. This one manages to simultaneous put us in the mood for some world travel and a trip to a real library.


Filed under: misc hacks
Hack a Day 18 Sep 12:00

Revive Old Drive-In Speakers with a Modern LED Twist

Ever used a drive-in movie speaker? Build your own and listen to your tunes in retro style.

Read more on MAKE

The post Revive Old Drive-In Speakers with a Modern LED Twist appeared first on Make: DIY Projects and Ideas for Makers.

Hackaday Prize Entry: 8-Bit Arduino Audio for Squares

A stock Arduino isn’t really known for its hi-fi audio generating abilities. For “serious” audio like sample playback, people usually add a shield with hardware to do the heavy lifting. Short of that, many projects limit themselves to constant-volume square waves, which is musically uninspiring, but it’s easy.

[Connor]’s volume-control scheme for the Arduino bridges the gap. He starts off with the tone library that makes those boring square waves, and adds dynamic volume control. The difference is easy to hear: in nature almost no sounds start and end instantaneously. Hit a gong and it rings, all the while getting quieter. That’s what [Connor]’s code lets you do with your Arduino and very little extra work on your part.

The code that accompanies the demo video (which is embedded below) is a good place to start playing around. The Gameboy/Mario sound, for instance, is as simple as playing two tones, and making the second one fade out. Nonetheless, it sounds great.

Behind the scenes, it uses Timer 0 at maximum speed to create the “analog” values (via PWM and the analogWrite() command) and Timer 1 to create the audio-rate square waves. That’s it, really, but that’s enough. A lot of beloved classic arcade games didn’t do much more.

While you can do significantly fancier things (like sample playback) with the same hardware, the volume-envelope-square-wave approach is easy to write code for. And if all you want is some simple, robotic-sounding sound effects for your robot, we really like this approach.

The HackadayPrize2016 is Sponsored by:

Filed under: Arduino Hacks, digital audio hacks, The Hackaday Prize

NS1 Nanosynth the hackable analog synthesizer is back!

We’ve been playing with NS1 Nanosynth in the last few weeks, when it first appeared under our radars on the Christmas’ Gift Guides (while going sold out in few days, after Synthopia blessed it with this interesting review).  It’s a hackable and customizable analog synthesizer coupled with an Arduino Micro platform.

Personally, it was one of my first steps into modular synthesizers. Nice sounds, easy approach. Peter Kirn is perfectly picturing this amazing compromise here!

Synths: they’re fun to tweak and play. Modulars: they’re fun to patch. Arduinos: they’re fun to hack. Small things: they’re fun to carry around.

But how to track patches? How to share sounds with friends? I was playing mainly with my son, and managed to print out a paper sketch depicting all the different pinout of the synth. I wasn’t satisfied with that, I needed more!

I started writing Sound Machines, about new patches, more sounds. It turned out I made a Fritzing part out of the Nanonsynth, and we started sharing each other patches. This repository holds them, and this is a short review of the best. Enjoy!


Here you can listen to the envelope Generator (ADSR) in action:


Want to add your very own sounds? You can either add it to their repository or comment here!

Audio Effects on the Intel Edison

With the ability to run a full Linux operating system, the Intel Edison board has more than enough computing power for real-time digital audio processing. [Navin] used the Atom based module to build Effecter: a digital effects processor.

Effecter is written in C, and makes use of two libraries. The MRAA library from Intel provides an API for accessing the I/O ports on the Edison module. PortAudio is the library used for capturing and playing back audio samples.

To allow for audio input and output, a sound card is needed. A cheap USB sound card takes care of this, since the Edison does not have built-in hardware for audio. The Edison itself is mounted on the Edison Arduino Breakout Board, and combined with a Grove shield from Seeed. Using the Grove system, a button, potentiometer, and LCD were added for control.

The code is available on Github, and is pretty easy to follow. PortAudio calls the audioCallback function in effecter.cc when it needs samples to play. This function takes samples from the input buffer, runs them through an effect’s function, and spits the resulting samples into the output buffer. All of the effect code can be found in the ‘effects’ folder.

You can check out a demo Effecter applying effects to a keyboard after the break. If you want to build your own, an Instructable gives all the steps.


Filed under: digital audio hacks

Embroidered Nyan Cat Brings a Meme to the Real World

Have you ever come across an Internet meme and just thought to yourself, “I have to bring this into the physical world!” Well [0xb3nn] and [Knit Knit] did. They decided to take the classic nyan cat meme and bring it to life.

The frame is 24″ x 36″. Many hours went into the knitting process, but the result obviously turned out very well. The stars include 24 LED sequins to add a sparkling animation effect. These were sewn onto the back of the work using conductive thread. They are bright enough to shine through to the front where needed. These connect back to an Arduino Pro Mini 5V board.

The Arduino is also connected to a capacitive touch sensor. This allows the user to simply place their hand over the nyan cat image to start the animation. No need for physical buttons or switches to take away from the visual design. An Adafruit AudioFX sound board was used to play back a saved nyan cat theme song over a couple of speakers. The source code for this project is available on github. Be sure to watch the demo video below.


Filed under: Arduino Hacks
Hack a Day 10 May 03:00

Play your emotional state with Social Vibes and twitter

Social Vibes’ is a Masters Degree (MSc.) project, in Interactive Media by Cian McLysaght, at the University of Limerick, Ireland. They shared with us their project, running on Arduino Uno, composed by a physical artifact designed and created specifically for an installation adopting the fundamental sound mechanisms used in a vibraphone, know also as a ‘Vibe’:

The instrument consists of twelve musical tones of different pitches. The music created on the instrument is derived from a continuous stream of input via multiple users on Twitter and the explicit interaction from Twitter users, tweeting the instrument directly to the project’s, “@vibe_experiment” Twitter account. Data associated with the emotional status of Twitter users, is mined from the Twitter network via Twitter’s open source, application programming interface (API).

For example if a user tweets “The sun is out, I’m happy”, the code I’ve written will strip out key words and strings associated with the user’s emotional state, within the tweets, ie “I’m happy”, and translate this to a musical notation. Mining Twitter’s API, allows a continuous stream of data. These emotional states are then mapped to specific notes on the physical musical instrument, located in a public space. The tempo of the musical expression will be entirely based upon the speed and volume of the incoming tweets on the Twitter API.

Twitter users who are both followers and non followers of the musical instrument’s Twitter account (@vibe_experiment) can tweet directly to the instrument and this direct interaction will be given precedence, allowing user’s who tweet directly to have their emotional state ‘played’. This allows users to hijack or take over the instrument and experiment with it in a playful manner, but also allows those with musical knowledge the potential to compose simple musical arrangements. When users are not tweeting the instrument directly, then the instrument will revert to mining the Twitter API.

To entice users to interact and observe the action of the instrument there is a live streaming broadcast of the instrument via Twitcam on the Vibe’s Twitter account. This is a live streaming broadcast of the instrument via Twitcam on the @vibe_experiment account. Twitcam, is Twitter’s built in live-streaming platform. This simply requires a webcam and a valid Twitter account.

The instrument constantly tweets back updates to it’s own Twitter account to not only inform people of the general status but also to engage users to interact directly with the ‘Vibe’.

New Project: The Arduino Audio Treasure Hunt

Just for fun, I designed my own variation of a treasure hunt game

Read more on MAKE

Fifty speakers for an interactive sound sculpture

Hive (2.0) is the second iteration of an interactive sound sculpture consisting of fifty speakers and seven audio channels. The sensors detect the proximity of people and Arduino manipulates audio according to it.

It was created by Hopkins Duffield, a Toronto-based collaborative duo exploring ways to combine both new and familiar mediums with artistically technological practices. In this work they used Arduino Uno together with Max 6 / Max For Live.
Check the video to listen to the sculpture: