Posts with «edison» label

Audio Effects on the Intel Edison

With the ability to run a full Linux operating system, the Intel Edison board has more than enough computing power for real-time digital audio processing. [Navin] used the Atom based module to build Effecter: a digital effects processor.

Effecter is written in C, and makes use of two libraries. The MRAA library from Intel provides an API for accessing the I/O ports on the Edison module. PortAudio is the library used for capturing and playing back audio samples.
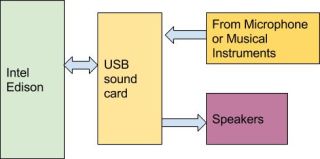
To allow for audio input and output, a sound card is needed. A cheap USB sound card takes care of this, since the Edison does not have built-in hardware for audio. The Edison itself is mounted on the Edison Arduino Breakout Board, and combined with a Grove shield from Seeed. Using the Grove system, a button, potentiometer, and LCD were added for control.

The code is available on Github, and is pretty easy to follow. PortAudio calls the audioCallback function in effecter.cc when it needs samples to play. This function takes samples from the input buffer, runs them through an effect’s function, and spits the resulting samples into the output buffer. All of the effect code can be found in the ‘effects’ folder.

You can check out a demo Effecter applying effects to a keyboard after the break. If you want to build your own, an Instructable gives all the steps.


Filed under: digital audio hacks

Keep your candies safe with Candy Locker and Intel Edison


Candy Locker is a mouth-watering tutorial based on  Intel® Edison and image recognition of objects.
You can keep your candies safe from greedy hands with this color recognition lock and a dispenser using a set of 5 distinct color images and setting up a pattern that will activate and dispense candies.

Follow the link and open the magic door of the video and picture recognition,  invent cool systems learning how to manage object recognition and OpenCv foundations.


Manipulate your voice with Mimic Monster and Intel Edison

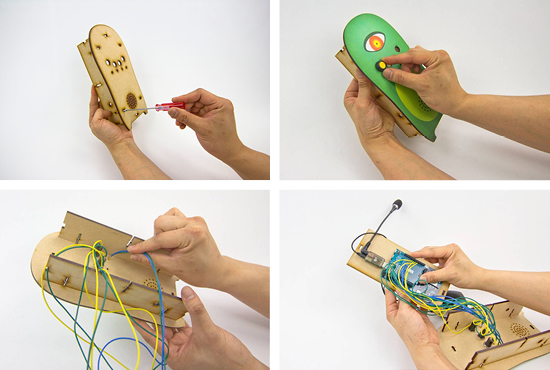
It’s time to introduce you to another great tutorial made for  Intel Edison.  Mimic Monster is a project allowing you to record soundbites and playing them back manipulated.
In this step-by-step project, everyone who is interested in audio features and mods , can find useful information on how to manipulate audio files and create amazing effects from your voice.

Grawr! It’s a mimic monster! What did you say? Grawr! It’s the mimic monster!

Having landed on Earth, this little alien needs you to teach it how to speak. Speak into its audio antenna and it will repeat your words back. Press a button and change its pitch. In this tutorial, you will learn in more detail, how to work with a USB sound card, a microphone, and a speaker.


Before you begin, make sure you’ve followed through Intel® Edison Getting Started guide, and our previous tutorial, the Intel® Edison mini-breakout Getting Started Guide.

 Check the other tutorials of the series.

Knock knock! Who’s near your door? Learn how to sense it

Smart Doorbell is the name of the project for a new tutorial created for Intel Edison. It’s a motion detecting doorbell, that senses when someone is near the door(bell) and via a webcam sends a picture of the person approaching the door to a web address while playing a sound.

Motion detecting video streaming doorbell“, a medium-advanced level tutorial, is intended to be a good starting point for building basic IoT devices. You’ll learn how to use a webcam to detect motion: when activated, the device will play a greeting, take a photo and email it to someone to let them know who is at the door.
Take a look at the video to see how it works and follow these steps to make yours:

Install Intel Galileo & Edison with the IDE Boards Manager

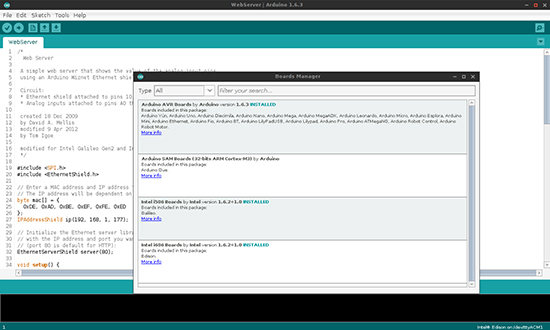
We are very pleased to announce the availability of Intel® Galileo and Edison boards support with the Arduino IDE Boards Manager.

If you’ve already installed the Arduino IDE 1.6.3 (or newer), you are already set!

Just click on menu Tools > Board > Boards Manager to find both Galileo and Edison listed and available for download. Click on one of the list, then click Install. Wait a couple of minutes for the IDE to download and unpack all the needed tools and voilà: Board menu will list the Intel board of your choice.


Play with the Basketball Robot running on Intel Edison

After you had an introduction to Intel Edison  following the Getting Started guide, and our previous tutorial, the Intel Edison mini-breakout Getting Started Guide, it’s now time to work on something a bit more complex. You’ll be also able to play a bit with Node.js,  a programming platform that runs on javascript and a good choice for building a web-based application. It is supported by the Intel® Edison standard system image so you can run node.js scripts directly on it.

He shoots! He scores! The crowd goes wild! Let’s build a robot that plays basketball with you. This tutorial is a step-by-step guide for a simple and small differential-drive robot that uses the Intel Edison. You’ll get to know a few more tricks on how to use Mini Breakout Kit and set up a node.js server for the communication.

Go and follow the steps to build it

Getting Started with Intel Edison Mini Breakout Board

Let’s start exploring a bit more about Intel Edison. As you may already know, Intel provides 2 different hardware platforms to work with Edison development board: the core module is called Intel Edison Compute Module, while the 2 extension boards are called Intel Edison Arduino Board and Intel Edison Breakout Board respectively. We refer to them as the Arduino module and mini-breakout board, respectively. The tutorial of this week is called Getting Started with Intel Edison Mini Breakout Board:

It is probably more common to use the Arduino module, since it’s easy to use and has many useful features, most notably the pin headers. However, the mini-breakout’s main advantage comes from its size and possible use as a wearable.

In this tutorial, you’ll get more familiar the mini-breakout board, learn how to use it for basic tasks, and then build a small “blink” example based on this knowledge.

Follow the link and explore

Making a lasercut Movie Recommender with Intel Edison

Some days ago we posted on Intel Makers Community an educational tutorial focused on Intel Edison. Our team explored Internet Queries to build a lasercut Movie Recommender and help you find a good movie title  extracted from The Open Movie Database starting from the 50s to the 10s and according to your favourite genre:

Pressing the button will activate the Movie Recommender and the search begins. After the magic is done, the curtain will open to reveal the movie that fits the criteria.

So get this project done, make some popcorn, dim the lights, and get ready to watch a sci-fi movie from 1988… “My Stepmother is an Alien”?!

Follow the link and create your DIY Movie Recommender!

Take a look at the video below to see how it works!

Arduino Blog 02 Mar 20:55

Edidoom: Intel Edison Running Doom

Proving that the Intel Edison is really a full Pentium-class PC, Lutz has successfully ported Doom to the tiny board. For those who aren’t quite as old as I am and are unfamiliar with the classic title, Doom literally blew away gamers in 1993 with a combination of fast paced […]

Read more on MAKE

MAKE » Arduino 09 Jan 20:01