Posts with «home entertainment hacks» label

1960s Stereo Console Gets an Upgrade

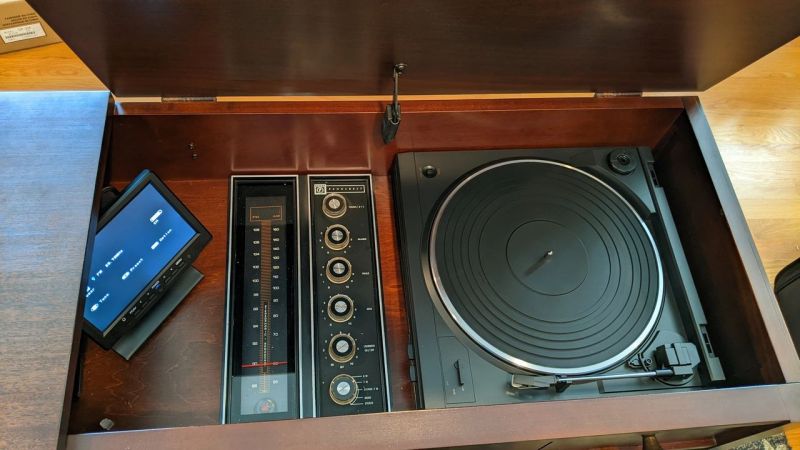
Faced with an old console stereo from the 1960s that was barely functional, [Sherman Banks] aka W4ATL decided to upgrade its guts while keeping its appearance as close to the original as possible. This stereo set is a piece of mahogany furniture containing an AM/FM stereo receiver and an automatic turntable from JCPenny’s Penncrest line. As best [Sherman] can determine, it is most likely a 1965 model. The old electronics were getting more and more difficult to repair and the tuner was drifting off-station every 15 minutes. He didn’t want to throw it away, so he decided to replace all the innards.

The first thing was to tear out the old electronics while retaining the chassis proper. The new heart of the entertainment center is a modern Denon AV stereo receiver. This unit can be controlled over Ethernet, has a radio tuner, inputs for SiriusXM and a turntable, and supports Bluetooth streaming. [Sherman] next replaced the 1965 turntable, and then turned his attention to connecting up the controls and indicators.

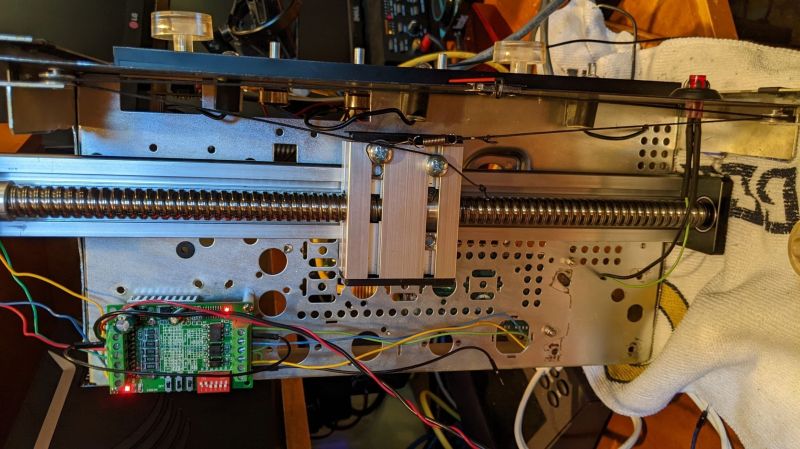
The potentiometers were replaced with equivalent ones of lower resistance, the neon stereo indicator was replaced with an LED, but the linear tuning dial proved to be a nearly two month challenge and resulted in a cool hack. In brief, he connected an optical rotary encoder to the tuning knob and used a stepper motor with a linear actuator to control the dial indicator. All this is controlled from an Arduino Mega 2560 with three shields for I/O and LAN. But there was still one remaining issue — without vacuum tubes to warm up, the radio would play immediately after power-on. [Sherman] fixed that by programming the Arduino to slowly ramp up the volume at the same rate as the original tube receiver. And finally, he installs a small HDMI monitor in the corner to display auxiliary information and metadata from the Denon receiver.

Check out the videos below the break. We wrote about a couple of similar conversions in the past: this one from 2018 was also a Penncrest, and from last year this COVID isolation project that emphasized the addition of a new liquor cabinet.

A Unique Microphone Preamp

We live in a world in which nearly any kind of gadget or tool you can imagine is just a few clicks away. In many respects, this has helped fuel the maker culture over the last decade or so; now that people aren’t limited to the hardware that’s available locally, they’re able to create bigger and better things than ever before. But it can also have a detrimental effect. One has to question, for instance, why they should go through the trouble of building something themselves when they could buy it, often for less than the cost of the individual components.

The critic could argue that many of the projects that grace the pages of Hackaday could be supplanted with commercially available counterparts. We don’t deny it. But the difference between buying a turn-key product and building an alternative yourself is that you can make it exactly how you want it. That is precisely why [Sam Izdat] created this truly one of a kind microphone preamplifier. Could he have bought one online for cheaper? Probably. Could he have saved himself an immense amount of time and effort? Undoubtedly. Do we care? Not in the slightest.

The amplifier is based on the Texas Instruments INA217 chip, with an Arduino Nano and 128×64 OLED display providing the visualization. [Sam] was able to find a bare PCB for a typical INA217 implementation on eBay for a few bucks (see what we mean?), which helped get him started and allowed him to spend more time on the software side of things. His visualization code offers a number of interesting display modes, uses Fast Hartley Transforms, and very nearly maxes out the Arduino.

But perhaps no element of this build is as unique as the case. The rationale behind the design is that [Sam] wanted to compartmentalize each section of the device (power supply, amplifier, visualization) to avoid any interference. The cylindrical shapes were an issue of practicality: the compartments were constructed by using a hole saw to make wooden discs, which were then glued together and hollowed out. The case was stained and coated with polyurethane, but due to some slightly overzealous use of glue and fillers, the coloring isn’t uniform. This gives the final piece a somewhat weathered look, in sharp contrast to the decidedly high-tech looking display.

Overall, this build reminds us of the modular 3D printed amplifier we saw earlier in the year combined with these speaker-integrated Arduino VU meters.

Dumb STB gets smart

[Vincent Deconinck] gave a fresh lease of life to an old set top box by adding a few Euro’s worth of hardware and some software smarts. The device in question is an old VOOcorder – a Cisco set-top box provided by VOO, his cable service provider in Belgium.

The VOOcorder doesn’t have any WiFi hardware or browser / app based interfaces. It’s a simple device controlled either via an IR remote or front panel buttons. [Vincent] added an ESP8266 and hooked it up to the IR receiver on the set-top box. He also set it up as an SPI slave to the front panel VFD display controller and connected it to the debug serial interface of the VOOcorder as well. The software, on the other hand, required a lot more work consisting of code running on the ESP itself, several HTML pages and JavaScript code for the browser front end, and a few scripts running in the background.

The result was bidirectional interactivity from within a browser, allowing him to send commands and receive status information as well as providing a user-friendly search interface. Further, his browser interface was integrated with information from the service providers website letting him do scheduling and recording of programs. The stuff that interested us is how he sniffed out the IR signals, figured out the SPI protocol used by the front panel controller, and implemented SPI-slave mode for the ESP8266. [Vincent] was surprised that such a cheap device could handle three distinct web servers while parsing two message streams without a hitch.

It’s a great hack showing us how to use super cheap electronics to upgrade and modernize old hardware. Check out the two videos after the break – showing a demo of the hack in action, and a walk through of the hardware modifications.


Filed under: hardware, home entertainment hacks

Shed Pounds and Inches while Binge Watching Netflix

Feel like breaking out of your streaming-induced vegetative state but can’t seem to break the binge-watching cycle? Maybe you’re a candidate for this exercise bike that controls how much Netflix you watch.

The concept behind [Roboro]’s anti-couch potato build is simple — just keep pedaling and you get to keep watching. The details are pretty simple too and start with an Arduino monitoring the signal coming from a jack thoughtfully provided by the manufacturer of his exercise bike. The frequency of the square wave is translated into a speed which a Python script on a PC reads over USB. Once a Netflix stream is started, dropping below the user-defined speed pauses the movie. The video below shows it doing its thing.

Improvements readily spring to mind, like adding a speed buffer so that pedaling faster lets you bank some streaming time and earn a rest. Maybe it could somehow integrate with these Netflix-enabled socks, or even with the Netflix and Chill button. But those sort of defeat the purpose a bit.


Filed under: home entertainment hacks, misc hacks

Netflix and Chill – and Socks?

Waking up to spoilers in the last episode after falling asleep during the first episode of a Netflix binge-watching session ranks right up there on the list of first-world problems. Luckily there’s a solution in the form of a pair of Netflix enabled socks, which looks like a pretty neat wearable IoT project.

To be sure, calling these socks Netflix enabled is a bit of a stretch. Aside from the sock designs, which are based on popular Netflix original series, there’s nothing about the electronics that’s specific to the popular streaming service. These socks, with their Arduino Pro Trinket and accelerometer, detect when you stop moving and send an IR signal to do your bidding – pause the movie, kill the TV, or whatever. The electronic side of the build is pretty approachable – it’s just a couple of modules soldered together. The fiber arts side of the project might be a little outside the wheelhouse of the typical hardware hacker, but you can either team up with someone who knits – an experienced knitter, as socks are not a beginner’s pattern – or just slip the felt-clad hardware into your favorite comfy socks. We’d be a bit concerned about ESD protection for the hardware in the wooly environment, though.

“Netflix and chill” is the current version of last century’s “Watching the submarine races,” and as such the need for special socks or a custom Netflix switch for the occasion is a bit puzzling. Still, the underlying wearables idea is pretty good, with plenty of possibilities for expansion and repurposing.

[Thanks for the tip, Lizzy!]


Filed under: home entertainment hacks, misc hacks

Add motorized blinds to your home theater

[Chipsy] found himself with an interesting problem. The room that serves his home theater has a wall mirror which reflects part of the screen during viewing. In an otherwise dark room this was very distracting. His solution was to add a blind that covers the mirror during viewing, but who wants to constantly pull that down and back up again? Since the motorized projection screen he is using has a remote control he figured out a way to motorize the blind and synchronize it with the screen’s remote.

The screen uses mechanical relays to switch the motor. He patched into these with an Arduino to detect whether the screen was going up or down. It was easy enough to use his own relay and motor with the blind, but he needed a way to stop the blind once it was in position. For covering up the mirror he simply sets an 18 second timer, but for retracting the blind he wanted precise alignment so he added a magnet and sense its position with a reed switch. See the synchronized screen and blind in the clip after the break.


Filed under: home entertainment hacks

Webmote: control anything with web-based remote

We’ve seen a lot of projects that let you control all of your devices from a smartphone. But this universal web-based remote control system looks like the most versatile we’ve seen yet. The project is called Webmote as the controls are served up as a web interface so that you’re not limited to say an Android device. The UI can be customized by choosing what buttons you will use and where to place them on the display. You can get a good feel for this by viewing this G+ album. Setup is made a bit easier thanks to an add-on system that has predefined layouts for common things like controlling XBMC.

The hardware seen above is the business end of Webmote. It’s an Arduino with an IR receiver, IR LED, and an XBee module. For your common home entertainment devices you can teach the system your codes using the IR receiver. The IR LED is used to transmit those codes back, and the Xbee gives you the ability to control X10 (home automation) devices. Right now the setup requires the hardware be connected to a server via USB, but it shouldn’t be hard to set up some type of wireless alternative.


Filed under: home entertainment hacks

Fighting over the Frat’s TV remote

[Colin Bookman] lives in a Fraternity house and apparently the remote for the cable box has a way of walking off. He figured out a method to give everyone control of the TV channel in one form or another.

The cable box can be seen perched on that shelf, and [Colin's] addition is the wooden box sitting on the floor. Inside is an Arduino board, and the cable snaking out of the enclosure is an IR LED. This give the Arduino the ability to send remote control commands to the TV box. The two arcade buttons on the front will switch the channel up or down.

But this is hardly a remote control replacement since you have to get up to use it, so he went a few steps further. The Arduino board was paired with an Ethernet shield. It serves up a web page that has a virtual keypad. So anyone with a smart phone or laptop can log into the server and start changing the channels. We’re not sure if this provides relief from a missing remote, or promotes impromptu fist fights when brothers can’t agree on what to watch. It certainly opens up the possibility of long-distance trolling as you could be sitting in class and decide to change the channel to Lifetime every ten minutes or so.

If you don’t have an Ethernet shield handy we’ve seen a similar setup that uses Bluetooth instead the network.


Filed under: home entertainment hacks

Adding remote control to Klipsch surround system

The speaker system [Zurcher] bought was made by Klipsch. It is a surround sound unit but it’s intended to be used with a computer so there’s no wireless remote for it. Instead, a wired unit sits on the desk and lets you select between the speakers or headphones, and has a volume adjustment knob. The thing is he uses them for his home theater system and had to add his own remote control hardware to adjust them from across the room.

He started with some web searches that helped a lot. It seems others have mapped out the hardware in the past and he was able to use that information to find the volume chip inside the controller. A bit of signal sniffing let him work out the control commands coming in over the i2c bus. This was the information he needed to build his own controller. He grabbed his Arduino board, and IR receiver to take commands from just about any remote, and a four-digit 7-segment display to provide settings feedback. You can seen him showing off the final build in the clip after the break.


Filed under: home entertainment hacks