Create your own Arduino Library
Project Description
In this short tutorial I will show you how to create your own Arduino Library. Making your own library seems daunting at first, but I will show you that it is not much harder than writing your own script/sketch. I would advise that you comment you code clearly, because when you come back to it in 5 years time, it will help to navigate you through your code at this time in history. Here we go, let's go through the process of creating a very simple Arduino library.
Parts Required
- Arduino UNO or compatible board
Project Steps
Before we begin, there are a few questions you must ask yourself:
- What will the library be called ?
- What will the library do ?
- What are you trying to simplify?
For our library, these are the answers to the questions above:
- BlinkMe
- It will blink an LED attached to one of the digital pins
- The aim is to reduce the blink commands to a single line
Create a Folder
Create a folder on your computer which will be used to house all of the files in this project. Name the folder the same name as the library. In this case we will name it "BlinkMe". Make sure you use consistent naming throughout the tutorial. Capital and lowercase letters do matter.
Create the files
Using any text based editor (eg. notepad++, PSPad, Notepad2 etc), you will need to create 3 blank files:
- The C++ file (BlinkMe.cpp) : Library code containing all of the functions
- The Header file (BlinkMe.h): Contains the library function declarations
- keywords.txt : Used for syntax highlighting within the Arduino IDE
I will tell you what you need to write inside each of these files, but make sure you have the blank BlinkMe.cpp, BlinkMe.h and keywords.txt files inside of the BlinkMe folder. Some people start by creating the header file first, but I personally like to start with the CPP file.
We will now look to populate the BlinkMe C++ file:
The C++ file (.cpp)
This file will contain all of the functions in your new library.
The first thing you will need to do is include the Arduino.h file. This will drag in all of the relevant Arduino code necessary for your library to function with an Arduino. And while we haven't yet created the header file (BlinkMe.h), we need to import that also. So the first two lines should be:
    #include <Arduino.h>
     #include <BlinkMe.h>
    BlinkMe::BlinkMe(){
        _dPin = 13;
     }
    void setOUTPUT(int dPin){
        _dPin = dPin;
        pinMode(_dPin, OUTPUT);
         }
    void blink(unsigned long delay_1){
        _delay_1 = delay_1;
        digitalWrite(_dPin, HIGH);
        delay(_delay_1);
        digitalWrite(_dPin, LOW);
        delay(_delay_1);
     }
Here is the complete "BlinkMe.cpp" file:
The Header file (.h)
The header file will be used to create the library function declarations. Open the "BlinkMe.h" file.
The first step is to check to make sure that the library is NOT already defined:
#ifndef BlinkMe_h
#define BlinkMe_h
#include "Arduino.h"
    //Create the class BlinkMe
    class BlinkMe{
        public:
            BlinkMe();
            void setOUTPUT(int dPin);
            void blink(unsigned long delay_1);
        private:
            int _dPin;
            unsigned long _delay_1;
     };
     #endif
Here is the complete header file:
keywords.txt (optional)
The keywords.txt file will contain the keywords for the library which will allow appropriate syntax highlighting. This file is optional, however it will highlight your classes or functions based on the keyword mapping.
- LITERAL1: specifies constants (eg. HIGH, LOW,
- KEYWORD1: specifies classes (eg. Serial)
- KEYWORD2: specifies methods and functions (eg. analogRead, digitalWrite, delay)
- KEYWORD3: specifies structures (eg. if, while, loop)
   BlinkMe     KEYWORD1
   setOUTPUT   KEYWORD2
   blink       KEYWORD2
Example Sketch (optional)
It is often useful to include an sketch that provides an example of the library in use. It provides some context. If you plan to include the sketch in your library, then you must follow these simple rules:
- Create an "examples" folder.
- Create an example sketch, an place it within a folder of the same name as the sketch
- Place the sketch folder inside of the examples folder
In our case it will be: examples/blinkTest/blinkTest.ino
Here is the example sketch for this library (Save as blinkTest.ino):
The library
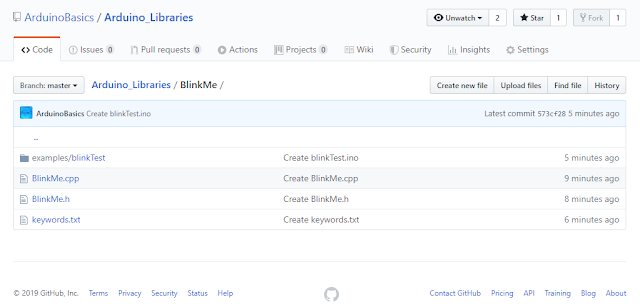
Here is a picture of the library contents:
And now the only thing left is to zip up the library folder and import it into the Arduino IDE. Use whatever program you want to zip up the BlinkMe folder, and note the location of the zip file. You need to import the zip file into the Arduino IDE:
- Arduino IDE > Sketch > Include Library > Add .ZIP Library...
- Select the library zip file you just created, and select "Open".
- You can now use your library in the Arduino IDE.
- Test it by running your example sketch: File > Examples > BlinkMe > blinkTest
Download
BlinkMe Library
Conclusion
In this tutorial, I showed you how to create a simple Arduino library. If you would like so see another example, have a look at my ToggleTimer library, which is very useful when trying to blink an LED without using a delay.You don't have to limit yourself to LEDs, you can use it for other projects where delay gets in the way. ToggleTimer is a non-blocking timer that toggles between two states.
If you found this tutorial helpful, please consider supporting me by buying me a virtual coffee/beer.
Social Media
You can find me on various social networks:
Follow me on Twitter: ScottC @ArduinoBasics.
I can also be found on Instagram, Pinterest, and YouTube.
And if all else fails, I have a server on Discord.
[original story: ScottC]


