Posts with «grbl» label

The $50 Pen Plotter

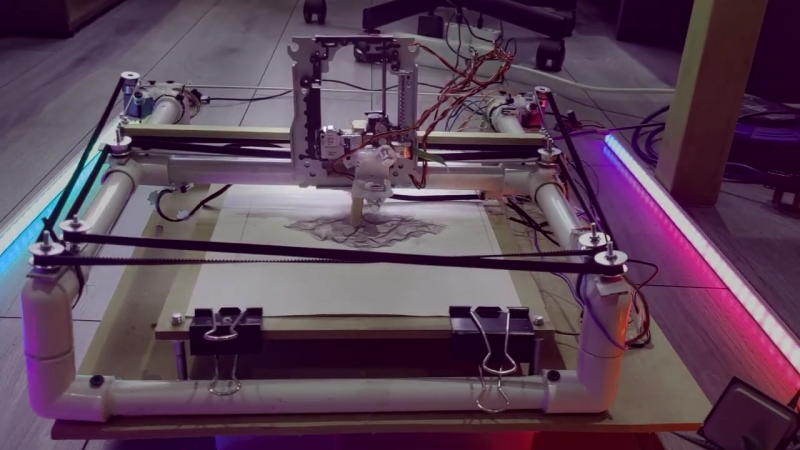
[Arca] sets out to build himself a low-cost pen plotter that doesn’t require access to a 3D printer. The plotter uses a coreXY arrangement, powered by 28BYJ-48 stepper motors, which he overdrives with +12 VDC to increase the torque. Pen up and down control is done using a stepper motor salvaged from a DVD reader. The frame is constructed using PVC electrical conduit and associated fittings, and [Arca] uses the hot glue gun quite liberally. Steppers were driven by A4988 modules with heatsinks, and motion control is provided by GRBL running on an Arduino UNO.

He has a few issues with glitches on the limit switches, and is continuing to tweak the design. There is no documentation yet, but you can discern the construction easily from the video if you want to try your hand at making one of these. This is a really cool DIY plotter, and many parts you probably have laying around your parts boxes. As [Arca] says, it’s not an AxiDraw, but the results are respectable. Keep a lookout for part 2 of this project on his YouTube channel.

Hack a Day 19 Mar 21:00

Old CNC Brain Swapped With An Arduino

[Sebastian] and [Stefan Shütz] had a ISEL EP1090 CNC machine at home, sitting unused, and they decided to bring it to life. With pretty good mechanical specs, this CNC looked promising – alas, it was severely constrained by its controller. The built-in CPU’s software was severely outdated, had subpar algorithms for motor driving programmed in, and communication with the CNC was limited because the proprietary ISEL communications protocol that isn’t spoken by other devices.The two brothers removed the CPU from its PLCC socket, and went on to wiring a grbl-fueled Arduino into the controller box.

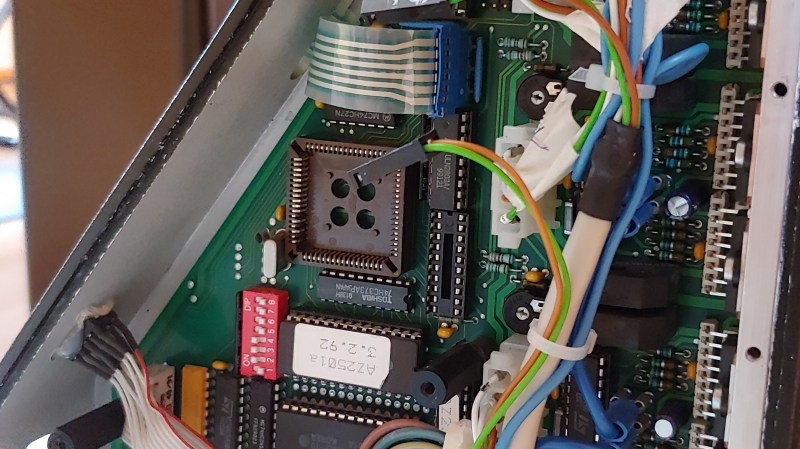
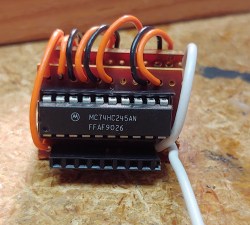
They reverse-engineered the motor driver connections – those go through a 74HC245 buffer between the original CPU and the drivers. Initially, they put an Arduino inside the control box of the CNC and it fit nicely, but it turned out the Arduino’s CPU would restart every time the spindle spun up – apparently, EMC would rear its head. So, they placed the Arduino out of the box, and used two CAT7 cables to wire up the motor and endstop signals to it.

For tapping into these signals, they took the 74HC245 out of its socket, and made an interposer from two small protoboards and some pin headers – letting them connect to the STEP and DIR lines without soldering wires into the original PCB. There’s extensive documentation, GRBL settings, and more pictures in their GitHub repo, too – in case you have a similar CNC and would like to learn about upgrading its controller board!

After this remake, the CNC starts up without hassles. Now, the brothers shall CNC on! Often, making an old CNC machine work is indeed that easy, and old controller retrofits have been a staple of ours. You can indeed use an Arduino, one of the various pre-made controller boards like Gerbil or TinyG, or even a Raspberry Pi – whatever helps you bridge the divide between you and a piece of desktop machinery you ought to start tinkering with.

Soundproofing A CNC Mill Conversion

The Proxxon MF70 is a nice desktop sized milling machine with a lot of useful add-on accessories available for it, making it very desirable for a hacker to have one in his or her home workshop. But its 20000 rpm spindle can cause quite the racket and invite red-faced neighbors. Also, how do you use a milling machine in your home-workshop without covering the whole area in metal chips and sawdust? To solve these issues, [Tim Lebacq] is working on Soundproofing his CNC mill conversion.

To meet his soundproof goal, he obviously had to first convert the manual MF70 to a CNC version. This is fairly straightforward and has been done on this, and similar machines, in many different ways over the years. [Tim] stuck with using the tried-and-tested controller solution consisting of a Raspberry Pi, an Arduino Uno and a grbl shield sandwich, with stepper motor drivers for the three NEMA17 motors. The electronics are housed inside the reclaimed metal box of an old power supply. Since the Proxxon MF70 is already designed to accept a CNC conversion package, mounting the motors and limit switches is pretty straightforward making it easy for [Tim] to make the upgrade.

Soundproofing the box is where he faced unknown territory. The box itself is made from wooden frames lined with particle board. A pair of drawer slides with bolt-action locks is used for the front door which opens vertically up. He’s also thrown in some RGB strips controlled via the Raspberry-Pi for ambient lighting and status indications. But making it soundproof had him experimenting with various materials and techniques. Eventually, he settled on a lining of foam sheets topped up with a layer of — “bubble wrap” ! It seems the uneven surface of the bubble wrap is quite effective in reducing sound – at least to his ears. Time, and neighbours, will tell.

Maybe high density “acoustic foam” sheets would be more effective (the ones similar to “egg crate” style foam sheets, only more dense)? Cleaning the inside of the box could be a big challenge when using such acoustic foam, though. What would be your choice of material for building such a sound proof box? Let us know in the comments below. Going back many years, we’ve posted about this “Portable CNC Mill” and a “Mill to CNC Conversion” for the Proxxon MF70. Seems like a popular machine among hackers.

Vintage Sewing Machine to Computerized Embroidery Machine

It is February of 2018. Do you remember what you were doing in December of 2012? If you’re [juppiter], you were starting your CNC Embroidery Machine which would not be completed for more than half of a decade. Results speak for themselves, but this may be the last time we see a first-generation Raspberry Pi without calling it retro.

The heart of the build is a vintage Borletti sewing machine, and if you like machinery porn, you’re going to enjoy the video after the break. The brains of the machine are an Arduino UNO filled with GRBL goodness and the Pi which is running CherryPy. For muscles, there are three Postep25 stepper drivers and corresponding NEMA 17 stepper motors.

The first two axes are for an X-Y table responsible for moving the fabric through the machine. The third axis is the flywheel. The rigidity of the fabric frame comes from its brass construction which may have been soldered at the kitchen table and supervised by a big orange cat. A rigid frame is the first ingredient in reliable results, but belt tension can’t be understated. His belt tensioning trick may not be new to you, but it was new to some of us. Italian translation may be necessary.

The skills brought together for this build were vast. There was structural soldering, part machining, a microcontroller, and motion control. The first time we heard from [juppiter] was December 2012, and it was the result of a Portable CNC Mill which likely had some influence on this creation. Between then, he also shared his quarter-gobbling arcade cabinet with us.

Man-in-the-Middle Jog Pendant: Two Parts Make Easier Dev Work

In a project, repetitive tasks that break the flow of development work are incredibly tiresome and even simple automation can make a world of difference. [Simon Merrett] ran into exactly this while testing different stepper motors in a strain-wave gear project. The system that drives the motor accepts G-Code, but he got fed up with the overhead needed just to make a stepper rotate for a bit on demand. His solution? A grbl man-in-the-middle jog pendant that consists of not much more than a rotary encoder and an Arduino Nano. The unit dutifully passes through any commands received from a host controller, but if the encoder knob is turned it sends custom G-Code allowing [Simon] to dial in a bit acceleration-controlled motor rotation on demand. A brief demo video is below, which gives an idea of how much easier it is to focus on the nuts-and-bolts end of hardware when some simple motor movement is just a knob twist away.

[Simon]’s jog pendant moves a single motor which is exactly what he needs to ease development of his 3D printed strain-wave gear using a timing belt, but it could be programmed with any G-Code at all. Speaking of DIY jog pendants for CNC machines, don’t forget this wireless one made from an Atari 2600 joystick that jogs a plasma cutter in X and Y, and zeroes it with a push of the button.


Filed under: Arduino Hacks, cnc hacks

Hackaday Prize Entry: The Green Machine

For Hackers, rapid prototyping is made easier using basic building blocks such as the Raspberry Pi, Arduino and the huge variety of add on shields for home brew projects. But we don’t see too many real world Industrial applications or machines built using these off-the-shelf electronics. [SlyScience] built The Green Machine – an industrial grade, automated spray painting device to help coat polycarbonate tubes consistently.

The Green Machine is essentially a linear drive that can move a spray gun across a spinning clear tube and coat it evenly with the desired color. These tubes are used as color filters – they slide over standard T5, T8 or T12 fluorescent lamps – and are used in advertising, special effects, films and similar applications. For almost 10 years prior to this machine, the task was done manually. The HPLV (high pressure, low volume) spray gun used for this process needed skilled hands to get consistent results. It was easy to ruin a tube and cleaning them was not possible. [SlyScience] figured things out on the go – teaching himself and figuring out all of the software and hardware pieces of the puzzle. The welded steel frame is about the only “custom” part in this build. Everything else is COTS. Check out the video of The Green Machine in action below, and if you have any tips to help improve the build, chime in with your comments.

The HackadayPrize2016 is Sponsored by:

Filed under: The Hackaday Prize

Cartesio – low cost cartesian plotter robot

Primary image

What does it do?

Plotter robot arm

Recently the famous site evilmadscientist introduced the new art robot called Axidraw.I saw the robot in action and it is very similar to the robot I built in the 2015, called Cartesio, a 3d printed cartesian robot.

Cost to build

$60, 00

Embedded video

Finished project

Complete

Number

Time to build

Type

URL to more information

Weight

read more

Handwriting suck? Build a machine to do it for you

Children of the information age are doomed to have the worst handwriting just for lack of use if nothing more. But some students at Olin College harnessed technology to find a solution to that problem. Meet Herald, a CNC machine that can produce beautiful calligraphy.

The machine uses a gantry to move the writing tip along the X and Y axes. The flexible-nib calligraphy pen is mounted on a sprocket which rotates the tip onto the writing surface, taking care of the third axis. The rig was beautifully rendered from their CAD drawings, then tweaked to ensure the smoothest motion possible before the quintet of Sophomores began the physical build.

The drive hardware is very simple yet it produces great results. It uses an Arduino along with three stepper motor drivers. There are also limiting switches to protect the hardware from runaway code. The software interface designed by the team lets the user cut and paste their text, and select a font, font size, alignment, etc. It then converts the text to G-code and pushes it to the Arduino where the GRBL package takes care of business.

Don’t miss the device in action, writing out a [Langston Hughes] work in the clip after the break.


Filed under: cnc hacks
Hack a Day 08 Mar 11:01