Posts with «tinkercad» label

Hacking the Classroom

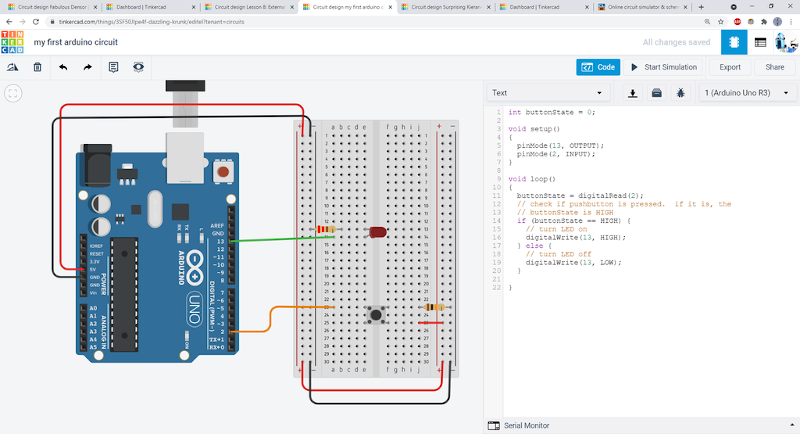
With so many students attending class virtually these days, how can you give kids — or adults — some hands on experience with electronics projects? [Ben Finio] says you can by moving your lab to the virtual world using — of all things — Tinkercad. [Ben] should know something about a classroom since he is a lecturer at Cornell.

Of course, you could do this trick with any online simulator, but Tinkercad is nice because it is easy to use, looks real, and doesn’t cost the students a dime. [Ben] mentions there are some scenarios where it is especially useful like large classes or online classes. There are probably some cases where it doesn’t make sense, like teaching RF design, for example. Even then, maybe you just need a different tool.

It would be something else if Tinkercad would add some features to support this use case. Imagine an instructor being able to peek at a student’s circuit or modify it without having to screen share to the whole class. Or perhaps provide a connector to connect one student’s outputs to another student’s inputs.

We couldn’t help but think you could do some more hardcore electronics using our favorite Falstad simulator. It doesn’t have the realistic look, but it can simulate a lot of interesting circuits. After all, we’ve long been a fan of project-based learning.

Hack a Day 09 Apr 03:00

DIY Baby MIT Cheetah Robot

3D printers have become a staple in most makerspaces these days, enabling hackers to rapidly produce simple mechanical prototypes without the need for a dedicated machine shop. We’ve seen many creative 3D designs here on Hackaday and [jegatheesan.soundarapandian’s] Baby MIT Cheetah Robot is no exception. You’ve undoubtedly seen MIT’s cheetah robot. Well, [jegatheesan’s] hack takes a personal spin on the cheetah robot and his results are pretty cool.

The body of the robot is 3D printed making it easy to customize the design and replace broken parts as you go. The legs are designed in a five-bar linkage with two servo motors controlling each of the four legs. An additional servo motor is used to rotate an HC-SR04, a popular ultrasonic distance sensor, used in the autonomous mode’s obstacle avoidance mechanism. The robot can also be controlled over Bluetooth using an app [jegatheesan] developed in MIT App Inventor.

Overall, the mechanics could use a bit of work — [jegatheesan’s] baby cheetah probably won’t outpace MIT’s robot any time soon — but it’s a cool hack and we’re looking forward to a version 3. Maybe the cheetah would make a cool companion bot?

“The Cow Jumped Over The Moon”

[Ash] built Moo-Bot, a robot cow scarecrow to enter the competition at a local scarecrow festival. We’re not sure if Moo-bot will win the competition, but it sure is a winning hack for us. [Ash]’s blog is peppered with delightful prose and tons of pictures, making this an easy to build project for anyone with access to basic carpentry and electronics tools. One of the festival’s theme was “Out of this World” for space and sci-fi scarecrows. When [Ash] heard his 3-year old son sing “hey diddle diddle, the cat and the fiddle…”, he immediately thought of building a cow jumping over the moon scarecrow. And since he had not seen any interactive scarecrows at earlier festivals, he decided to give his jumping cow a lively character.

Construction of the Moo-Bot is broken up in to three parts. The skeleton is built from lumber slabs and planks. The insides are then gutted with all of the electronics. Finally, the whole cow is skinned using sheet metal and finished off with greebles to add detailing such as ears, legs, spots and nostrils. And since it is installed in the open, its skin also doubles up to help Moo-bot stay dry on the insides when it rains. To make Moo-Bot easy to transport from barn to launchpad, it’s broken up in to three modules — the body, the head and the mounting post with the moon.

Moo-Bot has an Arduino brain which wakes up when the push button on its mouth is pressed. Its two OLED screen eyes open up, and the MP3 player sends bovine sounding audio clips to a large sound box. The Arduino also triggers some lights around the Moon. Juice for running the whole show comes from a bank of eight, large type “D” cells wired to provide 6 V — enough to keep Moo-Bot fed for at least a couple of months.

Check out the video after the break to hear Moo-bot tell some cow jokes – it’s pretty funny. We’re rooting for it to win the competition — Go Moo-bot.

If you’re hungry for more scarecrows, this isn’t the first we’ve seen.


Filed under: Arduino Hacks, robots hacks

Tinkercad does Arduino

If you’ve done 3D printing, you’ve probably at least heard of Tinkercad. This popular CAD package runs in your browser and was rescued from oblivion by Autodesk a few years ago. [Chuck] recently did a video about a new Tinkercad feature: building and simulating virtual Arduino circuits. You can watch it below.

There are a variety of components you can add to your design. You’ll find an integrated code editor and a debugger. You can even get to the serial monitor, all in your browser with no actual Arduino hardware. You can also build simple circuits that don’t use an Arduino, although the component selection is somewhat limited.

This could be great for teaching Arduino in classrooms or when you want to do some development in a hotel room. The layout is very visual, so if you are accustomed to reading schematics, you may not appreciate the style. In addition, the selection of components is somewhat limited (including only supporting the Arduino UNO, as far as we could tell). So for educational purposes, it is great. For breadboarding your next great Arduino-powered robot, maybe not so much.

If you remember Circuits123 (or circuits.io), this is the same underlying technology. They’ve just integrated it with Tinkercad. However, there doesn’t seem to be any real integration between the two other than they are on the same web page now. Perhaps in the future, they’ll let you drop components on the circuit that also show up in the 3D design (or, at least, with sockets or holders for those components).

However, having a simulated Arduino with a debugger could come in handy even if you don’t care about the circuit simulations. If you really want to do circuit simulation, it is hard to go wrong with LTSpice. If you really want it to be in your browser, there’s always Falstad.


Filed under: Arduino Hacks

Star Track: A Lesson in Positional Astronomy With Lasers

[gocivici] threatened us with a tutorial on positional astronomy when we started reading his tutorial on a Arduino Powered Star Pointer and he delivered. We’d pick him to help us take the One Ring to Mordor; we’d never get lost and his threat-delivery-rate makes him less likely to pull a Boromir.

As we mentioned he starts off with a really succinct and well written tutorial on celestial coordinates that antiquity would have killed to have. If we were writing a bit of code to do our own positional astronomy system, this is the tab we’d have open. Incidentally, that’s exactly what he encourages those who have followed the tutorial to do.

The star pointer itself is a high powered green laser pointer (battery powered), 3D printed parts, and an amalgam of fourteen dollars of Chinese tech cruft. The project uses two Arduino clones to process serial commands and manage two 28byj-48 stepper motors. The 2nd Arduino clone was purely to supplement the digital pins of the first; we paused a bit at that, but then we realized that import arduinos have gotten so cheap they probably are more affordable than an I2C breakout board or stepper driver these days. The body was designed with a mixture of Tinkercad and something we’d not heard of, OpenJsCAD.

Once it’s all assembled and tested the only thing left to do is go outside with your contraption. After making sure that you’ve followed all the local regulations for not pointing lasers at airplanes, point the laser at the north star. After that you can plug in any star coordinate and the laser will swing towards it and track its location in the sky. Pretty cool.


Filed under: Arduino Hacks, cnc hacks, news, solar hacks