Posts with «machining» label

Bring Precision to the Woodshop with an Electronic Router Lift
One of the knocks that woodworkers get from the metalworking crowd is that their chosen material is a bit… compliant. Measurements only need to be within a 1/16th of an inch or so, or about a millimeter, depending on which side of the Atlantic you’re on. And if you’re off a bit? No worries, that’s what sandpaper is for.

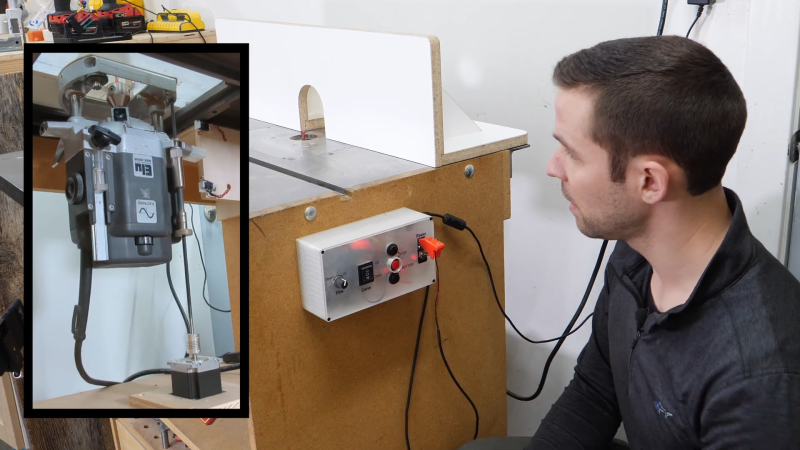
This electronic router lift is intended to close the precision gap and make woodworking a bit less subjective. [GavinL]’s build instructions are clearly aimed at woodworkers who haven’t dabbled in the world of Arduinos and stepper motors, and he does an admirable job of addressing the hesitancy this group might feel when tackling such a build. Luckily, a lot of the mechanical side of this project can be addressed with a commercially available router lift, which attaches to a table-mounted plunge router and allows fine adjustment of the cutting tool’s height from above the table.

What’s left is to add a NEMA 23 stepper to drive the router lift, plus an Arduino to control it. [GavinL] came up with some nice features, like a rapid jog control, a fine adjustment encoder, and the ability to send the tool all the way up or all the way down quickly. Another really nice touch is the contact sensor, which is a pair of magnetic probes that attach temporarily to the tool and a height gauge to indicate touch-off. Check the video below to see it all in action.

One quibble we have with [GavinL]’s setup is the amount of dust that the stepper will be subjected to. He might need to switch out to a dustproof stepper sooner rather than later. Even so, we think he did a great job bridging the gap between mechatronics and woodworking — something that [Matthias Wandel] has been doing great work on, too.

Teaching an Old Lathe New Tricks With a Programmable Power Feed

Ask anybody whose spent time standing in front of a mill or lathe and they’ll tell you that some operations can get tedious. When you need to turn down a stainless rod by 1/4″ in 0.030″ increments, you get a lot of time to reflect on why you didn’t just buy the right size stock as you crank the wheel back and forth. That’s where the lead screw comes in — most lathes have a gear-driven lead screw that can be used to actuate the z-axis ( the one which travels parallel to the axis of rotation). It’s no CNC, but this type of gearing makes life easier and it’s been around for a long time.

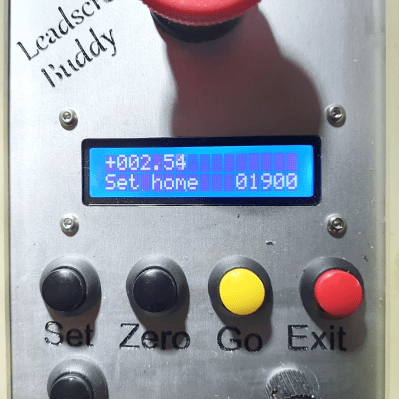
[Tony Goacher] took this idea a few steps further when he created the Leadscrew Buddy. He coupled a beautiful 1949 Myford lathe with an Arduino, a stepper motor, and a handful of buttons to add some really useful capabilities to the antique machine. By decoupling the lead screw from the lathe’s gearbox and actuating it via a stepper motor, he achieved a much more granular variable feed speed.

If that’s not enough, [Tony] used a rotary encoder to display the cutting tool’s position on a home-built Digital Readout (DRO). The pièce de résistance is a “goto” command. Once [Tony] sets a home position, he can command the z-axis to travel to a set point at a given speed. Not only does this make turning easier, but it makes the process more repeatable and yields a smoother finish on the part.

These features may not seem so alien to those used to working with modern CNC lathes, but to the vast majority of us garage machinists, [Tony]’s implementation is an exciting look at how we can step up our turning game. It also fits nicely within the spectrum of lathe projects we’ve seen here at Hackaday- from the ultra low-tech to the ludicrously-precise.

6-Axis Robot-Arm 3D Printer Runs on Arduino, Slings Spiderwebs

Most industrial robots run on proprietary systems, but this experimental KUKA arm uses an Arduino MEGA to 3D print in 6 axes, mimicking the shapes found in nature. Despite the size of this KUKA arm with a custom toolhead attachment — a 3D printer extruder — carefully looking at the […]

Read more on MAKE

Sleek Desk Lamp Changes Colors Based on Sun Position

[Connor] was working on a project for his college manufacturing class when he came up with the idea for this sleek desk lamp. As a college student, he’s not fond of having his papers glowing brightly in front of him at night. This lamp takes care of the problem by adjusting the color temperature based on the position of the sun. It also contains a capacities touch sensor to adjust the brightness without the need for buttons with moving parts.

The base is made from two sheets of aluminum and a bar of aluminum. These were cut and milled to the final shape. [Connor] found a nice DC barrel jack from Jameco that fits nicely with this design. The head of the lamp was made from another piece of aluminum bar stock. All of the aluminum pieces are held together with brass screws.

A slot was milled out of the bottom of the head-piece to make room for an LED strip and a piece of 1/8″ acrylic. This piece of acrylic acts as a light diffuser.  Another piece of acrylic was cut and added to the bottom of the base of the lamp. This makes for a nice glowing outline around the bottom that gives it an almost futuristic look.

The capacitive touch sensor is a pretty simple circuit. [Connor] used the Arduino capacitive touch sensor library to make his life a bit easier. The electronic circuit really only requires a single resistor between two Arduino pins. One of the pins is also attached to the aluminum body of the lamp. Now simply touching the lamp body allows [Connor] to adjust the brightness of the lamp.

[Connor] ended up using an Electric Imp to track the sun. The Imp uses the wunderground API to connect to the weather site and track the sun’s location. In the earlier parts of the day, the LED colors are cooler and have more blues. In the evening when the sun is setting or has already set, the lights turn more red and warm. This is easier on the eyes when you are hunched over your desk studying for your next exam. The end result is not only functional, but also looks like something you might find at that fancy gadget store in your local shopping mall.


Filed under: Arduino Hacks

Network Enabled ShapeOko CNC Uses Raspberry Pi and Alamode

Kevin Osborn was tired of worrying about getting dust from his ShapeOko CNC mill into his computer. Using a Raspberry Pi and an AlaMode shield he can now send G-Code to the machine over his wireless network, leaving his computer clean and available for other tasks. According to Kevin, "this is of the simplest and most rewarding applications of AlaMode."

Read the full article on MAKE