Posts with «aluminum» label

Robotic Platform Is Open Sourced And User Friendly

Having a 3D printer or a CNC machine available for projects is almost like magic. Designing parts in software and having them appear on the workbench is definitely a luxury. But for a lot of us, these tools aren’t easily available and projects that use them can be out-of-reach. That’s why one of the major design goals of this robotics platform was to use as many off-the-shelf components as possible.

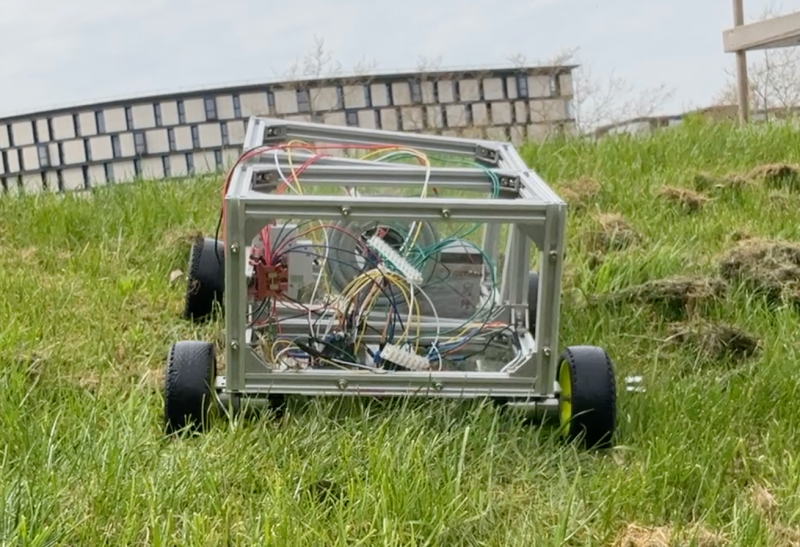
The robot is called the OpenScout and, as its name implies, intends to be a fully open-source robotics platform for a wide range of use cases. It uses readily-available aluminum extrusion as a frame, which bolts together without any other specialized tools like welders. The body of the robot is articulating, helping it navigate uneven terrain outdoors. The specifications also call for using an Arduino to drive the robot, although there is plenty of space in the robot body to house any robotics platform you happen to have on hand.

For anyone looking to get right into the useful work of what robots can do, rather than spending time building up a platform from scratch, this is an excellent project. It’s straightforward and easy to build without many specialized tools. The unique articulating body design should make it effective in plenty of environments. If you do have a 3D printer, though, that opens up a lot of options for robotics platforms.

Minimal Mill: The Minamil

Having a few machine tools at one’s disposal is a luxury that not many of us are afforded, and often an expensive one at that. It is something that a large percentage of us may dream about, though, and with some commonly available tools and inexpensive electronics a few people have put together some very inexpensive CNC machines. The latest is the Minamil, which uses a rotary tool and straps it to an economical frame in order to get a functional CNC mill setup working.

This project boasts impressively low costs at around $15 per axis. Each axis uses readily available parts such as bearings and threaded rods that are readily installed in the mill, and for a cutting head the build is based on a Dremel-like rotary tool that has a similarly low price tag. Let’s not ignore the essentially free counterweight that is used.

For control, an Arduino with a CNC shield powers the three-axis device which is likely the bulk of the cost of this project. [Paul McClay] also points out that a lot of the material he needed for this build can be salvaged from things like old printers, so the $45 price tag is a ceiling, not a floor.

The Minamil has been demonstrated milling a wide variety of materials with excellent precision. Both acrylic and aluminum are able to be worked with this machine, but [Paul] also demonstrates it in its capacity to mill PCBs. It does have some limitations but for the price it seems that this mill can’t be beat, even compared to his previous CNC build which repurposed old CD drives.

The HackadayPrize2021 is Sponsored by:

Stepper-Controlled Chop Saw Automates a Tedious Job

We’re not going to question why [Absorber Of Light] needs to cut a bazillion little fragments of aluminum stock. We assume his reasoning is sound, so all we’re interested in is the automated chop saw he built to make the job less tedious, and potentially less finger-choppy.

There are probably many ways to go about this job, but  [Absorber] leaves few clues as to why he chose this particular setup. Whatever the reason, the build looks like fun, with a long, stepper-driven threaded rod pushing a follower down a track to a standard chop saw. The aluminum stock rides in the track and gets pushed out a set amount before being lopped off cleanly as the running saw is lowered by a linear actuator. The cycle then repeats until the stock is gone.

An Arduino controls the stock-advance stepper in the usual way, but the control method for the linear actuator is somewhat unconventional. A second stepper motor has two cams offset by 180° on the shaft. The cams actuate four microswitches which are set up in an H-bridge configuration. The stepper swivels back and forth to run the linear actuator first in one direction then the other, with a neutral position in between. It’s an interesting approach using mechanical rather than the typical optical isolation. Check it out in action in the video below.

We’ll admit to some curiosity as to the use of the coupons this rig produces, so maybe we’ll get lucky with some details from [Absorber Of Light] in the comment section. After all, we knew exactly what the brass tubes being cut by the similar “Auto Mega Cut-O-Matic”  were being used for.


Hack a Day 10 Aug 21:00

Sleek Desk Lamp Changes Colors Based on Sun Position

[Connor] was working on a project for his college manufacturing class when he came up with the idea for this sleek desk lamp. As a college student, he’s not fond of having his papers glowing brightly in front of him at night. This lamp takes care of the problem by adjusting the color temperature based on the position of the sun. It also contains a capacities touch sensor to adjust the brightness without the need for buttons with moving parts.

The base is made from two sheets of aluminum and a bar of aluminum. These were cut and milled to the final shape. [Connor] found a nice DC barrel jack from Jameco that fits nicely with this design. The head of the lamp was made from another piece of aluminum bar stock. All of the aluminum pieces are held together with brass screws.

A slot was milled out of the bottom of the head-piece to make room for an LED strip and a piece of 1/8″ acrylic. This piece of acrylic acts as a light diffuser.  Another piece of acrylic was cut and added to the bottom of the base of the lamp. This makes for a nice glowing outline around the bottom that gives it an almost futuristic look.

The capacitive touch sensor is a pretty simple circuit. [Connor] used the Arduino capacitive touch sensor library to make his life a bit easier. The electronic circuit really only requires a single resistor between two Arduino pins. One of the pins is also attached to the aluminum body of the lamp. Now simply touching the lamp body allows [Connor] to adjust the brightness of the lamp.

[Connor] ended up using an Electric Imp to track the sun. The Imp uses the wunderground API to connect to the weather site and track the sun’s location. In the earlier parts of the day, the LED colors are cooler and have more blues. In the evening when the sun is setting or has already set, the lights turn more red and warm. This is easier on the eyes when you are hunched over your desk studying for your next exam. The end result is not only functional, but also looks like something you might find at that fancy gadget store in your local shopping mall.


Filed under: Arduino Hacks