Posts with «gps» label

Navigation Thing: Four Days, Three Problems, and Fake Piezos

The Navigation Thing was designed and built by [Jan Mrázek] as part of a night game activity for high school students during week-long seminar. A night-time path through a forest had stations with simple tasks, and the Navigation Thing used GPS, digital compass, a beeper, and a ring of RGB LEDs to provide a bit of “Wow factor” while guiding a group of students from one station to the next. The devices had a clear design direction:

“I wanted to build a device which a participant would find, insert batteries, and follow the beeping to find the next stop. Imagine the strong feeling of straying in the middle of the night in an unknown terrain far away from civilization trusting only a beeping thing you found. That was the feeling I wanted to achieve.”

The Navigation Things (there are six in total) guide users to fixed waypoints with GPS, a digital compass, and a ring of WS2812 LEDs — but the primary means of feedback to the user is a beeping that gets faster as you approach the destination. [Jan] had only four days to make all six units, which was doable. But as most of us know, delivering on a tight deadline is often less about doing the work you know about, and more about effectively handling the unexpected obstacles that inevitably pop up in the process.

The first real problem to solve was the beeping itself. “Beep faster as you get closer to the destination” seems like a simple task, but due to the way humans perceive things it’s more complex than it sounds. We perceive large changes easier than small incremental ones, so a straight linear change in beep frequency based on distance doesn’t work very well. Similar problems (and their solutions) exist whether you’re controlling volume, brightness, or just about anything else that humans perceive. Instead of encoding distance as a beep frequency, it’s much more effective to simply use beeps to signal overall changes: beep noticeably slower as you move away, but beep much faster as you get close.

A “piezo” buzzer that was assumed to have no significant magnetic field, but in fact contained a magnet.

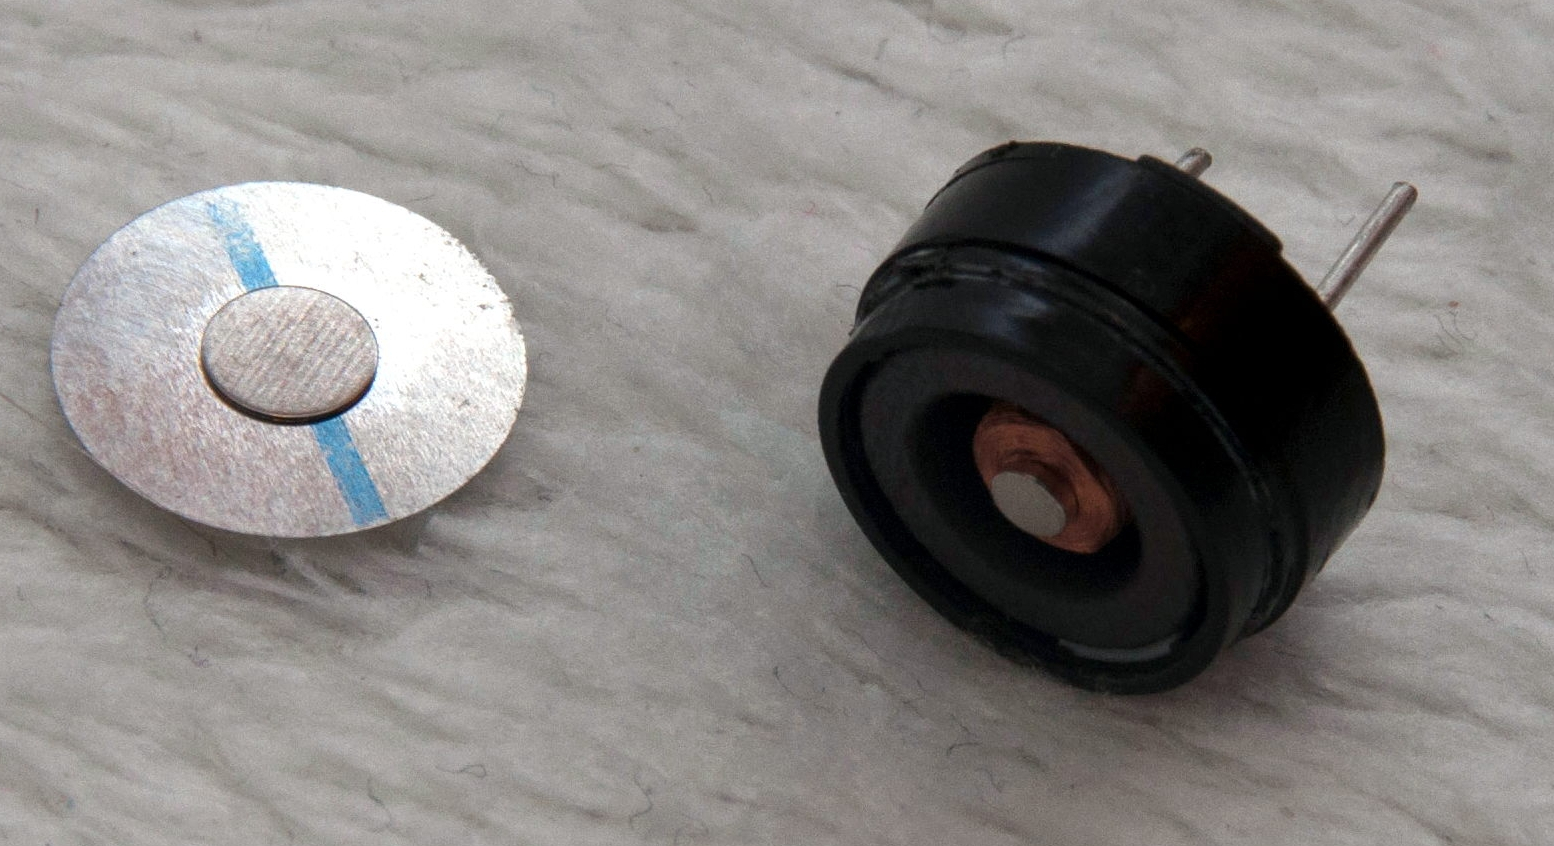
The other interesting problems were less straightforward and were related to the digital compass, or magnetometer. The first problem was that the piezo buzzers [Jan] sourced contained no actual piezo elements. They contained magnets – which interfered with the operation of the digital compass. After solving that, still more compass problems arose. When testing the final units in the field, the compass readings were not as expected and [Jan] had no idea why.

After careful troubleshooting, the culprit was found: the AA cells on the other side of the circuit board. Every AA cell has a faint (and slightly different) magnetic field, and the proximity and placement of the cells with respect to the magnetometer was causing the deviation. Happily, the fix was simple once the problem was understood: calibrate the compass every time new batteries are inserted.

If you’re interested in the Navigation Thing, check out the github repository. And on the topic of actual piezoelectric devices, piezos are implemented in a variety of clever ways. There are even piezo transformers and piezo vacuum pumps.


Filed under: gps hacks, misc hacks

Puzzlingly Simple Tutorial On GPS Time Corrected Clock

We’re not sure if [Derek Lieber] is messing with us or proving a point. Why are you doing this [Derek]? We know there’s technically enough information to build the clock. You even included the code. Couldn’t you have at least thrown in a couple of words? Do we have to skip straight to mediaglyphics?

Anyway, if we follow the equation. The equation… If you take a gps module, a 7 segment display with an HT16K33 backpack, a digital potentiometer, a piezo, and a boarduino we suppose we could grudgingly admit that these would all fit together to make a clock. We still don’t like it though, but we’ll admit that the nice handmade case was a nice touch, and that the pictures do give us enough details to do it ourselves.

It was also pretty cool when you added the Zelda theme song as an alarm sound. Also pretty neat that, being GPS corrected, there’s no need to ever set the time. We may also like the simplicity of the only inputs being the potentiometer, which is used to set the alarm time. It’s just. Dangit [Derek]. Nice clock build, we like it.


Filed under: clock hacks

Beware Of Tall Grass: Pokemon Go on the Gameboy Pocket

[Pepijn de Vos] was excited to interact with the world’s most popular augmented reality pedometer, Pokemon Go, and was extremely disappointed to find that his Blackberry couldn’t run it. Still, as far as he could tell from behind his wall of obsolete technology, Pokemon Go is all about walking distractedly, being suspicious, and occasionally catching a Pokemon. That should be possible.

Not a stranger to hacking Pokemon on the Gameboy, [Pepijn] put together a plan. Using his TCPoke module, he took it a step further. Rather than just emulating the original gameboy trade signals over the internet, he hacked a Pokemon Red ROM with some custom Z80 assembly to add some features to the Cable Club in the game.

After some waiting for the delivery man to bring a flashable cartridge and along with some Arduino code, he could now translate the steps he took in the game to his steps in the real world. Well, mostly. He could pick the location where he would like to catch a Pokemon. The character stands there. Somewhere around 100m the game will trigger a random pokemon battle.

[Pepijn] is now no longer a social outcast, as you can see in the video after the break. On a simple trip to the grocery store he caught two Pokemon!


Filed under: handhelds hacks, nintendo gameboy hacks

Testing a Heart Pulse Alarm based on Arduino Uno

Murad is a student of Mechatronics and Engineering at Tafila Technical University in the town of Tafila, in Jordan. He made a submission to our blog presenting his DIY project of a Heart Pulse Alarm based on Arduino Uno.

The HPA (Heart Pulse Alarm) is a portable device prototyped to measure the pulse rate and the body temperature of who’s wearing it. If the device receives an unusual heart pulse, it will send a sms message to paramedics to act quickly. He designed the device to help people who have cardiac problems and they lack  the resources for personal and professional assistants in his country.

Check the bill of materials and code on his blog.


Arduino Blog 18 Nov 16:59
arduino  arduino uno  diy  featured  gps  heart-beat  sms  uno  

Hackaday Prize Entry: Project Dekoboko 凸凹 Maps Bumpy Roads On A Bike

If you live in New England (like me) you know that the roads take a pounding in the winter. Combine this with haphazard maintenance and you get a recipe for biking disaster: bumpy, potholed roads that can send you flying over the handlebars. Project Dekoboko 凸凹 aims to help a little with this, by helping you map and avoid the bumpiest roads and could be a godsend in this area.

The 2015 Hackaday Prize entry from [Benjamin Shih], [Daniel Rojas], and [Maxim Lapis] is a device that clips onto your bike and maps how bumpy the ride is as you pedal around. It does this by measuring the vibration of the bike frame with an accelerometer. Combine this with a GPS log and you get a map of the quality of the roads that helps you plan a smooth ride, or which could help the city figure out which roads need fixing the most.

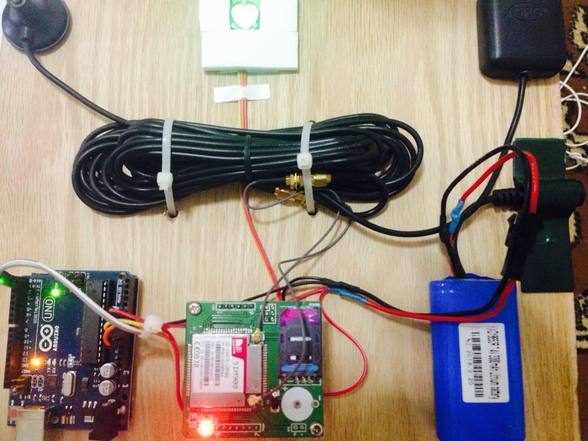
The project is currently on its  third version, built around an Arduino, Adafruit Ultimate GPS Logger shield, and a protoboard that holds the accelerometer (an Analog ADXL345). The team has also set up a first version of their web site, which contains live data from a few trips around Berlin. This does show one of the issues they will need to figure out, though: the GPS data has them widely veering off the road, which means that the data was slightly off, or they were cycling through buildings on the Prinzenstrasse, including a house music club. I’ll assume that it was the GPS being inaccurate and not them stopping for a rave, but they will need to figure out ways to tie this data down to a specific street before they can start really analyzing it. Google Maps does offer a way to do this, but it is not always accurate, especially on city streets. Still, the project has made good progress and could be useful for those who are looking for a smooth ride around town.

The 2015 Hackaday Prize is sponsored by:


Filed under: The Hackaday Prize, transportation hacks

Punky GPS Gets The Steam Built Up For Geocaching

While getting geared up for geocaching [Folkert van Heusden] decided he didn’t want to get one of those run of the mill GPS modules, and being inspired by steam punk set out and made his own.

Starting with an antique wooden box, and adding an Arduino, GPS module, and LiPo battery to make the brains. The user interface consists of good ‘ole toggle switches and a pair of quad seven segment displays to enter, and check longitude and latitude.

To top off the retro vibe of the machine two analog current meters were repurposed to indicate not only direction, but also distance, which we think is pretty spiffy. Everything was placed in a laser cut wooden control panel, which lend to the old-time feel of the entire project.

Quite a bit of wire and a few sticks of hot glue later and [Folkert] is off and ready for an adventure!


Filed under: Arduino Hacks, gps hacks
Hack a Day 11 Jul 21:00

Castrol Virtual Drift: Hacking Code at 80MPH with a Driver in a VR Helmet

Driving a brand new 670 horsepower Roucsh stage 3 Mustang while wearing virtual reality goggles. Sounds nuts right? That’s exactly what Castrol Oil’s advertising agency came up with though. They didn’t want to just make a commercial though – they wanted to do the real thing. Enter [Adam and Glenn], the engineers who were tasked with getting data from the car into a high end gaming PC. The computer was running a custom simulation under the Unreal Engine. El Toro field provided a vast expanse of empty tarmac to drive the car without worry of hitting any real world obstacles.

The Oculus Rift was never designed to be operated inside a moving vehicle, so it presented a unique challenge for [Adam and Glenn]. Every time the car turned or spun, the Oculus’ on-board Inertial Measurement Unit (IMU) would think driver [Matt Powers] was turning his head. At one point [Matt] was trying to drive while the game engine had him sitting in the passenger seat turned sideways. The solution was to install a 9 degree of freedom IMU in the car, then subtract the movements of that IMU from the one in the Rift.

GPS data came from a Real Time Kinematic (RTK) GPS unit. Unfortunately, the GPS had a 5Hz update rate – not nearly fast enough for a car moving close to 100 MPH. The GPS was relegated to aligning the virtual and real worlds at the start of the simulation. The rest of the data came from the IMUs and the car’s own CAN bus. [Adam and Glenn] used an Arduino with a Microchip mcp2515 can bus interface  to read values such as steering angle, throttle position, brake pressure, and wheel spin. The data was then passed on to the Unreal engine. The Arduino code is up on Github, though the team had to sanitize some of Ford’s proprietary CAN message data to avoid a lawsuit. It’s worth noting that [Adam and Glenn] didn’t have any support from Ford on this, they just sniffed the CAN network to determine each message ID.

The final video has the Hollywood treatment. “In game” footage has been replaced with pre-rendered sequences, which look so good we’d think the whole thing was fake, that is if we didn’t know better.

Click past the break for the final commercial and some behind the scenes footage.


Filed under: transportation hacks
Hack a Day 21 Jun 03:01

New Project: How to Build a Self-Balancing Autonomous Arduino Bot

Ready to level-up your robot skills? ArduRoller is a self-balancing, inverted pendulum robot that’s also capable of autonomous navigation indoors or out. I created it as an entry for the annual SparkFun Autonomous Vehicle Competition: The goal was to create a nontraditional vehicle capable of quickly navigating an obstacle course […]

Read more on MAKE

The post How to Build a Self-Balancing Autonomous Arduino Bot appeared first on Make:.

A Simple And Inexpensive GPS Navigation Device

There are plenty of GPS navigation units on the market today, but it’s always fun to build something yourself. That’s what [middelbeek] did with his $25 GPS device. He managed to find a few good deals on electronics components online, including and Arduino Uno, a GPS module, and a TFT display.

In order to get the map images on the device, [middelbeek] has to go through a manual process. First he has to download a GEOTIFF of the area he wants mapped. A GEOTIFF is a metadata standard that allows georeferencing information to be embedded into a TIFF image file.  [middelbeek] then has to convert the GEOTIFF into an 8-bit BMP image file. The BMP images get stored on an SD card along with a .dat file that describes the boundaries of each BMP. The .dat file was also manually created.

The Arduino loads this data and displays the correct map onto the 320×240 TFT display. [middelbeek] explains on his github page that he is currently unable to display data from two map files at once, which can lead to problems when the position moves to the edge of the map. We suspect that with some more work and tuning this system could be improved and made easier to use, of course for under $25 you can’t expect too much.


Filed under: Arduino Hacks
Hack a Day 30 Apr 00:00
arduino  arduino hacks  bitmap  bmp  display  geotiff  github  gps  lcd  navigation  tft  uno