Posts with «seven segment» label

The Seven-Segment Display That’s Also an Input Device
We’re used to seeing all manner of seven-segment displays, be they mechanical, electronic, or something in between. But what all these displays have in common is that they’re, you know, displays. Using them as inputs would just be crazy talk, right?

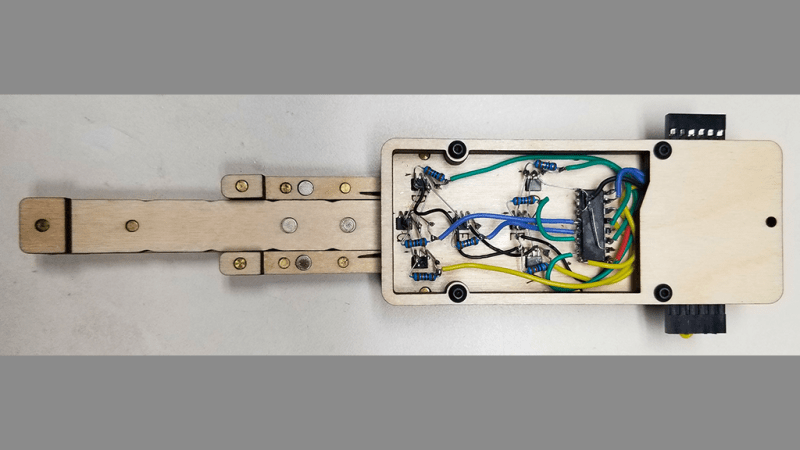
Perhaps, but we like where [Dave Ehnebuske] is going with “InSlide,” the seven-segment input device. The idea for this comes from the “DigiTag” display, which we covered back in October, and divides a standard seven-segment character into three vertical strips — two skinny ones for the outside vertical segments, and one wide strip holding the horizontal elements. By sliding these strips up and down relative to each other, the standard nine digits, plus a few other characters, can be composed.

[Dave]’s take on this theme started by building his display from laser-cut plywood pieces, which is a nice choice because of the good contrast between the white wood and the engraver segments. Next, he embedded rare earth magnets in the slides and installed seven Hall effect sensors in the frame. The sensors are connected to an Arduino Nano via a 74HC165 parallel-load shift register, which lets multiple modules be daisy-chained together. He also built an Arduino library to read the current state of the segments; it supports the full hexadecimal character set, or even duodecimal if you like.

[Dave] has shared the library, and it looks like you can get the build files for the mechanism from the original project. That’s good, because this looks ripe for hacking. It looks like it would be pretty easy to motorize a display like this by adding rack-and-pinion gearing and steppers — something like that could make an interesting clock.

Building This Mechanical Digital Clock Took Balls

In the neverending quest for unique ways to display the time, hackers will try just about anything. We’ve seen it all, or at least we thought we had, and then up popped this purely mechanical digital clock that uses nothing but steel balls to display the time. And we absolutely love it!

Click to embiggen (you’ll be glad you did)

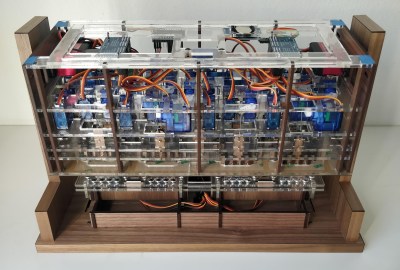
One glimpse at the still images or the brief video below shows you exactly how [Eric Nguyen] managed to pull this off. Each segment of the display is made up of four 0.25″ (6.35 mm) steel balls, picked up and held in place by magnets behind the plain wood face of the clock. But the electromechanical complexity needed to accomplish that is the impressive part of the build. Each segment requires two servos, for a whopping 28 units plus one for the colon. Add to that the two heavy-duty servos needed to tilt the head and the four needed to lift the tray holding the steel balls, and the level of complexity is way up there. And yet, [Eric] still managed to make the interior, which is packed with a laser-cut acrylic skeleton, neat and presentable, as well he might since watching the insides work is pretty satisfying.

We love the level of craftsmanship and creativity on this build, congratulations to [Eric] on making his first Arduino build so hard to top. We’ve seen other mechanical digital displays before, but this one is really a work of art.

Thanks to [Ruhan van der Berg] for the tip.

Panel Mount Display Solves The Problem Of Drilling Square Holes

[Absolutelyautomation] has a problem with seven-segment displays. Fitting these displays in an enclosure is a pain because you can’t drill perfectly square holes, and you will invariably mess up a few enclosures with overzealous file work. There is a solution to this problem – panel mount meters.

The bezels on these panel mount meters hide the imperfections in the enclosure, and usually don’t require screws. They are, however, dedicated displays, usually for temperature, RPM, or some other measurement.

[Absolutelyautomation] took one of these dedicated panel mount displays and turned it into an all-purpose device. Basically, it’s a panel mount Arduino with three seven-segment displays.

This project is built on perfboard cut down to fit inside the enclosure of a very cheap panel meter found at the usual suppliers. Tucked away underneath this perfboard is an ATmega, a few resistors, and the support parts to make everything go. This panel mount meter can either be a serial slave or as a standalone controller, programmable with the Arduino IDE. It’s cheap, too. You can check out [Absolutelyautomaion]’s video below.


Filed under: Arduino Hacks

Puzzlingly Simple Tutorial On GPS Time Corrected Clock

We’re not sure if [Derek Lieber] is messing with us or proving a point. Why are you doing this [Derek]? We know there’s technically enough information to build the clock. You even included the code. Couldn’t you have at least thrown in a couple of words? Do we have to skip straight to mediaglyphics?

Anyway, if we follow the equation. The equation… If you take a gps module, a 7 segment display with an HT16K33 backpack, a digital potentiometer, a piezo, and a boarduino we suppose we could grudgingly admit that these would all fit together to make a clock. We still don’t like it though, but we’ll admit that the nice handmade case was a nice touch, and that the pictures do give us enough details to do it ourselves.

It was also pretty cool when you added the Zelda theme song as an alarm sound. Also pretty neat that, being GPS corrected, there’s no need to ever set the time. We may also like the simplicity of the only inputs being the potentiometer, which is used to set the alarm time. It’s just. Dangit [Derek]. Nice clock build, we like it.


Filed under: clock hacks