Posts with «rpi» label

Pair of musical hacks use sensor arrays as keyboards

This pair of musical keyboard hacks both use light to detect inputs. The pair of tips came in on the same day, which sparks talk of consipiracy theory here at Hackaday. Something in the weather must influence what types of projects people take on because we frequently see trends like this one. Video of both projects is embedded after the jump.

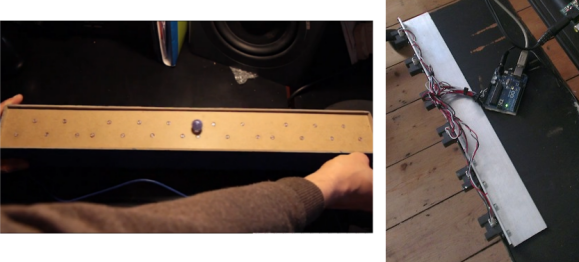
On the left is a light-sensitive keyboard which [Kaziem] is showing off. In this image he’s rolling a marble around on the surface. As it passes over the Cadmium Sulfide sensors (which are arranged in the pattern of white and black keys from a piano keyboard) the instrument plays pitches based on the changing light levels. [Thanks Michael via Make]

To the right is [Lex's] proximity sensor keyboard. It uses a half-dozen Infrared proximity sensor which pick up reflected light. He calls it a ‘quantised theremin’ and after seeing it in action we understand why. The overclocked Raspberry Pi playing the tones reacts differently based on distance from the keyboard itself, and hand alignment with the different sensors.


Filed under: musical hacks

Harry Potter location clock spies on your smart phone

The location clock found in the Harry Potter books makes for a really fun hack. Of course there’s no magic involved, just a set of hardware to monitor your phone’s GPS and a clock face to display it.

[Alastair Barber] finished building the clock at the end of last year as a Christmas gift. The display seen above uses an old mantelpiece clock to give it a finished look. He replace the clock face with a print out of the various locations known to the system and added a servo motor to drive the single hand. His hardware choices were based on what he already had on hand and what could be acquired cheaply. The an all-in-one package combines a Raspberry Pi board with a USB broadband modem to ensure that it has a persistent network connection (we’ve seen this done using WiFi in the past). The RPi checks a cellphone’s GPS data, compares it to a list of common places, then pushes commands to the Arduino which controls the clock hand’s servo motor. It’s a roundabout way of doing things but we imagine everything will get reused when the novelty of the gift wears off.


Filed under: gps hacks

Replacement controllers for slot car racing

That blur on the right is a car racing into the frame. But look around the rest of the image and you’ll see the area is littered with extra hardware. [Matthew], [Doug], and [Barry] have been hard at work adding extra functionality and replacing the original controllers on this Scalextric slot car setup. So far it looks like their build log has not caught up with all the work they’ve done. We’re hoping to learn more details as they have time to write about them (this is coursework at University so we’re sure there’s a lot on their plates). But for now there are several videos and a gallery of images to drool over.

The cars are controlled by the voltage level in the track. The team replaced the stock controllers with a Raspberry Pi. It manages that voltage using Pulse-Width Modulation via MOSFETs. This allows the races to be automated but also makes it simple for a human operator to use just about any input device imaginable to control the cars. For good measure they also added a lap counter that uses an IR LED and detector to sense when a car passes the finish line.

After viewing several of their videos we think the goal of the project is to log the fasts times without sending the cars flying off the tracks during the turns.


Filed under: Raspberry Pi, toy hacks
Hack a Day 23 Jan 19:01

Weather station graphs history on webpage

Kudos go out to [Jose] for his work getting so many different components to talk to each other in this Arduino weather station that using a Raspberry Pi to display the data online.

The components shown above make up the sensor package. There’s an Arduino with a custom shield that interfaces the barometric pressure sensor, real-time clock chip, a digital temperature sensor, and a humidity sensor. On top of that shield is an XBee shield that lets this push data back to the base station. [Jose] also rolled in an LCD character display and a few buttons so that the user may view weather data without heading to the web.

A Raspberry Pi board makes up the other half of the XBee pair. It harvests the incoming data from the radio module using a USB to Serial converter cable. You can see the data log on the webpage linked above. Just choose the “LIVE” menu option and click on “Daily” to get a better overview of humidity and pressure changes.


Filed under: home hacks

Arduino Sheild for Raspberry Pi

Thought I should share this. Dunno much about Raspberry Pi myself but saw this link online and thought it might help others.

Twitter radio

This anthropomorphized wood bowl will read Tweets out loud. It was built by [William Lindmeier] as part of his graduate work in the Interactive Telecommunications Program (ITP) at New York University. View the clip after the break to see and hear a list from his Twitter feed read in rather pleasant text-to-speech voices.

The electronics involved are rather convoluted. Inside the upturned bowl you’ll find both an Arduino and a Raspberry Pi. But that’s not the only thing that goes into this. The best sounding text-to-speech program [William] could find was for OSX, so there is a remote computer involved as well. But we think what makes this special is the concept and execution, not the level of hardware inefficiency.

The knob to the left sets the volume and is also responsible for powering down the device. The knob of the right lets you select from various Twitter lists. Each turn of the knob is responded to with a different LED color in the nose and a spoken menu label. You can get a quick overview of the project from this summary post.


Filed under: arduino hacks, Raspberry Pi
Hack a Day 12 Dec 21:30

Raspberry Pi driven Polargraph exhibits high precision drawing ability

This polar graph draws some amazing shapes on a dry erase board. Part of that is due to the mounting brackets used for the two stepper motors and the stylus. But credit is also due for the code which takes velocity into account in order to plan for the next set of movements.

The Go language is used to translate data into step commands for the two motors. This stream of commands is fed over a serial connection between the RPi board and an Arduino. The Arduino simply pushes the steps to the motor controllers. The inclusion of the RPi provides the horsepower needed to make such smooth designs. This is explained in the second half of [Brandon Green's] post. The technique uses constant acceleration, speed, and deceleration for most cases which prevents any kind of oscillation in the hanging stylus. But there are also contingencies used when there is not enough room to accelerate or decelerate smoothly.

You can catch a very short clip of the hardware drawing a tight spiral in the video embedded after the break.


Filed under: Raspberry Pi
Hack a Day 16 Nov 17:30