Posts with «hearing loss» label

DIY Arduino Hearing Test Device
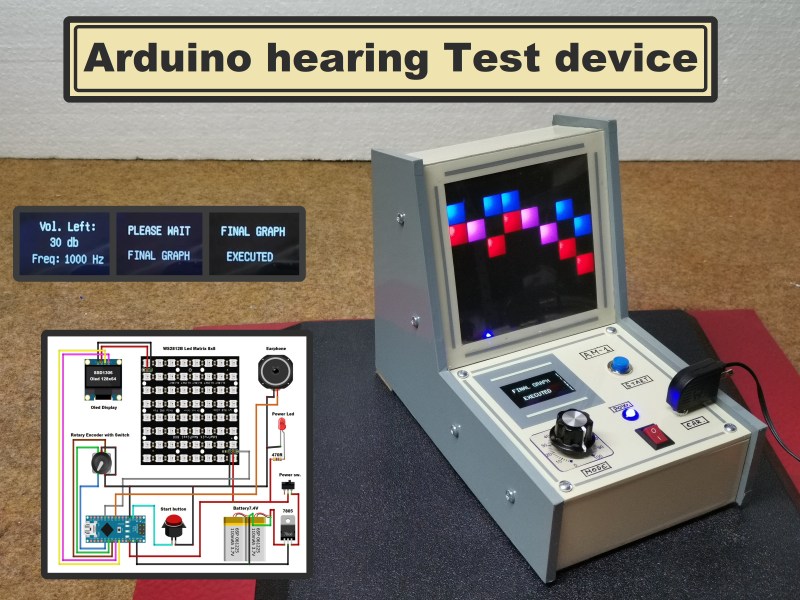
Hearing loss is a common problem for many – especially those who may have attended too many loud concerts in their youth. [mircemk] had recently been for a hearing test, and noticed that the procedure was actually quite straightforward. Armed with this knowledge, he decided to build his own test system and document it for others to use.
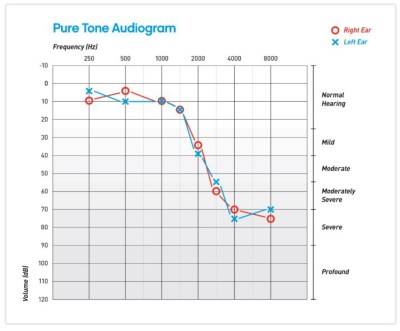
Resultant audiogram from the device showing each ear in a different color

By using an Arduino to produce tones of various stepped frequencies, and gradually increasing the volume until the test subject can detect the tone, it is possible to plot an audiogram of hearing threshold sensitivity.  Testing each ear individually allows a comparison between one side and the other.

[mircemk] has built a nice miniature cabinet that holds an 8×8 matrix of WS2812 addressable RGB LEDs.  A 128×64 pixel OLED display provides user instructions, and a rotary encoder with push-button serves as the user input.

Of course, this is not a calibrated professional piece of test equipment, and a lot will depend on the quality of the earpiece used.  However, as a way to check for gross hearing issues, and as an interesting experiment, it holds a lot of promise.

There is even an extension, including a Class D audio amplifier, that allows the use of bone-conduction earpieces to help narrow down the cause of hearing loss further.

There’s some more information on bone conduction here, and we’ve covered an intriguing optical stimulation cochlear implant, too.

Hackaday Prize Entry: Vibhear

Hearing impairment, either partial or total, is a serious problem afflicting a large number of people. Almost 5% of the global population has some form of hearing disorder. For those affected by this disability from birth, it further impacts the development of language and speech abilities. In recent years, cochlear implants are increasingly being used to address this problem. These implants consist of two parts – the receiver and electrode array are implanted under the skin near the ear (with the electrode array terminating inside the Cochlea), while the microphone, electronics, transmitter and power source are attached on the outside. Often, the external unit has to be removed – for example, when the person needs to sleep. This is particularly so in the case of young children. The external unit is fairly large compared to their head and causes discomfort during sleep. And parents are worried that the expensive device could get damaged when the child is sleeping. This leads to the alarming situation where the child is asleep and has no audio sensory inputs being received from the surroundings. Not only can they not hear morning alarms, but also cannot react when there is an emergency situation such as a smoke alarm going off.

[Srdjan Pavlovic] came across this problem first hand when he visited his friend and learned about their six-year-old son with hearing loss since birth. The parents said their child will not be disturbed by loud noises at night since the external unit of his cochlear implant is removed each night. [Srdjan] then started work on building the Vibhear – an assistive hearing device to be used when the main hearing aid is removed or not working. It is a low-cost arm-band that provides a vibratory signal in response to high ambient noises.

The main components are a microphone, amplifier, microcontroller and vibration motor powered by a LiPo battery through a boost converter/charger. An RTC module allows setting up daily wake up alarms. It’s currently prototyped around the Arduino, but the next iteration will use a specialized DSP which can be programmed to perform signal processing operations on input sound. This will allow identification of specific sounds such as car horns, barking dogs, smoke alarms or emergency sirens.

[Srdjan] is in the process of choosing components for his next iteration, so if you have any recommendations to help him choose the microcontroller, power supply controller or other parts, do let him know via comments below.


Filed under: The Hackaday Prize