Posts with «quadcopter» label

Teach your drone what is up and down with an Arduino

Gyroscopes and accelerometers are the primary sensors at the heart of an IMU, also known as an internal measurement unit — an electronic sensor device that measures the orientation, gravitational forces and velocity of a multicopter, and help you keep it in the air using Arduino.

Two videos made by Joop Brokking, a Maker with passion for RC model ‘copters, clearly explain how to program your own IMU so that it can be used for self-balancing your drone without Kalman filters,  libraries, or complex calculations.

Auto leveling a multicopter is pretty challenging. It means that when you release the pitch and roll controls on your transmitter the multicopter levels itself. To get this to work the flight controller of the multicopter needs to know exactly which way is down. Like a spirit level that is on top of the multicopter for the pitch and roll axis.

Very often people ask me how to make an auto level feature for their multicopter. The answer to a question like this is pretty involved and cannot be explained in one email. And that is why I made this video series.

You can find the bill of materials and code here.

Find a Drone

Flying a drone usually leads to–sooner or later–crashing a drone. If you are lucky, you’ll see where it crashes and it won’t be out of reach. If you aren’t lucky, you’ll know where it is, but it will be too high to easily reach. The worst case is when it just falls out of the sky and you aren’t entirely sure where. [Just4funmedia] faced this problem and decided to use some piezo buzzers and an Arduino to solve it.

Yeah, yeah, we know. You don’t really need an Arduino to do this, although it does make it easy to add some flexibility. You can pick two tones that are easy to hear and turn on the buzzers with a spare channel or sense a loss of signal or power.

The device has its own battery so it will work even if the drone’s power depletes. Apparently, the 9V battery will run the whole thing for over 20 hours. Pulsing the audio would probably push that number even higher. Of course, the downside is the drone has to carry the extra weight, but if you recover an otherwise lost drone, that might be a small price to pay.

This might be more practical than a calculus-based approach. Maybe like a tightrope walker, you’d rather use a net.


Filed under: Arduino Hacks, drone hacks

Arduino Quadcopter Game Uses Serial Monitor

Every new generation of computers repeats the techniques used by the earlier generations. [Kim Salmi] created an ASCII-based quadcopter simulation game using an Arduino that displays on the Arduino serial monitor. The modern twist is the controller: an accelerometer supplements the joystick for immersive play. And of course there are flashing LEDs.

An Arduino Uno provides the processing power and drives the serial monitor. A joystick and a Hitachi H48C accelerometer are mounted on a breadboard and wired to the Uno. The tilting of the accelerometer controls the height and left-right motion of the quadcopter on the screen. The joystick sets the the ‘copter in hover mode and lowers a ‘rescue’ line. Another LED warns when the maximum height, the vertical limit of the screen, is reached. The joystick also selects one of the three quadcopters, which have different performance characteristics.

There’s a video after the break. [Kim] provides the source code so  you use it as a reference for handling the joystick and accelerometer inputs.

More proof that what is old is new. 


Filed under: Arduino Hacks

Amateur Builds Super Deep Super Cheap Ocean Vehicle

During the summers [Doug] has been building a 75 foot sailing junk to be launched from America’s most inland port. When Oklahoma’s winter hits he heads indoors to work on an ROV that will prowl 3,000 feet below the surface. Originally building a piloted submarine, he grew bored and decided to use the sailboat as a carrier for his fleet of remote submersibles instead.

A consummate amateur, Doug is the first to admit how little he knows about anything and how much he enjoys the open source spirit: collaboration, cooperation and learning from others. Determination and hard work fills in everything in between.

Hackaday covered the beginnings of his ROV last winter. In the year since it has progressed from some sketches and a 10″ steel pipe turned into a pressure testing rig to a nearly-complete, 10 foot long,  custom-lathed 4″ aluminum torpedo laying on his shop table. In a bow-to-stern walk-through Doug shows how he is building science equipment for less than a penny on the dollar using largely off-the-shelf imaginatively-repurposed parts or things he could fabricate himself with only a lathe and a 3d printer.

Continue after the break for a breakdown of the tech used.

The body of the ROV alternates between wet (flooded) and dry sections to preserve balance. Surprisingly, the multitude of thrusters on-board are plain RC outrunners most of us would recognize from quadcopters – apparently with a little potting they are not overly harmed by immersion in salt water. Ditto for the LED banks which lack any heat-sinking, relying on exposure to near-freezing seawater for cooling. Dry sections are stuffed full of all manner of gear: a complement of HD IP cameras, RC LiPo (11.1v, 6Ah each) packs, motor ESCs, external & internal pressure sensors, humidity sensors, an inertial measurement unit and relay banks all controlled by an Arduino Mega with an ethernet shield.

The pride and joy of the electronics are an affordable pair of Lowrance sonars for ocean bed mapping, commonly used as fish-finders. He chose the model he did because the board can be collapsed smaller, making it easier to fit into a pressure vessel. Each sonar board is connected to a transducer, one side-scanning and one spotlight facing forward. These display up on the surface what the terrain looks like 150 feet away in the pitch black.

Unexposed wiring having to traverse a between dry sections is handled by brass hose barbs and sealed inside vinyl aquarium tubing. The pressure through the wet section crushes the tubing tight onto the wires. For exposed wiring, [Doug] has come up with own solution of centrifugally packing epoxy into plumbing fittings fitted with connection pins for a 2,600 PSI seal.

The ROV maintains a data connection to the surface with a simple, slightly-buoyant Cat-5e and polycord tether. 5000 feet of cord is too long of a run for household hardware so [Doug] has mounted ordinary Startech VDSL2 extenders which also reduce the wiring requirements down to a single twisted pair  (3000 feet yielded 46MBps and only 2ms lag). A bigger issue are the HD cams themselves which they found to be rather jello-like anywhere near HD performance.

When his carrier ship is finished [Doug] plans on sailing around the world, exploring the depths and doing meaningful science into retirement. He figures his $5,000 ROV will match ones sold for $1,200,000. For research projects that puts his open source ROV design in the realm of disposable relative to operations costs. For him it means he is able to own one at all.

All of [Doug]’s videos regarding both his sailing ship (with an ubiquitous $250 schoolbus diesel engine as a backup) and his ROV are superbly filmed, cut and edited. Camera angles change quickly enough to stave off boredom and show both scale and detail of the work. It is easy to spend hours watching how he overcomes each obstacle and budget hurdle.

Ever the collaborator, [Doug] is calling out for anyone who wants to stop by for a visit to work on the boat or to participate in the ROV build with advice. His videos regularly feature collaborators who travelled to help. If you feel you have something to contribute, he seems welcome for assistance.


Filed under: transportation hacks

Controlling a Quadcopter with Gestures

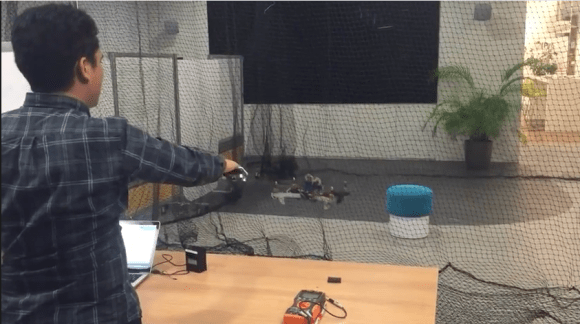
[grassjelly] has been hard at work building a wearable device that uses gestures to control quadcopter motion. The goal of the project is to design a controller that allows the user to intuitively control the motion of a quadcopter. Based on the demonstration video below, we’d say they hit the nail on the head. The controller runs off an Arduino Pro Mini-5v powered by two small coin cell batteries. It contains an accelerometer and an ultrasonic distance sensor.

The controller allows the quadcopter to mimic the orientation of the user’s hand. The user holds their hand out in front of them, parallel to the floor. When the hand is tilted in any direction, the quadcopter copies the motion and will tilt the same way. The amount of pitch and roll is limited by software, likely preventing the user from over-correcting and crashing the machine. The user can also raise or lower their hand to control the altitude of the copter.

[grassjelly] has made all of the code and schematics available via github.


Filed under: Arduino Hacks, drone hacks

A Quadcopter from Scratch

[AwesomeAwesomeness] wanted a low cost quadcopter, so he built one from scratch. Okay, not quite from scratch. [AA's] cookie mix came in the form of an Arduino Uno and some motors. He started with motors and propellers from a Hubsan X4 quadcopter. Once the power system was specified, [AA] designed a frame, arms, and motor pods in Solidworks. He printed his parts out and had a sweet quadcopter that just needed a brain.

Rather than buy a pre-made control board, [AA] started with an Arduino Uno.  An Arduino alone can’t source enough current to drive the Hubsan motors. To handle this, [AA] added a ULN2003A  Darlington transistor array. The 2003A did work, but [AA] had some glitching issues. We think FETs would do much better in this application, especially when running PWM.

On the control side of things, [AA] added an MPU-6050 Triple Axis Accelerometer and Gyro breakout from SparkFun. The 6050 has 3 gyros and 3 accelerometers in one package. Plenty for a quadcopter.

All this left was the coding. Multicopters generally use Proportional-Integral-Derivative (PID) control loops to maintain stability in the air. [AA] used the Arduino PID library for his quadcopter. He actually created two PID instances – one for pitch and one for roll.

[AA] doesn’t have any videos of his quadcopter in action yet, and we’re guessing this is due in part to weight. Lifting an Uno, a perfboard, and a frame is a tall task for those motors. Going with a one of the many tiny Arduino’s out there would help reduce weight. In addition, [AA] could use a gear system similar to what is used in the Syma X series quadcopters. Stick with it – you’re on the right track!


Filed under: drone hacks, news
Hack a Day 13 May 06:00