Posts with «video hacks» label

The Most Immersive Pinball Machine: Project Supernova

Over at [Truthlabs], a 30 year old pinball machine was diagnosed with a major flaw in its game design: It could only entertain one person at a time. [Dan] and his colleagues set out to change this, transforming the ol’ pinball legend “Firepower” into a spectacular, immersive gaming experience worthy of the 21st century.

A major limitation they wanted to overcome was screen size. A projector mounted to the ceiling should turn the entire wall behind the machine into a massive 15-foot playfield for anyone in the room to enjoy.


With so much space to fill, the team assembled a visual concept tailored to blend seamlessly with the original storyline of the arcade classic, studying the machine’s artwork and digging deep into the sci-fi archives. They then translated their ideas into 3D graphics utilizing Cinema4D and WebGL along with the usual designer’s toolbox. Lasers and explosions were added, ready to be triggered by game interactions on the machine.

To hook the augmentation into the pinball machine’s own game progress, they elaborated an elegant solution, incorporating OpenCV and OCR, to read all five of the machine’s 7 segment displays from a single webcam. An Arduino inside the machine taps into the numerous mechanical switches and indicator lamps, keeping a Node.js server updated about pressed buttons, hits, the “Lange Change” and plunged balls.

The result is the impressive demonstration of both passion and skill you can see in the video below. We really like the custom shader effects. How could we ever play pinball without them?


Filed under: classic hacks, video hacks

Spit Out VGA with Non-Programmable Logic Chips

It’s not uncommon to bitbang a protocol with a microcontroller in a pinch. I2C is frequently crunched from scratch, same with simple serial protocols, occasionally complex systems like Ethernet, and a whole host of other communication standards. But VGA gets pretty tricky because of the timing requirements, so it’s less common to bitbang. [Sven] completely threw caution to the wind. He didn’t just bitbang VGA on an Arduino, but he went one step further and configured an array of 7400 logic chips to output a VGA signal.

[Sven]’s project is in two parts. In part one, he discusses choosing a resolution and setting up the timing signal. He proceeds to output a simple(-ish) VGA signal that can be displayed on a monitor using a single gate. At that point only a red image was displayed, but getting signal lock from the monitor is a great proof of concept and [Sven] moved on to more intricate display tricks.

With the next iteration of the project [Sven] talks about adding in more circuitry to handle things like frame counting, geometry, and color. The graphics that are displayed were planned out in a simulator first, then used to design the 7400 chip configuration for that particular graphic display. It made us chuckle that [Sven] reports his monitor managed to survive this latest project!

We don’t remember seeing non-programmable integrated circuits used for VGA generation before. But bitbanging the signal on an Arduino or from an SD card slot is a great test of your ability to calculate and implement precise timings with an embedded system. Give it a try!


Filed under: video hacks
Hack a Day 16 Oct 00:01

Arduino Video Over 2 Wires for Under $50: Mesa-Video

If you want video support on your project, you might start from a device like a Raspberry Pi that comes with it built in. [Kevinhub88] doesn’t accept such compromises, so he and his Black Mesa Labs have come up with a whole new way to add video support to devices like the Arduino and other cheap controllers. This project is called Mesa-Video, and it can add digital video at a resolution of up to 800 by 600 pixels to any device that has a single serial output.

The video is created by an FT813, a low cost GPU from FTDI that offers a surprising amount of video oomph from a cheap, low power chip (he has demoed it running from a lemon battery), meaning that he is hoping to be able to sell the Mesa-Video for under $50.

However, Mesa-Video is just the beginning. [Kevinhub88] wanted to get around the problem of stacking shields on Arduinos: add more  than one and you get problems. He wanted to create an interface that would be simpler, faster and more open, so he created the Mesa-Bus. This effectively wraps SPI and I2C traffic together over a simple, fast serial connection that doesn’t require much decoding. This means that you can send power and bi-directional data over a handful of wires, and still connect multiple devices at once, swapping them out as required. You could, for instance, do your development work on a PC talking to the prototype devices over Mesa-Bus, them swap the PC out for an Arduino when you have got the first version working in your dev environment. Is the Arduino not cutting it? Because Mesa-Bus is cross-platform and open source, it is easy to swap the Arduino for a Raspberry Pi without having to change your other devices. And, because all the data is going over a simple serial connection in plain text, it is easy to debug.

It’s an ambitious project, and [Kevinhub88] has a way to go: he is currently working on getting his first prototype Mesa-Bus devices up and running, and finalizing the design of the Mesa-Video. But it is an impressive start and we’ll be keeping a close eye on this work. Hopefully he can avoid that head crab problem as well because those things are as itchy as hell.


Filed under: Arduino Hacks, video hacks
Hack a Day 01 Sep 09:00

Googly Eyes Follow You Around the Room

If you’re looking to build the next creepy Halloween decoration or simply thinking about trying out OpenCV for the first time, this next project will have you covered. [Glen] made a pair of giant googly eyes that follow you around the room using some servos and some very powerful software.

The project was documented in three parts. In Part 1, [Glen] models and builds the eyes themselves, including installing the servo motors that will eventually move them around. The second part involves an Arduino and power supply that will control the servos, and the third part goes over using OpenCV to track faces.

This part of the project is arguably the most interesting if you’re new to OpenCV; [Glen] uses this software package to recognize different faces. From there, the computer picks out the most prominent face and sends commands to the Arduino to move the eyes to the appropriate position. The project goes into great detail, from Arduino code to installing Ubuntu to running OpenCV for the first time!

We’ve featured some of [Glen]’s projects before, like his FPGA-driven LED wall, and it’s good to see he’s still making great things!


Filed under: video hacks

Eye-Controlled Wheelchair Advances from Talented Teenage Hackers

[Myrijam Stoetzer] and her friend [Paul Foltin], 14 and 15 years old kids from Duisburg, Germany are working on a eye movement controller wheel chair. They were inspired by the Eyewriter Project which we’ve been following for a long time. Eyewriter was built for Tony Quan a.k.a Tempt1 by his friends. In 2003, Tempt1 was diagnosed with the degenerative nerve disorder ALS  and is now fully paralyzed except for his eyes, but has been able to use the EyeWriter to continue his art.

This is their first big leap moving up from Lego Mindstorms. The eye tracker part consists of a safety glass frame, a regular webcam, and IR SMD LEDs. They removed the IR blocking filter from the webcam to make it work in all lighting conditions. The image processing is handled by an Odroid U3 – a compact, low cost ARM Quad Core SBC capable of running Ubuntu, Android, and other Linux OS systems. They initially tried the Raspberry Pi which managed to do just about 3fps, compared to 13~15fps from the Odroid. The code is written in Python and uses OpenCV libraries. They are learning Python on the go. An Arduino is used to control the motor via an H-bridge controller, and also to calibrate the eye tracker. Potentiometers connected to the Arduino’s analog ports allow adjusting the tracker to individual requirements.

The web cam video stream is filtered to obtain the pupil position, and this is compared to four presets for forward, reverse, left and right. The presets can be adjusted using the potentiometers. An enable switch, manually activated at present is used to ensure the wheel chair moves only when commanded. Their plan is to later replace this switch with tongue activation or maybe cheek muscle twitch detection.

First tests were on a small mockup robotic platform. After winning a local competition, they bought a second-hand wheel chair and started all over again. This time, they tried the Raspberry Pi 2 model B, and it was able to work at about 8~9fps. Not as well as the Odroid, but at half the cost, it seemed like a workable solution since their aim is to make it as cheap as possible. They would appreciate receiving any help to improve the performance – maybe improving their code or utilising all the four cores more efficiently. For the bigger wheelchair, they used recycled car windshield wiper motors and some relays to switch them. They also used a 3D printer to print an enclosure for the camera and wheels to help turn the wheelchair. Further details are also available on [Myrijam]’s blog. They documented their build (German, pdf) and have their sights set on the German National Science Fair. The team is working on English translation of the documentation and will release all design files and source code under a CC by NC license soon.


Filed under: Medical hacks, Raspberry Pi, video hacks

Joystick operated security cam will overlook the moat

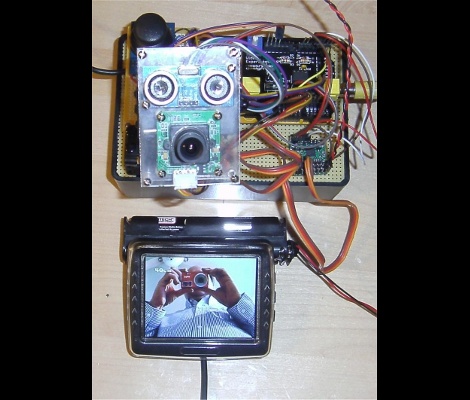
What good is a moat if nobody is guarding it? We suppose that depends on what beasties lurk beneath the surface of the water, but that’s neither here nor there. The members of LVL1 continue their quest to outdo each other in augmenting the building’s automated features. The latest offering is this security camera which is operated with an analog thumb stick.

These are the people who are building a moat (which the city things is a reflecting pool) in front of their main entrance. Now they will be able to see and sense if anyone is trying to get across the watery hazard. The hack marries an ultrasonic rangefinder and camera module with a pair of servo motors. The brackets for the motors allow a full range of motion, and the signal is translated by an Arduino and Video Experimenter shield to put out a composite video signal. That’s not going to make streaming all that easy, but we’re sure that is just one more hack away.


Filed under: Hackerspaces, video hacks