Posts with «schmitt trigger» label

Arduino Versus Logic: The Coil Gun War Continues

Looks like another shot has been fired in the simmering Coil Gun Control War. This time, [Great Scott] is taken to the discrete woodshed with a simplified and improved control circuit using a single CMOS chip and a few transistors. Where will it end? Won’t somebody think of the children?

The latest salvo is in response to [GreatScott]’s attempt to control a DIY coil gun with discrete logic, which in turn was a response to comments that he took the easy way out and used an Arduino in the original build. [Great Scott]’s second build was intended to justify the original design choice, and seemed to do a good job of explaining how much easier and better the build was with a microcontroller. Case closed, right?

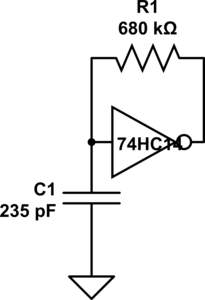
Nope. Embedded designer [fede.tft] wasn’t sure the design was even close to optimized, so he got to work — on his vacation, no less!’ He trimmed the component count down to a single CMOS chip (a quad Schmitt trigger NAND), a couple of switching transistors, the MOSFETs that drive the coils, and a few passives. The NANDs are set up as flip-flops that are triggered and reset by the projectile sensors, which are implemented as hardwired AND gates. The total component count is actually less than the support components on the original Arduino build, and [fede.tft] goes so far as to offer ideas for an alternative that does away with the switching transistors.

Even though [fede.tft] admits that [GreatScott] has him beat since he actually built both his circuits, hats off to him for showing us what can likely be accomplished with just a few components. We’d like to see someone implement this design, and see just how simple it can get.


Filed under: Arduino Hacks, weapons hacks

Hysteresis board

Now that we’re using a 74HC14 Schmitt trigger in the capacitive touch sensor for the hysteresis oscillator, that lab can be the first soldering project, in addition to learning about hysteresis.

I tried laying out a very compact PC board for the students to solder (still requiring them to do some design—they’ll have to breadboard their design first to get appropriate R and C values). I came up with one very compact design that could get 4 copies into the 50mm×50mm limit of the $1 boards from ITEAD, making the boards only 25¢ each.

Compact layout to get 4 hysteresis oscillator boards out of one 50mm×50mm board. The gutters are pretty narrow, though, and I’m not sure I’m skillful enough with the board shears to cut that accurately.  The yellow “airwires” are Eagle telling me that the Gnd and +5V wires are not connected between the different copies.

It seemed a little silly to try to squeeze the price down to 25¢, when the other parts cost 90¢: 59¢ for the screw terminals, 28¢ for the Schmitt trigger chip, 1¢ for the resistor, and 2¢ for the capacitor. With this layout it is also a little tricky for the students to properly wire the unused inputs high.

Given the high risk of ruining the boards trying to cute them with the board shears, I decided to redesign for a 50¢ board.

Much looser layout, having only two copies on the 50mm x 50mm board. This version makes it easier for the students to see how things are connected, and has lots of room for the board shears to make the cut.

The lab would now require that the students measure the thresholds of the Schmitt trigger, breadboard the hysteresis oscillator, make a touch pad out of foil and packing tape, measure the frequency of the oscillation to estimate the touch pad capacitance, adjust the parameters of the Arduino program to match the frequencies of their oscillator, solder up the board, and demonstrate it working to control an LED. I think that is plenty for a 3-hour lab.

When I set up the web pages for the course, I’ll try to make sure I put the Eagle design files (.brd and .sch) for each board the students use on the web, so that future instructors can easily order more copies of the board, even if my laptop gets run over by a beer truck.  That will also make it easier for instructors at other schools to try to duplicate the course.


Filed under: Circuits course, Printed Circuit Boards Tagged: Arduino, bioengineering, capacitive touch sensor, circuits, course design, Printed circuit board, Schmitt trigger, sensors, teaching

Hysteresis lab

Schmitt-trigger oscillator.

Since I decided in Capacitive sensing with Schmitt trigger to use an off-the-shelf Schmitt trigger chip (like a 74HC14) and a very simple oscillator, I needed to rethink the lab and expand it.  Students will no longer be spending much time on building the circuit, so we need to play with other uses for the oscillator circuit and other applications of Schmitt triggers.

The Schmitt trigger is a useful device for students to learn about, since hysteresis is an important concept in detecting signals.  Probably the first thing to have them do is to use the oscilloscope in x-y mode to see the Vout vs. Vin curve for the Schmitt trigger inverter. It would be good for them to devise a way to measure the threshold voltages accurately (with their lab writeup describing both the method used and the thresholds measured), using the equipment they have available.  Perhaps bonus points for methods that don’t require any of the bench equipment? (There are some fairly easy methods using the Arduino for voltage measurements, though precision would be limited to about 5mV.)

After characterizing the inverter, they should design and measure one-inverter oscillators for different frequencies, using different combinations of resistors and capacitors (some low-resistance, high-capacitance designs and some high-resistance, low-capacitance designs).  They should show computations for the frequency using the threshold voltages and the R and C values.  It might be worthwhile to have them estimate the parasitic capacitance of the input to the Schmitt trigger (together with the wiring).

Then they should measure capacitance by hooking up an unknown capacitor with a known resistance, measuring the frequency, and computing the capacitance.  We would have to make up some unknowns with a wide range of different values.

Finally, they should make a capacitive touch pad (a piece of aluminum foil covered with a layer of packing tape). I’ve decided that I like foil covered with packing tape better than foil wrapped in plastic wrap.  The tape may be a bit thicker, but the lack of an air bubble makes for a much more repeatable capacitance, and it is less likely to fall apart when handled.

They should use the oscillator frequency to estimate the capacitance of both the plain pad and the pad when touched by a finger.  After observing the oscillator output on the oscilloscope they should adjust the parameters of a simple hysteresis program to turn an LED on and off with the touch sensor so that a firm touch is needed to light the LED and it doesn’t flicker with a light touch:

void setup(void)
{  pinMode(2,INPUT);
   pinMode(13,OUTPUT);
}

void loop(void)
{   digitalWrite(13, LOW);
    while (pulseIn(2,HIGH) <= 60) {}
    digitalWrite(13, HIGH);
    while (pulseIn(2,HIGH) >= 45) {}
}


Filed under: Circuits course Tagged: Arduino, bioengineering, capacitive touch sensor, circuits, course design, Schmitt trigger, sensors, teaching

Capacitive sensing with Schmitt trigger

Capacitive sensing with op amps and Capacitive sensing with op amps, continued used a rather complicated circuit to make a Schmitt-trigger oscillator out of op amps:

Modified circuit for longer period. C1 is just the stray capacitance of the touch sensor, with no deliberately added capacitance.

But if we use an off-the-shelf Schmitt trigger chip (like a 74HC14), then a very simple circuit can be made to oscillate:

Schmitt-trigger oscillator.

Without a touch sensor, it oscillates at about 10 kHz. With an untouched touch sensor, the frequency drops to about 9.5 kHz. With a touched sensor, the frequency drops further to around 6.7 kHz. I can make the touch sensor have a bigger relative frequency change by reducing the capacitor to 157pF (3 470pF in series), from 15kHz down to 8kHz. This oscillator works fine with the code I wrote for the op-amp oscillator. Neither the resistor nor the capacitor values are particularly critical (as long as the addition of about 140pF from the touch drops the frequency enough to be measurable).

The Schmitt trigger is a useful device for students to learn about, since hysteresis is an important concept in detecting signals. In fact, it might not be a bad idea to have the code that detects the frequency and turns the LED on or off have some hysteresis, as code that just uses a time-out for debouncing tends to make the LED flash on and off when a near-touch is done.

This circuit is too simple for a full 3-hour lab. It can be wired in a couple of minutes and tested in a few more. I’ll have to think of other things to do with a Schmitt trigger to make this into a full lab.  Perhaps this could be an Arduino programming lab, where they start with just a simple pulseIn program and make some modifications:

void setup(void)
{  pinMode(2,INPUT);
   pinMode(13,OUTPUT);
}

void loop(void)
{
    uint8_t on = (pulseIn(2,HIGH) >= 50) ;
    digitalWrite(13, on);
}

Perhaps a simple hysteresis program:

void setup(void)
{  pinMode(2,INPUT);
   pinMode(13,OUTPUT);
}

void loop(void)
{   digitalWrite(13, LOW);
    while (pulseIn(2,HIGH) <= 50) {}
    digitalWrite(13, HIGH);
    while (pulseIn(2,HIGH) >= 40) {}
}

Students would have to measure their oscillator waveforms on the oscilloscope, then play with the constants in the code to get reliable switching. It’s still not a 3-hour lab, but it gives another view of hysteresis.

I’ll have to think about this some more.


Filed under: Circuits course Tagged: Arduino, bioengineering, capacitive touch sensor, circuits, course design, op amp, Schmitt trigger, sensors, teaching