Posts with «arduino nano» label

Why Make Coffee When You’re Tired? Let a Robot Do It for You

Like us, [Alberto] doesn’t compromise when it comes to a good cup of coffee. We figure that if he went to an office in the Before Times, he was the type of coworker to bring in their own coffee equipment so as not to suffer the office brew. Or perhaps he volunteered to order the office supplies and therefore got to decide for everyone else. Yep, that’s definitely one way to do it.

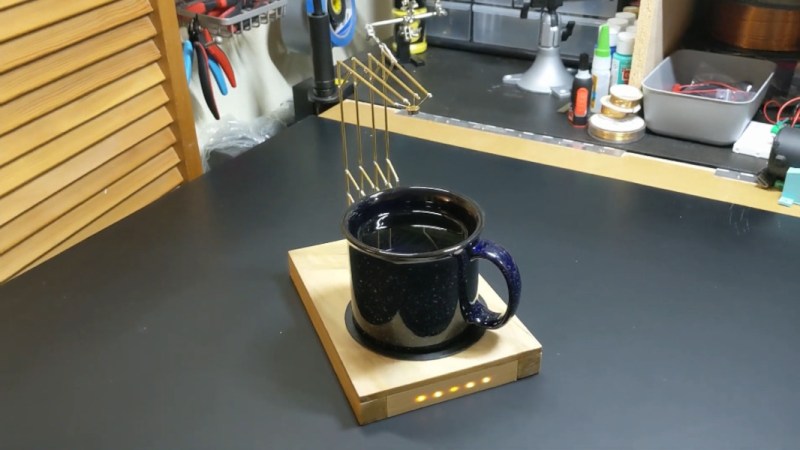
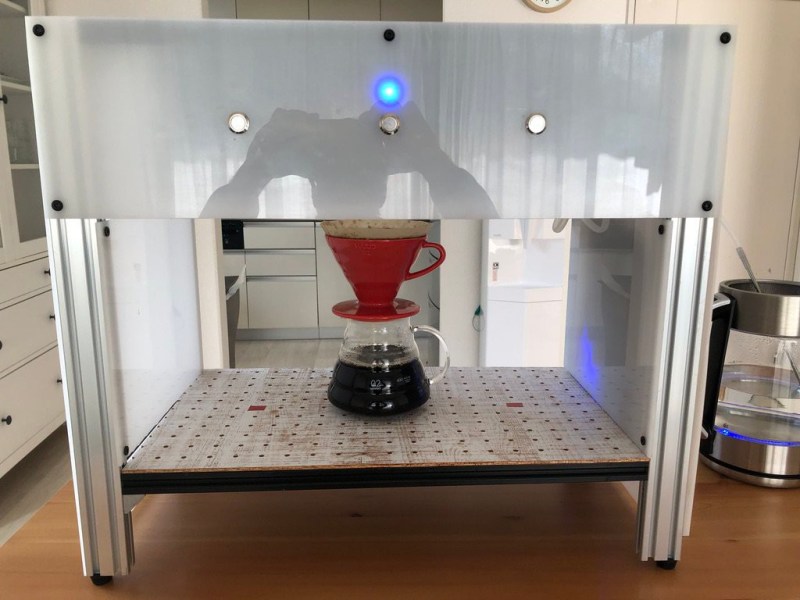
But like many of us, he is now operating out of a home office. Even so, he’s got better things to do than stand around pouring the perfect cup of coffee every morning. See, that’s where we differ, [Alberto]. But we do love Cafeino, your automated pour-over machine. It’s so sleek and lovely, and we’re sure it does a much better job than we do by hand — although we enjoy doing the pouring ourselves.

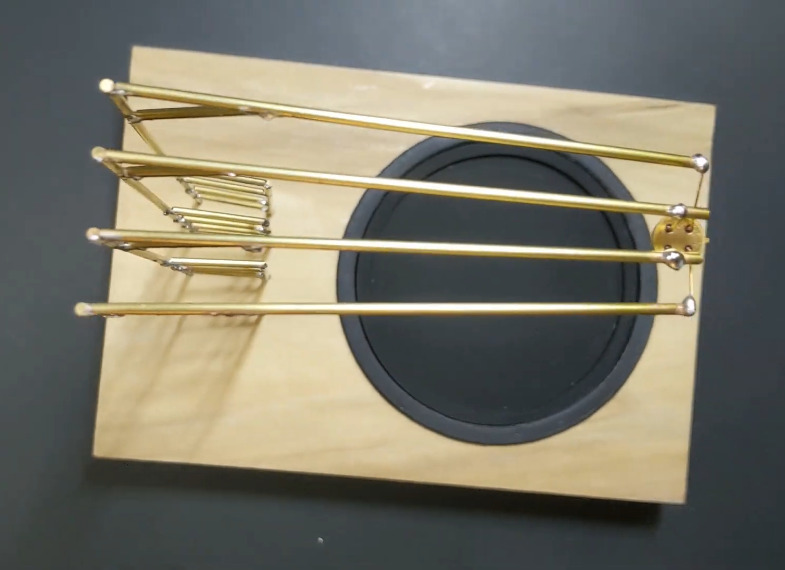
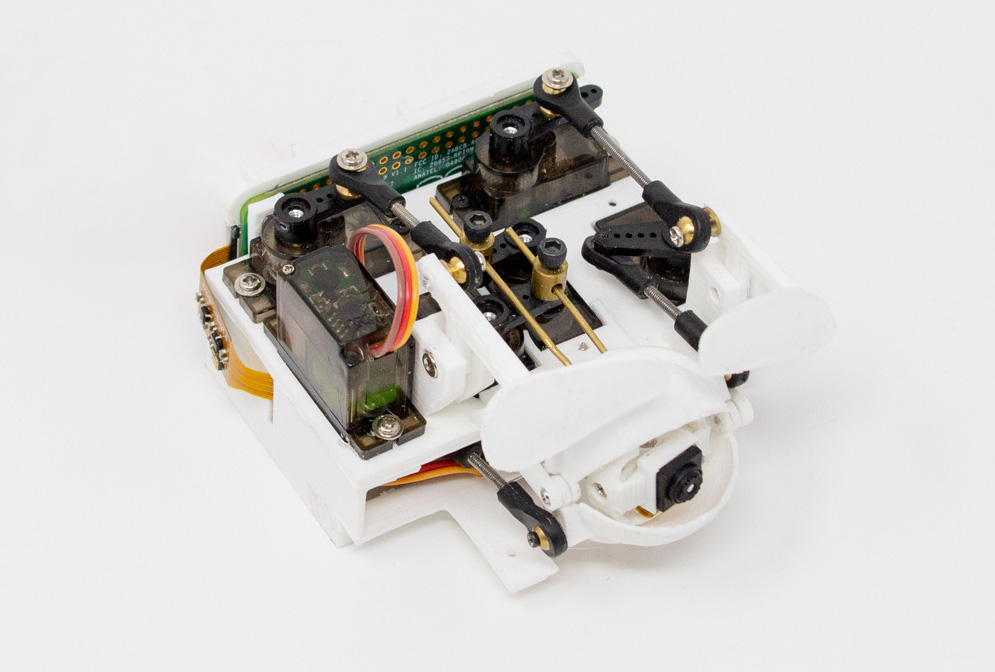
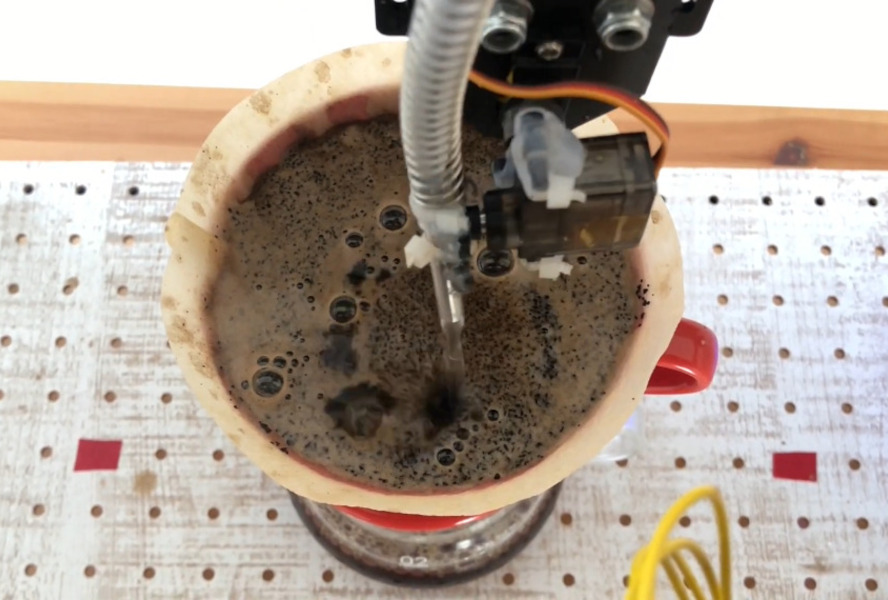
Cafeino is designed to mimic the movements of a trained barista’s hand, because evidently you’re supposed to pour the water in slow, deliberate swirls to evenly cover the grounds. (Our kettle has a chunky spout, so we just sort of wing it.) Cafeino does this by pumping water from an electric kettle and pouring a thin stream of it in circles with the help of two servos.

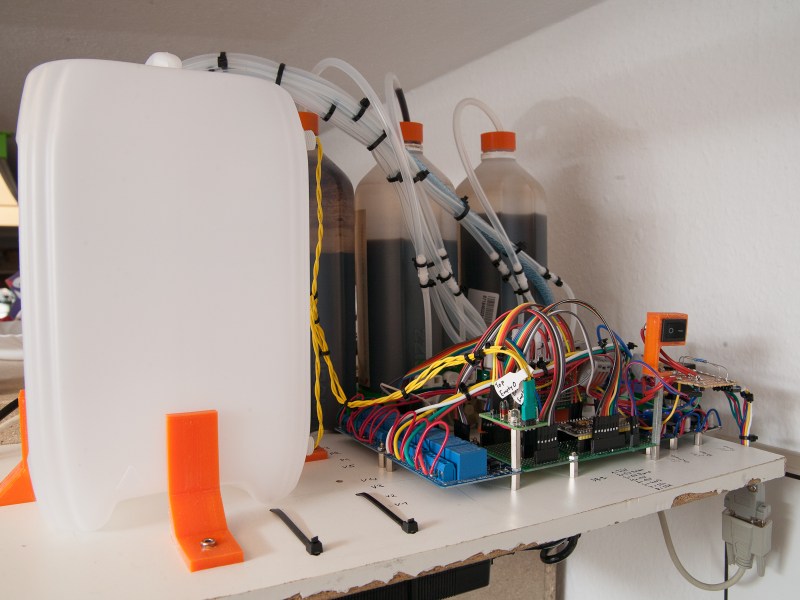
The three buttons each represent a different recipe setting, which specifies the amount of water, the hand pouring pattern, and the resting times between blooming the grounds and actually pouring the bulk of the water. These recipes are set using the accompanying web app via an ESP32, although the main brain barista is an Arduino Nano. Grab a cup and check out the demo after the break.

Got an old but modern coffee robot lying around? You could turn it into a planter with automated watering.

The HackadayPrize2021 is Sponsored by:

Arduino Nano Memory Upgrade with No Soldering

Ok, we’ll come clean. [Design Build Destroy] didn’t really add any memory to his Arduino Nano. But he did get about 1.5K more program space when compared to the stock setup. The trick? On some Nano boards and clones, the bootloader is set to use a large block of reserved memory, but Optiboot only requires a fraction of that reserved memory. By reprogramming the bootloader and changing the configuration fuses, you can reclaim that unused memory.

Of course, you can’t easily overwrite the bootloader and fuses over the serial port to prevent you from bricking your device. The video below shows how to connect another Arduino to do the programming. You could also use any dedicated AVR programmer you happen to have. Oddly, the Uno already uses Optiboot with the same processors, and is set correctly and the video shows the differences in the configuration between the two in their default state.

Of course, depending on where you get your Nano devices and their age, you may already have this set up at which point you won’t gain anything, but you should be able to easily tell if you need to go through the steps or not. The same trick will probably work with any older Arduino boards you have laying around if Optiboot supports them. What can you do with the extra memory? Maybe speech recognition?

Wood and Brass Drink Temperature Monitor Looks Good, Has Class

We’ve all been there. Your current project has hit a wall, or the next step will take days to complete, and you need something to do in the meantime. So you start a project that you envision will fit nicely in the gap, and then, inevitably, it doesn’t. Maybe it even takes so long that the original project gets finished first. So what? There’s nothing wrong with that, especially when the filler project turns out as well as this drink temperature monitor disguised as a circuit sculpture (video, embedded below). Just put your mug on the coaster, and the weight of it activates a hidden switch, which causes the sculpture to display its secret LEDs.

[MakeFunStuff] wanted to make something that looked less like a circuit and more like art, while building a tool that could determine the relative hotness of a beverage. Such a a useful circuit sculpture sounds like a tall order to us, but [MakeFunStuff] pulled it off with finesse and style.

The circuit is based around this Sputnik-looking standalone IR temperature sensor which, as [MakeFunStuff] aptly describes, is “a single-pixel infrared camera that picks up everything in a 90° cone starting at the sensor.”

[MakeFunStuff] paired this easy-to-use sensor with an Arduino Nano and five LEDs that show how hot a beverage is on a scale from 1 to 5. The sensor is hidden in plain sight, suspended from the top of the brass rod sculpture and blending in perfectly. We love that the LEDs are hidden behind a thin layer of carefully-drilled wood and agree that a drill press would have been much easier.

The code is set up for just about every temperature scale from Celsius to Rømer, so that solves that argument. [MakeFunStuff] went with the Kelvin scale because science. Our favorite thing about this video is that [MakeFunStuff] shared their failures and fixes as they built their way toward answering the questions of how to suspend the sensor over the drink, and how best to display the heat level while hiding the electronics. Go grab a hot cup of something and check it out after the break while you let it cool off the normie way.

We admit that we would likely zone out while waiting for the LEDs to disappear. Here’s a smart coaster that uses an ESP8266 to send a message to Discord when your beverage has reached the perfect drinking temperature.

Thanks for the hot tip, [Perry]!

12-Arduino Orchestra Plays Star Wars Fanfare

Back in the early days of the musical synthesizer, some designers who wished for polyphony in their instruments would simply build multiple tone-generators for as many notes as they wished to play. [Kevin] took that same approach with his Arduino orchestra, and set about having it play the closing number from Star Wars: A New Hope.

The build consists of twelve Arduino Nanos, each wired up to power, a speaker, and the same MIDI cable. The MIDI cable carries note data for each Arduino on a separate MIDI channel, allowing each to play its own role in the orchestra. [Kevin] then set about arranging the Star Wars music into a MIDI file suitable for the Arduinos, roughly setting six voices to high parts and six voices low. The Arduinos play the notes received using the simple tone() function. The result is a very chiptune rendition of the end of the fourth episode of the world’s most famous space opera.

It may not be neat, tidy, or efficient, but it certainly is fun. Twelve Arduinos bleeping away with their flashing LEDs and cute little speakers makes quite the conversation piece. It’s a similar approach to the Floppotron, which plays more notes by adding more floppy drives. We’ve also seen the same thing done with SEGA sound chips. Video after the break.

Hack a Day 11 Jun 16:00

Automated Watering Machine Has What Plants Crave: Fertilizer

We’ve seen countless automated plant care systems over the years, but for some reason they almost never involve the secret sauce of gardening — fertilizer. But [xythobuz] knows what’s up. When they moved into their new flat by themselves, it was time to spread out and start growing some plants on the balcony. Before long, the garden was big enough to warrant an automated system for watering and fertilizing.

This clever DIY system is based around a 5L gravity-fed water tank with solenoid control and three [jugs] of liquid fertilizer that is added to the water via peristaltic pump. Don’t worry, the water tank has float switches, and [xythobuz] is there to switch it off manually every time so it doesn’t flood the flat.

On the UI side, an Arduino Nano clone is running the show, providing the LCD output and handling the keypad input. The machine itself is controlled with an ESP32 and a pair of four-channel relay boards that control the inlet valve, the four outlet valves, and the three peristaltic pumps that squirt out the fertilizer. The ESP also serves up a web interface that mimics the control panel and adds in the debug logs. These two boards communicate using I²C over DB-9, because that’s probably what [xythobuz] had lying around. Check out the demo video after the break, and then go check on your own plants. They miss you!

Don’t want to buy just any old peristaltic pumps? Maybe you could print your own.

Eyecam is Watching You in Between Blinks

We will be the first to admit that it’s often hard to be productive while working from home, especially if no one’s ever really looking over your shoulder. Well, here is one creepy way to feel as though someone is keeping an eye on you, if that’s what gets you to straighten up and fly right. The Eyecam research project by [Marc Teyssier] et. al. is a realistic, motorized eyeball that includes a camera and hangs out on top of your computer monitor. It aims to spark conversation about the sensors that are all around us already in various cold and clinical forms. It’s an open source project with a paper and a repo and a how-to video in the works.

The eyebrow-raising design pulls no punches in the uncanny department: the eye behaves as you’d expect (if you could have expected this) — it blinks, looks around, and can even waggle its brow. The eyeball, brow, and eyelids are actuated by a total of six servos that are controlled by an Arduino Nano.

Inside the eyeball is a Raspberry Pi camera connected to a Raspi Zero for the web cam portion of this intriguing horror show. Keep an eye out after the break for the Eyecam infomercial.

Creepy or fascinating, it succeeds in making people think about the vast amount of sensors around us now, and what the future of them could look like. Would mimicking eye contact be an improvement over the standard black and gray oblong eye? Perhaps a pair of eyes would be less unsettling, we’re not really sure. But we are left to wonder what’s next, a microphone that looks like an ear? Probably. Will it have hair sprouting from it? Perhaps.

Yeah, it’s true; two eyes are more on the mesmerizing side, but still creepy, especially when they follow you around the room and can shoot frickin’ laser beams.

Thanks for the tip, [Sven, greg, and Itay]!

Nixie Shot Timer Adds Useful Elegance to Espresso Machine

Once you’ve ground the beans and tamped the grounds just so, pulling the perfect shot of espresso comes down to timing. Ideally, the extraction should last 20-30 seconds, from the first dark drips to the tan and tiger-striped crema on top that gives the espresso a full aftertaste.

[Marco] has a beautiful espresso machine that was only missing one thing: an equally beautiful shot timer with a Nixie tube display. Instead of messing with the wiring, [Marco] took the non-invasive approach and is using a DIY coil to detect the magnetic field of the espresso machine’s pump and start a shot timer.

An LM358-based op-amp magnifies the current induced by the machine and feeds it to an Arduino Nano, which does FFT calculations. [Marco] found a high-voltage interface driver to switch 170 V to the Nixies instead of using two handfuls of transistors. Grab yourself a flat white and check it out after the break.

The last Nixies may have been mass-produced in the 1980s, but never fear — Dalibor Farny is out there keeping the dream alive and making new Nixies.

Negative Reinforcement: Drill Bits Edition

In theory, it’s fun to have a lot of toys tools around, but the sad reality is that it’s only as fun as the organization level applied. Take it from someone who finds organization itself thrilling: it really doesn’t matter how many bits and bobs you have, as long as there’s a place for everything and you put away your toys at the end of the day.

[Cranktown City] is always leaving drill bits lying around instead of putting them back in their bit set boxes. Since he responds well to yelling, he decided to build an intelligent drill bit storage system that berates him if he takes one out and doesn’t put it back within ten minutes.

But [Cranktown City] did much more than that. The system is housed in a really nice DIY stand that supports his new milling and drilling machine and has space to hold a certain type of ubiquitous red tool box beneath the drill bits drawer.

All the bits now sit in a 3D-printed index that fits the width of the drawer. [Cranktown City] tried to use daisy-chained pairs of screws as contacts behind each bit that could tell whether the bit was home or not, but too much resistance interfered with the signal. He ended up using a tiny limit switch behind each bit instead. If any bit is removed, the input signal from the index goes low, and this triggers the Arduino Nano to do two things: it lights up a strip of red LEDs behind the beautiful cut out letters on the drawer’s lip, and it starts counting upward. Every ten minutes that one or more bits are missing, the drawer complains and issues ad hominem attacks. Check out the demo and build video after the break, but not until you put your tools away. (Have you learned nothing?)

Okay, so how do you deal with thousands of jumbled drill bits? Calipers and a Python script oughta do it.

Motor-Driven Movement Modernizes POV Toy

Just as we are driven today to watch gifs that get better with every loop, people 100+ years ago entertained themselves with various persistence of vision toys that used the power of optical illusions to make still images come to life. [jollifactory] recently recreated one of the first POV devices — the phenakistoscope — into a toy for our times.

The original phenakistoscopes were simple, but the effect they achieved was utterly amazing. Essentially a picture disk with a handle, the user would hold the handle with one hand and spin the disk with the other while looking in a mirror through slits in the disk. Unlike the phenakistoscopes of yore that could only be viewed by one person at a time, this one allows for group watching.

Here’s how it works: an Arduino Nano spins a BLDC motor from an old CD-ROM drive, and two strips of strobing LEDs provide the shutter effect needed to make the pictures look like a moving image.The motor speed is both variable and reversible so the animations can run in both directions.

To make the disks themselves, [jollifactory] printed some original phenakistiscopic artwork and adhered each one to a CD that conveniently snaps onto the motor spindle. Not all of the artwork looks good with a big hole in the middle, so [jollifactory] created a reusable base disk with an anti-slip mat on top to spin those.

If you just want to watch the thing in action, check out the first video below that is all demonstration. There be strobing lights ahead, so consider yourself warned. The second and third videos show [jollifactory] soldering up the custom PCB and building the acrylic stand.

There are plenty of modern ways to build old-fashioned POV toys, from all-digital to all-printable.

A Tubular Fairy Tale You Control with Your Phone

At first glance, this might appear to be a Rube Goldberg machine made of toys. The truth isn’t far off — it’s a remote-control animatronic story machine driven by its spectators and their phones. [Niklas Roy] and a team of volunteers built it in just two weeks for Phaenomenale, a festival centered around art and digital culture that takes place every other year.

A view of the tubes without the toys.

A red ball travels through a network of clear acrylic tubes using 3D printed Venturi air movers, gravity, and toys to help it travel. Spectators can change the ball’s path with their phones via a local website with a big picture of the installation. The ball triggers animations along its path using break beam detection and weaves a different story each time depending on the toys it interacts with.

Here’s how it works: a Raspberry Pi 4 is responsible for releasing the ball at the beginning of the track and for controlling the track switches. The Pi also hosts a server for smartphones and the 25 Arduino Nanos that control the LEDs and servos of the animatronics. As a bonus animatronic, there’s a giant whiteboard that rotates and switches between displaying the kids’ drawings and the team’s plans and schematics. Take a brief but up-close tour after the break.

This awesome art project was a huge collaborative effort that involved the people of Wolfsburg, Germany — families in the community donated their used and abandoned toys, groups of elementary school kids were brought in to create stories for the toys, and several high school kids and other collaborators realized these drawings with animatronics.

Toys can teach valuable lessons, too. Take this body-positive sushi-snarfing Barbie for example, or this dollhouse of horrors designed to burn fire safety into children’s brains.