Posts with «optiboot» label

Arduino Nano Memory Upgrade with No Soldering

Ok, we’ll come clean. [Design Build Destroy] didn’t really add any memory to his Arduino Nano. But he did get about 1.5K more program space when compared to the stock setup. The trick? On some Nano boards and clones, the bootloader is set to use a large block of reserved memory, but Optiboot only requires a fraction of that reserved memory. By reprogramming the bootloader and changing the configuration fuses, you can reclaim that unused memory.

Of course, you can’t easily overwrite the bootloader and fuses over the serial port to prevent you from bricking your device. The video below shows how to connect another Arduino to do the programming. You could also use any dedicated AVR programmer you happen to have. Oddly, the Uno already uses Optiboot with the same processors, and is set correctly and the video shows the differences in the configuration between the two in their default state.

Of course, depending on where you get your Nano devices and their age, you may already have this set up at which point you won’t gain anything, but you should be able to easily tell if you need to go through the steps or not. The same trick will probably work with any older Arduino boards you have laying around if Optiboot supports them. What can you do with the extra memory? Maybe speech recognition?

Arduinos (and other AVRs) Write To Own Flash

In this post on the Arduino.cc forums and this blog post, [Majek] announced that he had fooled the AVR microcontroller inside and Arduino into writing user data into its own flash memory during runtime. Wow!

[Majek] has pulled off a very neat hack here. Normally, an AVR microcontroller can’t write to its own flash memory except when it’s in bootloader mode, and you’re stuck using EEPROM when you want to save non-volatile data. But EEPROM is scarce, relative to flash.

Now, under normal circumstances, writing into the flash program memory can get you into trouble. Indeed, the AVR has protections to prevent code that’s not hosted in the bootloader memory block from writing to flash. But of course, the bootloader has to be able to program the chip, so there’s got to be a way in.

The trick is that [Majek] has carefully modified the Arduino’s Optiboot bootloader so that it exposes a flash-write (SPM) command at a known location, so that he can then use this function from outside the bootloader. The AVR doesn’t prevent the SPM from proceeding, because it’s being called from within the bootloader memory, and all is well.

The modified version of the Optiboot bootloader is available on [Majek]’s Github.  If you want to see how he did it, here are the diffs. A particularly nice touch is that this is all wrapped up in easy-to-write code with a working demo. So next time you’ve filled up the EEPROM, you can reach for this hack and log your data into flash program memory.

Thanks [Koepel] for the tip!


Filed under: Arduino Hacks

Sparkfun Ships 2000 MicroViews Without Bootloaders

Everyone has a bad day right? Monday was a particularly bad day for the folks at Sparkfun. Customer support tickets started piling up, leading to the discovery that they had shipped out as many as 1,934 MicroViews without bootloaders.

MicroView is the tiny OLED enabled, Arduino based, microcontroller system which had a wildly successful Kickstarter campaign earlier this year. [Marcus Schappi], the project creator, partnered up with SparkFun to get the MicroViews manufactured and shipped out to backers. This wasn’t a decision made on a whim, Sparkfun had proven themselves by fulfilling over 11,000 Makey Makey boards to backers of that campaign.

Rather than downplay the issue, Sparkfun CEO [Nathan Seidle] has taken to the company blog to explain what happened, how it happened, and what they’re going to do to make it right for their customers. This positions them as the subject of our Fail of the Week column where we commiserate instead of criticize.

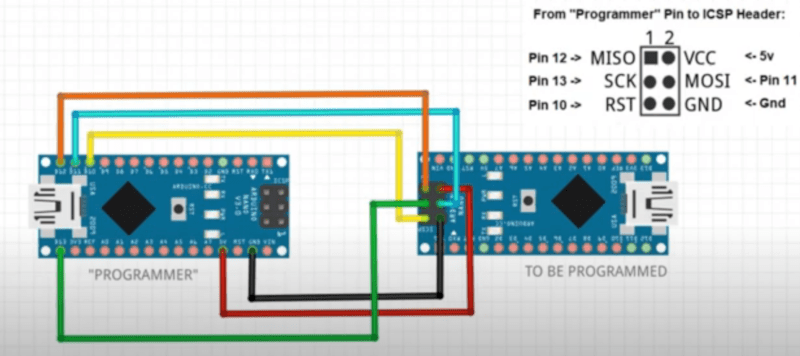
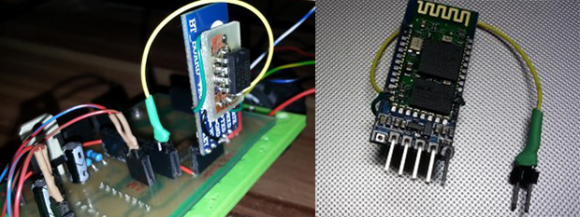
First things first, anyone who receives an effected MicroView is getting a second working unit shipped out by the beginning of November. Furthermore, the bootloaderless units can be brought to life relatively easily. [Nate] provided a hex file with the correct bootloader. Anyone with an Atmel AVR In-System Programming (ISP) programmer and a steady hand can bring their MicroView to life. Several users have already done just that. The bootloader only has to be flashed via ISP once. After that, the MicroView will communicate via USB to a host PC. Sparkfun will publish a full tutorial in a few weeks.

Click past the break to read the rest of the story.

So what went wrong? The crux of the problem is a common one to manufacturing: An incomplete production test. For many of their products, Sparkfun loads a single hex file containing the production test and the optiboot bootloader. The test code proves out the functionality of the device, and the bootloader allows the customer to flash the device with their own sketches. The problem is the bootloader normally connects to a PC host via USB. Enumerating a USB connection can take up to 30 seconds. That’s way too slow for volume production.

Sparkfun opted to skip the bootloader test, since all the pins used to load firmware were electrically tested by their production test code. This has all worked fine for years – until now. The production team made a change to the test code on July 18th. The new hex file was released without the bootloader. The production test ran fine, and since no one was testing the bootloader, the problem wasn’t caught until it was out in the wild.

The Sparkfun crew are taking several steps to make sure this never happens again.They’re using a second ATmega chip on their test fixture to verify the bootloader without the slow PC enumeration step. Sparkfun will also avoid changing firmware during a production run. If firmware has to change, they’re planning to beta test before going live on the production line. Finally, Sparkfun is changing the way they approach large scale production. In [Nathan's] own words:

Moving from low volume to mid-volume production requires a very different approach. SparkFun has made this type of mistake before (faulty firmware on a device) but it was on a smaller scale and we were agile enough to fix the problem before it became too large. As we started producing very large production runs we did not realize quality control and testing would need very different thinking. This was a painful lesson to learn but these checks and balances are needed. If it didn’t happen on Microview it would have happened on a larger production run someday in the future.

Everyone has bad days, this isn’t the first time Sparkfun has lost money due to a mistake. However, they’re doing the right thing by attacking it head on and fixing not only the immediate issue but the underlying thought process which allowed the problem to arise.


Filed under: Hackaday Columns, news

Programming Micros With Impossibly Cheap Bluetooth Adapters

[Zenios] and [Raivis] are building a small balancing robot, and for communications to the outside world, they’re using a small, extremely cheap Bluetooth adapter. They figured uploading code to the microcontroller over Bluetooth would be a good idea, but their adapter, a cheap HC-06 module, had no way of resetting the microcontroller; it just provided Tx and Rx the serial port. They did notice a LED blinked when a device wasn’t connected to the adapter, so with a simple circuit they kludged a reset circuit where it wasn’t intended.

The small LED on the HC-06 module blinks when nothing is connected, and remains on when a connection is established. Figuring a new connection would be a good time to upload new code, the guys needed to design a circuit that would stay low when the LED was blinking, and switch to high when the LED was on.

A simple RC filter took care of the blinking LED, keeping the line low until a device connected. Bringing the logic level high when the LED stayed solid required digging through a part drawer, eventually finding an LM741 p differential amplifier.

After a few small changes to the bootloader, the guys had a reliable means of flashing new firmware without the need of programming adapters or wires draped over their workspace, all with a Bluetooth adapter that shouldn’t have this capability. Video below.


Filed under: Arduino Hacks