Posts with «fail of the week» label

Fail of the Week: The Arduino Walkie That Won’t Talkie

There’s something seriously wrong with the Arduino walkie-talkie that [GreatScott!] built.

The idea is simple: build a wireless intercom so a group of motor scooter riders can talk in real-time. Yes, such products exist commercially, but that’s no fun at all. With a little ingenuity and a well-stocked parts bin, such a device should be easy to build on the cheap, right?

Apparently not. [GreatScott!] went with an Arduino-based design, partly due to familiarity with the microcontroller but also because it made the RF part of the project seemingly easier due to cheap and easily available nRF24 2.4 GHz audio streaming modules. Everything seems straightforward enough on the breadboard – an op-amp to boost the signal from the condenser mic, a somewhat low but presumably usable 16 kHz sampling rate for the ADC. The radio modules linked up, but the audio quality was heavily distorted.

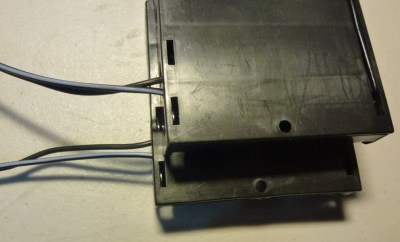
[GreatScott!] assumed that the rat’s nest of jumpers on the breadboard was to blame, so he jumped right to a PCB build. It’s a logical step, but it seems like it might be where he went wrong, because the PCB version was even worse. We’d perhaps have isolated the issue with the breadboard circuit first; did the distortion come from the audio stage? Or perhaps did the digitization inject some distortion? Or could the distortion be coming from the RF stage? We’d want to answer a few questions like that before jumping to a final design.

We love that [GreatScott!] has no issue with posting his failures – we’ve covered his suboptimal CPU handwarmer, and his 3D-printed BLDC motor stator was a flop too. It’s always nice to post mortem these things to avoid a similar fate.

Fail Of The Week: Arduino Sand Matrix Printer

NYC beaches are where tropical beaches addicted to meth go to die. So says [Vije Miller] in his write-up for his Arduino sand matrix printer. It’s a clever idea, five servo-operated cardboard plungers that indent a pattern of dots in the sand as the device is pulled forward, resulting in something not unlike a dot matrix printer that can write messages in the sand.

He’s submitted it to us as a Fail Of The Week, because it doesn’t do a very good job of writing in the sand, and it’s burned out a servo. But we feel this isn’t entirely fair, because whether or not it has delivered the goods it’s still an excellent build. Cardboard isn’t a material we see much of here at Hackaday, but in this case he’s mastered it in a complex mechanism that while it may have proved a little too flexible for the job in hand is nevertheless a rather impressive piece of work.

You can see a brief video below the break showing it in action. He tells us his motivation has waned on this project, and expresses the hope that others will take up the baton and produce a more viable machine.

This may be our first sand matrix printer, but it’s not our first sand 3D printer.


Fail of the Week is a Hackaday column which celebrates failure as a learning tool. Help keep the fun rolling by writing about your own failures and sending us a link to the story — or sending in links to fail write ups you find in your Internet travels.


Filed under: Arduino Hacks, Fail of the Week

Fail Of The Week: Don’t Tie Those Serial Lines High

Fail Of The Week is a long-running series here at Hackaday. Over the years we’ve been treated to a succession of entertaining, edifying, and sometimes downright sad cock-ups from many corners of the technological and maker world.

You might think that we Hackaday writers merely document the Fails of others, laughing at others’ misfortunes like that annoying kid at school. But no, we’re just as prone to failure as anyone else, and it is only fair that we eat our own dog food and tell the world about our ignominious disasters when they happen.

And so we come to my week. I had a test process to automate for my contract customer. A few outputs to drive some relays, a few inputs from buttons and microswitches. Reach for an Arduino Uno and a prototyping shield, divide the 14 digital I/O lines on the right into 7 outputs and 7 inputs. Route 7 to 13 into a ULN2003 to drive my relays, tie 0 to 6 high with a SIL resistor pack so I can trigger them with switches to ground. Job done, and indeed this is substantially the hardware the test rig ended up using.

So off to the Arduino IDE to write my sketch. No rocket science involved, a fairly simple set of inputs, outputs, and timers. Upload it to the Arduino, and the LED on pin 13 flashes as expected. Go for a well-deserved lunch as a successful and competent engineer who can whip up a test rig in no time.

Back at the bench refreshed by the finest British pub grub, I started up the PC, plugged the shield into the Arduino, and applied the power. My sketch worked. But wait! There’s a slight bug! Back to the IDE, change a line or two and upload the sketch.

And here comes my fail. The sketch wouldn’t upload, the IDE reported a COM port error. “Damn’ Windows 10 handling of USB serial ports”, I thought, as I’m not a habitual Windows user on my own machines. Then followed something I’ve not done for quite a while; diving into the Windows control panel to chase the problem. Because it had to be a Windows problem, right?

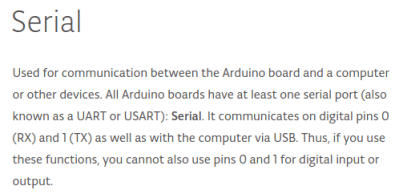
The seasoned Arduinisti among you probably spotted my fail four paragraphs ago. We all know that pins 0 and 1 on an Arduino are shared with the serial port, but who gives it a second thought? I guess I’d always had the good fortune to drive those pins from lines which didn’t enforce a logic state, and had never ended up tying them high. Hold them to a logic 1, and the Arduino can’t do its serial thing so sketches stay firmly in the IDE.

I could have popped the shield off every time I wanted to upload a new sketch, but since in the event I didn’t need all those inputs I just lifted the links tying those pins high and shifted the other inputs up the line. And went home that evening a slightly less competent engineer whose ability to whip up a test rig in no time was a bit tarnished. Ho hum, at least the revised sketch worked and the test rig did its job exactly as it should.

So that’s my Fail Of The Week. What’s yours?

Header image: pighixxx.com, CC-BY-ND via MarkusJenkins


Fail of the Week is a Hackaday column which celebrates failure as a learning tool. Help keep the fun rolling by writing about your own failures and sending us a link to the story — or sending in links to fail write ups you find in your Internet travels.


Filed under: Arduino Hacks, Fail of the Week

Fail of the Week: Battery Pack Jack Wired Backwards

Last Saturday I had a team of teenage hackers over to build Arduino line-following robots from a kit. Everything went well with the mechanical assembly and putting all the wires on the correct pins. The first test was to check that the motors were moving in the proper direction. I’d written an Arduino program to test this. The first boy’s robot worked fine except for swapping one set of motor leads. That was anticipated because you cannot be totally sure ahead of time which way the motors are going to run.

The motor’s on the second robot didn’t turn at all. As I checked the wiring I smelled the dreaded hot electronics smell but I didn’t see any smoke. I quickly pulled the battery jack from the Arduino and – WOW! – the wires were hot. That didn’t bode well. I checked and the batteries were in the right way. A comparison with another pack showed the wires going into the pack were positioned properly. I plugged in another pack but the motors still didn’t run.

I got my multimeter, checked the voltage on the jack, and it was -5.97 V from center connector to the barrel. The other pack read 6.2 V. I had a spare board and pack so swapped those and the robot worked fine. Clearly the reverse polarity had zapped the motor control ICs. After that everyone had a good time running the robots on a course I’d laid out and went home pleased with their robots.

After they left I used the ohmmeter to check the battery pack and found the wiring was backwards, as you can see in the feature photo. A close inspection showed the wire with a white line, typically indicating positive, indeed went to the positive battery terminal. I shaved the barrel connector down to the wires and the white line wire was connected to the outside of the barrel. FAIL!

This is a particularly bad fail on the part of the battery pack supplier because how hard is it to mess up two wires? You can’t really fault the robot kit vendor because who would expect a battery pack to be bad? The vendor is sending me a new battery pack and board so I’m satisfied. Why did I have an extra board and pack, actually an entire kit? For this exact reason; something was bound to go wrong. Although what I had imagined was for one of the students to break a mechanical part or change wiring and zap something. Instead, we were faced with a self-destructing kit. Prudence paid off.


Filed under: Arduino Hacks, Fail of the Week, Hackaday Columns

Sparkfun Ships 2000 MicroViews Without Bootloaders

Everyone has a bad day right? Monday was a particularly bad day for the folks at Sparkfun. Customer support tickets started piling up, leading to the discovery that they had shipped out as many as 1,934 MicroViews without bootloaders.

MicroView is the tiny OLED enabled, Arduino based, microcontroller system which had a wildly successful Kickstarter campaign earlier this year. [Marcus Schappi], the project creator, partnered up with SparkFun to get the MicroViews manufactured and shipped out to backers. This wasn’t a decision made on a whim, Sparkfun had proven themselves by fulfilling over 11,000 Makey Makey boards to backers of that campaign.

Rather than downplay the issue, Sparkfun CEO [Nathan Seidle] has taken to the company blog to explain what happened, how it happened, and what they’re going to do to make it right for their customers. This positions them as the subject of our Fail of the Week column where we commiserate instead of criticize.

First things first, anyone who receives an effected MicroView is getting a second working unit shipped out by the beginning of November. Furthermore, the bootloaderless units can be brought to life relatively easily. [Nate] provided a hex file with the correct bootloader. Anyone with an Atmel AVR In-System Programming (ISP) programmer and a steady hand can bring their MicroView to life. Several users have already done just that. The bootloader only has to be flashed via ISP once. After that, the MicroView will communicate via USB to a host PC. Sparkfun will publish a full tutorial in a few weeks.

Click past the break to read the rest of the story.

So what went wrong? The crux of the problem is a common one to manufacturing: An incomplete production test. For many of their products, Sparkfun loads a single hex file containing the production test and the optiboot bootloader. The test code proves out the functionality of the device, and the bootloader allows the customer to flash the device with their own sketches. The problem is the bootloader normally connects to a PC host via USB. Enumerating a USB connection can take up to 30 seconds. That’s way too slow for volume production.

Sparkfun opted to skip the bootloader test, since all the pins used to load firmware were electrically tested by their production test code. This has all worked fine for years – until now. The production team made a change to the test code on July 18th. The new hex file was released without the bootloader. The production test ran fine, and since no one was testing the bootloader, the problem wasn’t caught until it was out in the wild.

The Sparkfun crew are taking several steps to make sure this never happens again.They’re using a second ATmega chip on their test fixture to verify the bootloader without the slow PC enumeration step. Sparkfun will also avoid changing firmware during a production run. If firmware has to change, they’re planning to beta test before going live on the production line. Finally, Sparkfun is changing the way they approach large scale production. In [Nathan's] own words:

Moving from low volume to mid-volume production requires a very different approach. SparkFun has made this type of mistake before (faulty firmware on a device) but it was on a smaller scale and we were agile enough to fix the problem before it became too large. As we started producing very large production runs we did not realize quality control and testing would need very different thinking. This was a painful lesson to learn but these checks and balances are needed. If it didn’t happen on Microview it would have happened on a larger production run someday in the future.

Everyone has bad days, this isn’t the first time Sparkfun has lost money due to a mistake. However, they’re doing the right thing by attacking it head on and fixing not only the immediate issue but the underlying thought process which allowed the problem to arise.


Filed under: Hackaday Columns, news