Posts with «repair hacks» label

New Brains Save 12 V Fridge From the Scrap Heap

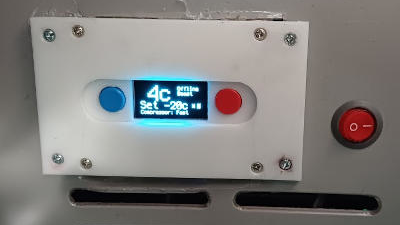
Recently [nibbler]’s Evakool 55L vehicle fridge started to act strangely, reporting crazy temperature errors and had no chance of regulating. The determination was that the NTC thermistor was toast, and rather than trying to extricate and replace this part, it was a lot easier to add a new one at a suitable location

Bog-standard fridge internals

A straight swap would have been boring, so this was a perfect excuse for an overboard hack. Reverse engineering the controller wouldn’t be easy, as the data wasn’t available, as is often the case for many products of this nature.

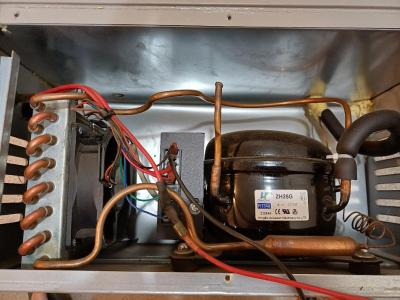
While doing a brain transplant, the hacker way, we can go overboard and add the basics of an IoT control and monitoring system. To that end, [nibbler] learned as much as possible about the off-the-shelf ZH25G compressor and the associated compressor control board. The aim was to junk the original user interface/control board and replace that with a Raspberry Pi Pico W running CircuitPython.

For the display, they used one of the ubiquitous SH1106 monochrome OLED units that can be had for less than the cost of a McDonald’s cheeseburger at the usual purveyors of cheap Chinese electronics.  A brief distraction was trying to use a DS18B20 waterproof thermometer probe, which they discovered didn’t function, so they reverted to tried and trusted tech — a simple NTC thermistor.

Testing testing

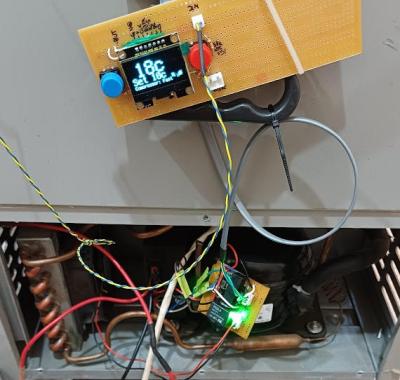
The final puzzle piece was to interface the Pico to the compressor controller. The controller expected a variable resistance to control the speed, for which they could have used a digitally controlled potentiometer. However, after failing to tame this particular beast, an easier solution was to build a small PCB with a few relays and some fixed resistors and call it a hack.

An annoyance was the lack of interrupt support in CircuitPython. This meant that interpreting the fault codes from the controller would be a bit tricky. The solution was to wedge in another microcontroller, a small Arduino. Its job is to sit there, listen for commands on the serial port, control the relay board to drive the compressor, listen for any error codes, and pass those back to the Pico. Of course, this could have all been done directly on the Pico, just not with CircuitPython, and a lot more learning would have been needed.

Of course, you need to own a working refrigerator to hack it, but you can easily build it from scratch. Even on a tight budget, you can get your beers cold. Needs must!

Mademoiselle Pinball Table Gets Rock ‘n Roll Makeover

Once upon a time, there was a music venue/artist collective/effects pedal company that helped redefine industry in Williamsburg, Brooklyn. That place was called Death By Audio. In 2014, it suffered a death by gentrification when Vice Media bought the building that DBA had worked so hard to transform. From the ashes rose the Death By Audio Arcade, which showcases DIY pinball cabinets made by indie artists.

Their most recent creation is called A Place To Bury Strangers (APTBS). It’s built on a 1959 Gottlieb Mademoiselle table and themed around a local noise/shoegaze band of the same name that was deeply connected to Death By Audio. According to [Mark Kleeb], this table is an homage to APTBS’s whiz-bang pinball-like performance style of total sensory overload. Hardly a sense is spared when playing this table, which features strobe lights, black lights, video and audio clips of APTBS, and a fog machine. Yeah.

[Mark] picked up this project from a friend, who had already cut some wires and started hacking on it. Nearly every bit of the table’s guts had to be upgraded with OEM parts or else replaced entirely. Now there’s a Teensy running the bumpers, and another Teensy on the switches. An Arduino drives the NeoPixel strips that light up the playfield, and a second Uno displays the score on those sweet VFD tubes. All four micros are tied together with Python and a Raspi 3.

If you’re anywhere near NYC, you can play the glow-in-the-dark ball yourself on July 15th at Le Poisson Rouge. If not, don’t flip—just nudge that break to see her in action. Did we mention there’s a strobe light? Consider yourself warned.

Want to get into DIY pinball on a smaller scale? Build yourself a sandbox and start playing.

Reviving an Electron Microscope with Arduino

We don’t know about you, but when our friends ask us if we want to help them fix something, they’re usually talking about their computer, phone, or car. So far it’s never been about helping them rebuild an old electron microscope. But that’s exactly the request [Benjamin Blundell] got when a friend from a local hackerspace asked if he could take a look at a vintage Cambridge Stereoscan 200 they had found abandoned in a shed. Clearly we’re hanging out with the wrong group of people.

As you might imagine, the microscope was in desperate need of some love after spending time in considerably less than ideal conditions. While some of the hackerspace members started tackling the hardware side of the machine, [Benjamin] was tasked with finding a way to recover the contents of the scope’s ROM. While he’s still working on verification, the dumps he’s made so far of the various ROMs living inside the Stereoscan 200 have been promising and he believes he’s on the right track.

The microscope uses a mix of Texas Instruments 25L32 and 2516 chips, which [Benjamin] had to carefully pry out after making sure to document everything so he knew what went where. A few of the chips weren’t keen on being pulled from their home of 30-odd years, so there were a few broken pins, but on the whole the operation was a success.

Each chip was placed in a breadboard and wired up to an Arduino Mega, as it has enough digital pins to connect without needing a shift register. With the wiring fairly straightforward, [Benjamin] just needed to write up some code to read the contents of the chip, which he has graciously provided anyone else who might be working on a similar project. At this point he hasn’t found anything identifiable in his ROM dumps to prove that they’ve been made successfully, all he really knows right now is that he has something. At least it’s a start.

More and more of these older electron microscopes are getting a second lease on life thanks to dedicated hackers in their home labs. Makes you wonder if there’s ever going to be a piece of hardware the hacker community won’t bend to their will.

Using an Arduino to Re-Create a Computer’s Keyboard Decoder

[Max Breedon] found an old Apple IIe clone twenty years ago. He recently dug this Epson AP-200 out of the salvage heap and quickly discovered that the keyboard decoder chip was fried. The old chip was way too obscure to source a replacement — and soon this post will be the top Google result for the string, ‘C35224E’ — so he busted out his trusty UNO and created a replacement keyboard decoder.

Unlike the Apple II, where all the keyboard decoding happens on the keyboard, this clone used a dedicated chip on the main board. Although it’s a rare part that’s virtually ungoogleable, this chip’s architecture and pinout can be figured out by testing out every trace for continuity. After locating what looked like four data pins, he had the Arduino send signals onto the clone to see what characters popped up. That didn’t work, but it led him to idea that two of the wires were clock and data, and after a bit of experimenting figured out that the third pin was a latch enable of some sort that sent the character.

So, [Max] created an Arduino rig to do the same thing. The Arduino uses a shift register to interact with the keyboard’s 8×10 matrix, and the sketch translates any serial data it receives into the keypresses the clone is expecting. After prototyping with the UNO, [Max] hardwired an Arduino Nano (as well as the shift register) into a daughter board with pins extending into the old chip’s sockets. A permanent solution!

In addition to a weird keyboard controller that has been lost to the sands of time, this Apple IIe clone features a few more parts that are downright weird. There are two chips that are found in a few other Apple clones labeled STK 65301 and STK 65371, used as ASICs, MMUs, or a 20-IC expression of Wozzian brilliance condensed into custom silicon. There’s another weird chip in this clone, a 27c32 ROM loaded up with repetitive bits. There is no obvious 6502 code or strings in this ROM, so if anyone has an idea what this chip does, send [Max] a note.


Filed under: repair hacks

Solving Arduino’s stk500_getsync() error

[psgarcha] took a year-old Arduino Uno on an international trip and upon returning found something was wrong. Every time he would try to upload, he would get the dreaded avrdude error, ‘stk500_getsync(): not in sync resp=0×00′. The Rx light would blink a few times during the attempted upload, but the tx light did not. Somehow, something was terribly wrong with the ‘duino, and [psgarcha] dug deep to figure out why.

To test the quality of the Arduino’s serial connection, [psgarcha] performed a loopback test; basically a wire plugged into the Tx and Rx pins of the Arduino. Sending a short message through the serial port showed the problem wasn’t the USB cable, the ATmega16u2 on the ‘duino, or any traces on the board. This would require more thought.

The main reason for the error would then be no communication between the computer and the ‘duino, the wrong COM port selected, the wrong board selected in the Arduino text editor, or timing errors or a corrupt bootloader. The first three errors were now out of the question, leaving timing errors and a corrupt bootloader. Troubleshooting then moved on to ordering a new programmer, and still this didn’t work with the broken Uno.

Frustrated with one of the greatest failures to become an Arduino tinkerer, [psgarcha] took a good, long look at the Uno board. He glanced over to an Arduino Mega board. Something looked different. On the Uno, the resonator had blown off. Problem found, at least.

Replacing the blown part with a hilariously large can crystal oscillator, [psgarcha] was back in business. This isn’t how you would fix 99% of getsync() errors, and it’s difficult imagining a situation where a this part would randomly blow, but if you’re ever looking at a nearly intractable problem, you need to start looking at what really shouldn’t fail.

Awesome rework, though.


Filed under: Arduino Hacks, repair hacks