Posts with «burning man» label

Burning Man camp marker with dancing LED robots

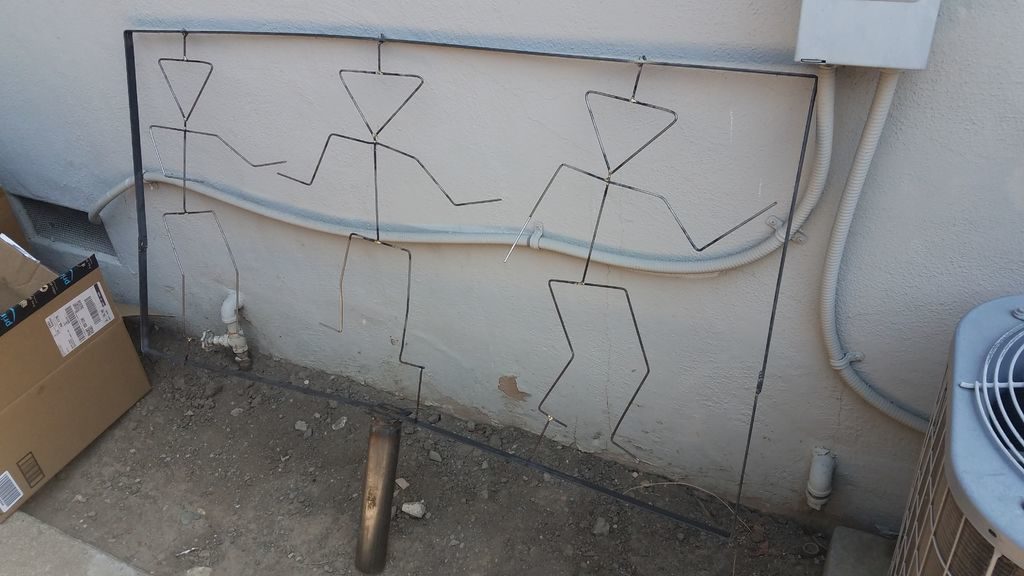
Instructables user “r570sv” needed a marker to find his way back to camp at Burning Man 2018, and decided to make a trio of LED dancing robots that could be raised high up on a pole. The idea is that he could see this from anywhere in the desert, making it great for this particular event—and perhaps for later expeditions, such as beach camping.

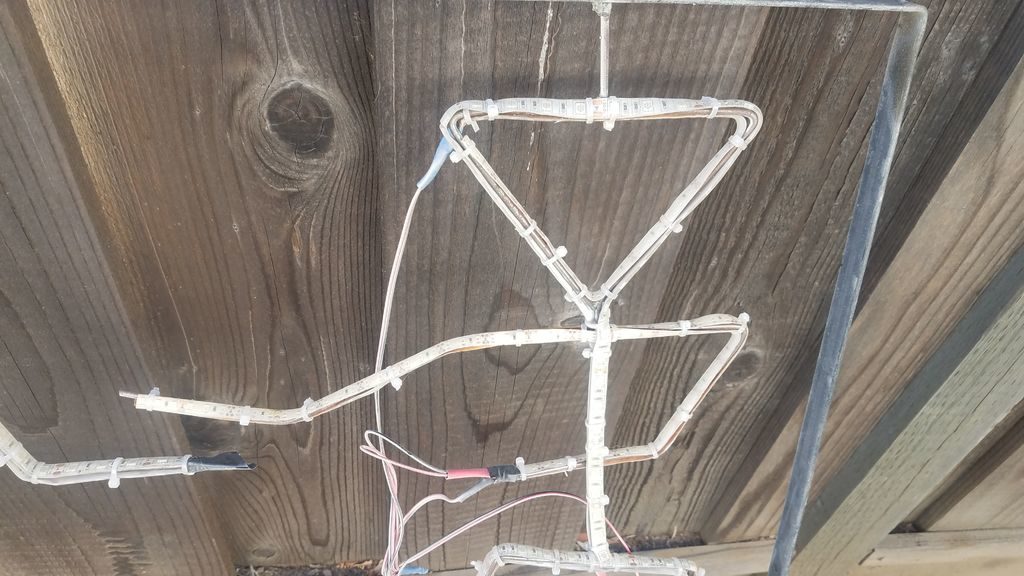
The robots were bent out of 1/8” steel wire, with single-color red LED strips affixed to it using zip ties. Three robotic panels are sequentially lit up using an Arduino and a bank of relays to form animations, similar to a neon sign. The flagpole used to raise the animated sculpture was affixed to his truck, creating a sturdy base as well as convenient source of 12V power.

I wanted to make something so I could find our camp at night at Burning Man 2018. 2018 was a robot theme and I’m a fan of neon but no way was gonna head that route so I came up with an idea about a dancing cocktail glass kinda robot.

We beach camp and have sand rails so I know how useful flying some kind of flag can be during the day and some kind of LED light pole is at night. So I figured, use it an burning man and keep using when we go to the beach.

So using metal and welding is in my wheel house and I’m good with Arduinos so that’s the medium that I chose to implement this project in.

Helmet of many LEDs built for Burning Man

This motorcycle helmet was heavily altered to accept all of the hardware that goes into driving that huge array of LEDs. [Brian Cardellini] built it to wear at burning man. He claims to have been in over his head with the project, but we certainly don’t get that feeling when we see the thing in action. It’s light on build details, but there are plenty of demo shots in the video after the break. The animation and fading action really gets started about a minute and a half into it.

One of the early frames of the video is a shot of the parts order webpage. Since it’s an HD clip we were able to glean a few bits and pieces from that. It includes a MAX7219 LED Display Driver and fifteen 25-packs of Blue LEDs. Now that chip is a great choice, and one of the later shots shows two of them on breakout board driven by an Arduino. The look is very clean since he carved out most of the helmet’s padding to make room for the electronics.

[via Adafruit]


Filed under: led hacks, wearable hacks

Building an artificial moon for Burning Man

If you were lucky enough to score passes to this year’s Burning Man, be sure to keep a look out for [Laurence Symonds] and crew, who are putting together an ambitious fixture for the event. In reality, we’re guessing you won’t have to look far to find their giant moon replica floating overhead – in fact it will probably be pretty hard to miss.

They are calling the sculpture “Lune and Tide”, which of an 8 meter wide internally lit moon which hovers over a spinning platform that’s just as big across. The inflatable sphere is made up of giant ripstop nylon panels which are home to 36,000-odd sewn-in LEDs. The LEDs illuminate the sphere to reflect the natural color of the moon, though with a simple command, [Laurence] and Co. can alter the lighting to their heart’s content.

If Hack a Day’s [Jesse Congdon] makes his way out to the festival again this year, we’ll be sure he gets some footage of Lune and Tide in action. For now, you’ll have to satisfy your curiosity by checking out the project’s build log.


Filed under: arduino hacks, led hacks

Suit Success, Refurbishment...

Three nights out on the playa, the light suit did not disappoint! So much fun to embody the bouncing red LED, for me and folks around me. It ran so much the second night-- music response mode and a high brightness can really draw current-- that I went through both batteries, ending the night unlit! The third night with all batteries charged and on-hand, there was no shortage of power and I ran it bright, but it was getting rough after so many miles, with a few segments not responding and a few dead 3-LED groups. All the time, the system worked beautifully, and I left it running when I finally took it off and stuffed it in a box Sunday morning, rippling and flickering, so bright before switching off.

Taking it out of the box Thursday in a puff of dust, a few segments did not respond but the system worked just as when I put away. I stripped out the main left arm board, all board-to-board cabling, the MOSFET boards, and then the light strips, pulling them off one at a time, removing the right arm accelerometer last. The suit and (surprisingly) sneakers made it through the wash and look great. I'm checking LED strips now, making a to-do list of fixes, remakes, and changes. I'll clean off all the boards and hook it together for a full pre-test, and then stuff it back in the suit.

Flight Suit Works!

So much to do before we take off for BRC but the suit is fully functional!

I'll post photos and videos and all design files after the long weekend at some point, but here's a video showing the audio mode, which was the target all along:


Polishing work to deal with:
  • Test foot "A" and "B" strips Velcroed to shoes; hook and loop glue should be cured by tonight.
  • Finish remote control: straighten display, sand outside, glue top layers.
  • Tidy up buttonhole wiring and shift bands to correct alignment along Velcro loop bands.
  • Finalize light strip lengths: clip any extra length and seal ends.
  • Come up with a better remote control attachment... clip? hook? Velcro?
  • Make a cover for the ZX-Sound audio input board.

LED (F)Light Suit: Ramping Up

I've been mesmerized by bouncing red LED's since the early '80s. LED's were mostly red, needle-style VU meters were on the outs, we hadn't yet graduated to green-yellow-red meters, and I grew a special place in my heart for those bouncing red lights. We also had KITT and the Cylons: bouncing red lights were and still are awesome ("rad" had not been invented yet).

I put together a black flight suit with red EL-wire segments for Burning Man in 2008 but did not have time to build the sequencer and control system I envisioned, so it was an on/off affair, or it pulsated to the music before the small batteries died.

Working on a suit for this year's burn, I've decided to return to the original concept-- red LED's-- and am working on the major areas now:
  • Suit electronics: Arduino core, I2C port expander w/PWM output using PCA9685 16-channel, 12-bit PWM I2C-bus LED controller driving power MOSFETs, one per segment. There are 17 segments in my design, so I'll use the port expander and then another spare pin to trigger the 17th channel.
  • Audio metering: I have a MaceTech Shifty VU shield working but I wonder about adjusting levels on the fly, and how to best get a mic input to it or something similar. There will be other modes for sequencing the lights, but bouncing VU meter is the primary mode I'm looking for.
  • Segment planning: location and length of each segment, power lead routing, attachment to suit. This is going well, with the first seven (of 22) segments cut and tested last night from my first 5M strip from DealExtreme; the suit will need 53' of light strip so I've ordered more.
  • Power: rechargable 12V power packs are easy to get; not sure how to recharge them on the Playa.
  • Remote control: would like to have a small, wireless remote to control modes and mode parameters.
  • The program: I have a list of modes I'd like to switch between, some of which have parameters I'll want to adjust on the fly. Ideally I'll be able to edit the program during the day if I come up with new ideas while I'm in BRC.