Posts with «arduino hacks» label

Reading punch cards with an Arduino and digital camera

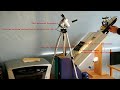
[digitaltrails] wanted the data on a few old IBM 80-column punch cards he had lying around, but didn’t have decades old computer hardware in his garage. He decided to build his own out of LEGO, an Arduino, a digital camera, and a bit of Python.

The hardware portion of [digitaltrails] build includes a crank-operated feed mechanism made entirely out of LEGO. For each turn of the crank, the feed mechanism sends one card down a chute where a photodetector wired into an Arduino tells a camera to take a picture. After that, a servo is activated, sending the card into the ‘already scanned’ bin.

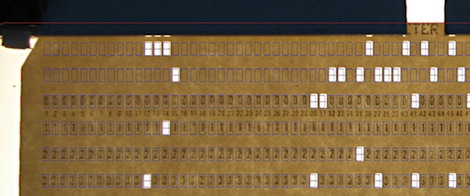
On the software side of the build, [digitatrails] used the Python Imaging Library to scan one row of pixels where each column is expected to be. The software outputs the code and data contained on the 80-column card as well as a very cool ASCII art version of each card.

Considering you just can’t go down to Fry’s and buy an IBM 80-column punch card reader, we’re loving [digitatrails]‘ clever way of getting data off an otherwise unreadable storage medium. Check out the video of the card reader in action after the break.


Filed under: arduino hacks, classic hacks, digital cameras hacks

Building an artificial moon for Burning Man

If you were lucky enough to score passes to this year’s Burning Man, be sure to keep a look out for [Laurence Symonds] and crew, who are putting together an ambitious fixture for the event. In reality, we’re guessing you won’t have to look far to find their giant moon replica floating overhead – in fact it will probably be pretty hard to miss.

They are calling the sculpture “Lune and Tide”, which of an 8 meter wide internally lit moon which hovers over a spinning platform that’s just as big across. The inflatable sphere is made up of giant ripstop nylon panels which are home to 36,000-odd sewn-in LEDs. The LEDs illuminate the sphere to reflect the natural color of the moon, though with a simple command, [Laurence] and Co. can alter the lighting to their heart’s content.

If Hack a Day’s [Jesse Congdon] makes his way out to the festival again this year, we’ll be sure he gets some footage of Lune and Tide in action. For now, you’ll have to satisfy your curiosity by checking out the project’s build log.


Filed under: arduino hacks, led hacks

Reading Sega carts off a breadboard

Golden Axe is great, and the Sonic 3/Sonic and Knuckles combo is one of the highest works of art from the 16-bit era, but for those of us without a working Genesis or Megadrive, we’ve had to make due with the ROMs others provide. [Lee] figured out an easy way to read the data off these old Sega cartridges using easily scavenged parts and an Arduino Mega, paving the way for an Arduino-based ROM dumper.

The connector on the bottom of a Sega Genesis cartridge has a 2×32 pinout, normally requiring 64 connections to actually read the card. These connectors aren’t readily available, but [Lee] did manage to find a few 2×31 pin connectors lying around in the form of old ISA sockets. The outer pins of a Genesis cart are used for grounds and a ‘cartridge insert’ slot, and after filing away the end of an old ISA connector, [Lee] found he could actually read the data on these old game cartridges.

There are 49 data and address pins on these old Sega carts, so an Arduino Mega needed to be brought into the mix to actually read some of the data on the ROM chip. As of now, [Lee] can read data from the cart but has only gotten so far as to read the licensing data stored at 0×80. Still, very cool and the first step towards an Arduinofied Sega cart dumper.


Filed under: arduino hacks, classic hacks

The proper way to put an Arduino in a Raspberry Pi

For all their hoopla, the GPIO pins on the Raspberry Pi aren’t terribly useful on their own. Sure, you can output digital data, but our world is analog and there just isn’t any ADCs or DACs on these magical Raspi pins.

The AlaMode, a project designed by [Kevin], [Anool], and [Justin] over at the Wyolum OSHW collaborative aims to fix this. They developed a stackable Arduino-compatable board for the Raspberry Pi.

Right off the bat, the AlaMode plugs directly into the GPIO pins of the Raspberry Pi. From there, communication with the ATMega of the Arduino is enabled, allowing you to send and receive data just as you would with an Arduino. There’s a real-time clock, servo headers, plenty of ways to power the board, and even a breakout for this GPS module.

A lot of unnecessary cruft is done away with in the AlaMode; There’s no USB port, but it can be programmed directly over the GPIO pins of the Raspberry Pi. Pretty neat, and we can’t wait to grab one for our Raspi.


Filed under: arduino hacks, Rasberry pi

Using an IR remote with your Arduino

If you’ve ever needed a short-range remote control for a project, [firestorm] is here to help you out. He put up a great tutorial on using an IR remote to do just about anything with everyone’s favorite microcontroller platform.

[firestorm] used the Arduino IRremote library to decode the button presses on his remote. After uploading the IR receive demo included in the library, the Arduino spit out hex codes of what the IR receiver was seeing. [firestorm] wrote these down, and was able to program his Arduino to respond to each individual button press.

After figuring out the IR codes for his remote, [firestorm] threw a shift register into his bread board and attached a seven-segment LED. Since [firestorm] knows the codes for the number buttons on his remote, it’s very easy to have the LED display flash a number when the corresponding button on the remote is pressed.

A single seven-segment display might not be extremely useful, but with [firestorm]‘s tutorial, it’s easy to give your Arduino some remote control capabilities with a simple IR receiver. Not bad for a few dollars in parts.


Filed under: arduino hacks, how-to

Kegerator tallies your pints on Untappd while you sit back with a cold one

[Jeff] admits that he’s pretty well addicted to Untappd, a site he describes as a Foursquare for beer. Like his fellow beer nerds, he enjoys reporting the pints he’s had, even if they happen to be from his own stash of homebrew kegs. Untappd certainly supports this level of dedication, but it seemed silly to [Jeff] that he needed to grab his phone each time he poured himself a cold one in the comfort of his own home.

He took a look around the room and spied an Arduino doing a whole lot of nothing, so he set off to build a system that would allow him to automatically record his drinking habits without the use of his smartphone. The system is not overly complex, and measures pours using flow sensors, uploading the results to Untappd using their “check-in” API. [Jeff] was sure to include several other useful features into his build, including a lockout timer that prevents multiple check-ins when simply topping off a pint, as well as “neighbor mode” which lets you pour a round for friends without recording the pour.

Be sure to check out the build in its entirety on [Jeff’s] site, and let us know if you’re doing something equally cool with your keg setup at home.


Filed under: arduino hacks, beer hacks
Hack a Day 18 Jul 12:01

Reading bar codes with Arduino and unaltered CueCat

[Damcave] decided to try out some bar code reader projects. He got his hands on a CueCat years ago. The problem is that it outputs encrypted character sets instead of a clear text string. To get around this he used his Arduino to decrypt the CueCat’s data output.

Originally you could get you hands on a CueCat for free. It was meant to work like QR codes do now — you see a bar code, you scan it to get to a web address. It never really took off but you can still get your hands on one for about twelve clams. We’ve seen projects that clip a pin on the processor to disable to encryption. But [Damcave] didn’t want to mess with the hardware. Instead he connected the Arduino via the PS/2 connector and used software to translate the data. The encryption format has long been know so it was just a matter of translating the steps into an Arduino function.


Filed under: arduino hacks
Hack a Day 12 Jul 13:09

EMIC2 text to speech module

This is the EMIC2 text-to-speech module. You can see from the logo on the bottom left it’s the latest gadget coming out of [Joe Grand's] Grand Idea Studios. [Dino] tipped us off about his first experience with a prototype of the board. He’s driving it with an Arduino and the video after the break shows that the sound rendering is high quality and the words are very easy to understand. One of the things that we think is interesting is that the serial communications used to drive the board are not uni-directional. In fact, there’s a serial terminal that provides documentation on how to use the chip. Obviously this is most suited to the Arduino, which always has a PC-side terminal window available to it.

[Joe] himself shows some of the potential for the board. He gave new life to a broken toy by replacing its internals with a PIC-based circuit to drive the EMIC2. That video is also found after the break. He’s just using the demo clips, but from that you will get a good idea of the vocal modulations this device is capable of. The board rings up at $60 and is available from Parallax.

[Dino's] introduction:

[Joe's] project:

and it’s on sale now for about $60 for Parallax.


Filed under: arduino hacks

Time-based One-Time Passwords with an Arduino

Get your feet wet with Time-based One-Time Password (TOTP) security by building your own Arduino OATH system. OATH is an open standard authentication system that provides a platform to generate tokens, making your login more secure than a password alone would.

The TOTP approach is what is used with many companies that issue hardware-based dongles for logging in remotely. This security may have been compromised but it’s still better than passwords alone. Plus, if you’re building it around an Arduino we’d bet you’re just trying to learn and not actually responsible for protecting industrial or state secrets.

The hardware setup requires nothing more than the Arduino board with one button and a screen as a user interface. Since the board has a crystal oscillator it keeps fairly accurate time (as long as it remains powered). It will push out a new token every thirty seconds. The video after the break shows that the Arduino-calculated value does indeed match what the test box is displaying.


Filed under: arduino hacks, security hacks
Hack a Day 11 Jul 12:01

Cheap as chips Arduino Ethernet shield

It’s no secret that Ethernet shields for the Arduino are a little expensive. With the official Ethernet shield selling for about $50 and other options not much cheaper, there’s a lot of room for improvement for Arduinofied Ethernet. [Boris] over at Open Electronics has a solution to this problem: his Ethercard powered by a $3 Ethernet controller.

The Ethercard uses the Microchip ENC28J60, a through-hole Ethernet controller. There isn’t much else on the board apart from an RJ45 jack, caps, resistors, and a cheap buffer chip. This board was designed to be easily produced, and we’re thinking it might be possible to etch this board at home.

There are a few drawbacks to this ENC28J60 Ethernet shield – the official Arduino Ethernet shield has a 10/100 Mbps connection where the Microchip-powered shield is limited to 10 Mbps. Given the reduced cost, ease of assembly, and the fact that it’s pretty hard to saturate a 100Mbps connection with an Arduino this flaw can be easily ignored.

Pretty neat, especially considering how much you can do with an Ethernet connection on your Arduino. Files and code available in the git.


Filed under: arduino hacks, hardware
Hack a Day 10 Jul 23:02