Posts with «hackaday columns» label

The Case for Arduino in “Real Engineering”

For over ten years, Arduino has held onto its popularity as “that small dev-board aimed to get both artists and electronics enthusiasts excited about physical computing.” Along the way, it’s found a corner in college courses, one-off burning man rigs, and countless projects that have landed here. Without a doubt, the Arduino has a cushy home among hobbyists, but it also lives elsewhere. Arduino lives in engineering design labs as consumer products move from feature iterations into user testing. It’s in the chem labs when scientists need to get some sensor data into their pc in a pinch. Despite the frowns we’ll see when someone blinks an LED with an Arduino and puts it into a project box, Arduino is here to stay. I thought I’d dig a little bit deeper into why both artists and engineers keep revisiting this board so much.

Arduino, do we actually love to hate it?

It’s not unusual for the seasoned engineers to cast some glares towards the latest Arduino-based cat-feeding Kickstarter, shamelessly hiding the actual Arduino board inside that 3D-printed enclosure. Hasty? Sure. Crude, or unpolished? Certainly. Worth selling? Well, that depends on the standards of the consumer. Nevertheless, those exact same critical engineers might also be kicking around ideas for their next Burning Man Persistence-of-Vision LED display–and guess what? It’s got an Arduino for brains! What may seem like hypocrisy is actually perfectly reasonable. In both cases, each designer is using Arduino for what it does best: abstracting away the gritty details so that designs can happen quickly. How? The magic (or not) of hardware abstraction.

Meet HAL, the Hardware-Abstraction Layer

In a world where “we just want to get things blinking,” Arduino has a few nifty out-of-the-box features that get us up-and-running quickly. Sure, development tools are cross-platform. Sure, programming happens over a convenient usb interface. None of these features, however, can rival Arduino’s greatest strength, the Hardware Abstraction Layer (HAL).

HAL is nothing new in the embedded world, but simply having one can make a world of difference, one that can enable both the artist and the embedded engineer to achieve the same end goal of both quickly and programmatically interacting with the physical world through a microcontroller. In Arduino, the HAL is nothing more than the collection of classes and function calls that overlay on top of the C++ programming language and, in a sense, “turn it into the Arduino programming language” (I know, there is no Arduino Language). If you’re curious as to how these functions are implemented, take a peek at the AVR directory in Arduino’s source code.

With a hardware abstraction layer, we don’t need to know the details about how our program’s function calls translate to various peripherals available on the Uno’s ATMEGA328p chip. We don’t need to know how data was received when Serial.available() is true. We don’t “need to know” if Wire.begin() is using 7-bit addressing or 10-bit addressing for slave devices. The copious amounts of setup needed to make these high-level calls possible is already taken care of for us through the HAL. The result? We save time reading the chip’s datasheet, writing helper functions to enable chip features, and learning about unique characteristics and quirks of our microcontroller if we’re just trying to perform some simple interaction with the physical world.

Cross-Platform Compatibility
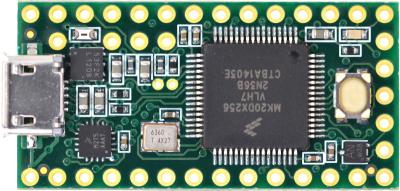
Teensy 3.2 keeps form factor but adds on-chip hardware features compared to 3.1

There are some cases where the HAL starts to break down. Maybe the microcontroller doesn’t have the necessary hardware to simultaneously drive 16 servos while polling a serial port and decoding serial data. In some cases, we can solve this issue by switching Arduino platforms. Maybe we actually do need three serial ports instead of one (Teensy 3.2). Maybe we do need pulse-width-modulation (PWM) capability on every pin (Due). Because of the hardware abstraction layer, the rest of the source code can remain mostly unchanged although we may be switching chip architectures and even compilers in the process! Of course, in an environment where developing code for the target platform does matter, it doesn’t make sense to go to such efforts to write the general-purpose code that we see in Arduino, or even use Arduino in the first place if it doesn’t have the necessary features needed for the target end-goal. Nevertheless, for producing an end-to-end solution where “the outcome matters but the road to getting there does not,” writing Arduino code saves time if the target hardware needs to change before getting to that end goal.

HAL’s drawbacks
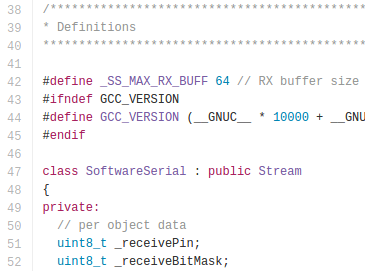
Of course, there’s also a price to pay for such nice things like speedy development-time using the HAL, and sometimes switching platforms won’t fix the problem. First off, reading the Arduino programming language documentation doesn’t tell us anything about the limitations of the hardware it’s running on. What happens, let’s say, if the Serial data keeps arriving but we don’t read it with Serial.read() until hundreds of bytes have been sent across? What happens if we do need to talk to an I2C device that mandates 10-bit addressing? Without reading the original source code, we don’t know the answers to these questions. Second, if we choose to use the functions given to us through the HAL, we’re limited by their implementation, that is, of course, unless we want to change the source code of the core libraries. It turns out that the Serial class implements a 64-byte ring buffer to hold onto the most recently received serial data. Is 64 bytes big enough for our application? Unless we change the core library source code, we’ll have to use their implementation.

Both of the limitations above involve understanding how the original HAL works and than changing it by changing the Arduino core library source code. Despite that freedom, most people don’t customize it! This odd fact is a testament to how well the core libraries were written to suit the needs of their target audience (artists) and, hence, Arduino garnered a large audience of users.

Pros of Bare-Metalspeak
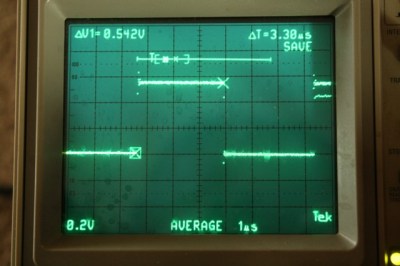
digitalWrite takes a whopping 52-55 cycles to change pin direction! [image source]
Are there benefits to invoking the hardware directly? Absolutely. A few curious inquirers before us have measured the max pin-toggling frequency with digitalWrite to be on the order of ~100 KHz while manipulating the hardware directly results in a pin-toggling frequency of about 2 MHz, about 20 times faster. That said, is invoking the hardware directly worth it? Depends, but in many cases where tight timing isn’t a big deal and where the goal of a functional end-to-end system matters more than “how we got there,” then probably not! Of course, there are cases when tight timing does matter and an Arduino won’t make the cut, but in that case, it’s a job for the embedded engineer.

Use the HAL, Luke!

To achieve an end-to-end solution where the process of “how we got there” matters not, Arduino shines for many simple scenarios. Keep in mind that while the HAL keeps us from knowing too many details about our microcontroller that we’d otherwise find in the datasheet, I don’t proclaim that everyone throw out their datasheets from here on out. I am, however, a proponent of “knowing no more than you need to know to get the job done well.” If I’m trying to log some sensor data to a PC, and I discover I’ll be saving a few days reading a datasheet and configuring an SPI port because someone already wrote SPI.begin(), I’ll take an Arduino, please.

If you’ve rolled up your sleeves and pulled out an Arduino as your first option at work, we’d love to hear what uses you’ve come up with beyond the occasional side-project. Let us know in the comments below.


Filed under: Arduino Hacks, Hackaday Columns, tool hacks

Code Craft: When #define is Considered Harmful

An icon of Computer Science, [Edsger Dijkstra], published a letter in the Communications of the Association of Computer Machinery (ACM) which the editor gave the title “Go To Statement Considered Harmful“. A rousing debate ensued. A similar criticism of macros, i.e. #define, in C/C++ may not rise to that level but they have their own problems.

Macros are part of the preprocessor for the C/C++ languages which manipulates the source code before the actual translation to machine code. But there are risks when macros generate source code. [Bjarne Stroustrup] in creating C++ worked to reduce the need and usage of the preprocessor, especially the use of macros. In his book, The C++ Programming Language he writes,

Don’t use them if you don’t have to. Almost every macro demonstrates a flaw in the programming language, in the program, or in the programmer.

As C retrofitted capabilities of C++, it also reduced the need for macros, thus improving that language.

With the Arduino using the GNU GCC compilers for C and C++ I want to show new coders a couple of places where the preprocessor can cause trouble for the unwary. I’ll demonstrate how to use language features to achieve the same results more cleanly and safely. Of course, all of this applies equally when you use any of these languages on other systems.

We’re only going to be looking at macros in this article but if you want to read more the details about them or the preprocessor see the GNU GCC Manual section on the preprocessor.

Basic Macro Usage

The preprocessor is complex, but described in simplified terms, it reads each line in a compilation unit, i.e. file, scanning for lines where the first non-whitespace character is a hash character (#). There may be whitespace before and after the #. The next token, i.e. a set of characters bounded by whitespace, is the name of the macro. Everything following the name is the argument. A macro has the form:

#define <name> <rest of line>

The simplest macro usage is to create symbols that are used to control the preprocessor or as text substitution in lines of code. A symbol can be created with or without a value. For example:

#define LINUX 
#define VERSION 23 

The first line defines the symbol LINUX but does not give it a value. The second line defines VERSION with the value 23. This is how constant values were defined pre-C++ and before the enhancements to C.

By convention, macro symbol names use all caps to distinguish them from variable and function names.

Symbols without values can only be used to control the preprocessor. With no value they would simply be a blank in a line of code. They are used in the various forms of the #if preprocessor directives to determine when lines of code are included or excluded.

When a symbol with a value appears in a line of code, the value is substituted in its place. Here is how using a macro with a value looks:

const int version_no = VERSION; 

which results in the code

const int version_no = 23; 

This type of macro usage doesn’t pose much of a threat that problems will arise. That said, there is little need to use macros to define constants. The language now provides the ability to declare named constants. One reason macros were used previously was to avoid allocating storage for a value that never changes. C++ changed this and constant declarations do not allocate storage. I’ve tested this on the Arduino IDE, and found that C does not appear to allocate storage but I’ve seen mention that C may do this on other systems.

Here is the current way to define constants:

const int version = 23;
enum {start=10, end=12, finish=24};   // an alternative for related integer consts

Function Macros

Another form of macro is the function macro which, when invoked looks like a function call, but it is not. Similar to the symbol macros, function macros were used to avoid the overhead of function calls for simple sequences of code. Another usage was to provide genericity, i.e. code that would work for all data types.

Function macros are used to pass parameters into the text replacement process. This is fraught with danger unless you pay close attention to the details. The use of inline functions is much safer as I’ll show below.

To illustrate here’s an example of a function macro to multiply two values.

#define MULT(lhs, rhs) lhs * rhs

This function macro is used in source code as:

int v_int = MULT(23, 25);
float v_float = MULT(23.2, 23.3);

Consider this use of the macro, its expansion, and its evaluation, which definitely does not produce the expected result:

int s = MULT(a+b, c+d);
// translates to: int s = a + b * c + d;
// evaluates as: a + (b * c) + d

This can be addressed by adding parenthesis to force the proper evaluation order of the resulting code. Adding the parenthesis results in this code:

#define MULT(lhs, rhs) ((lhs) * (rhs))
int s = MULT(a+b, c+d);
// now evaluates as: (a + b) * (c + d)

The parenthesis around lhs force (a + b) to be evaluated before the multiplication is performed.

Another ugly case is:

#define POWER(value) ((value) * (value))
int s = POWER(a++);
// evaluates as: ((a++) * (a++))

Now there are two problems. First, a is incremented twice, and, second, the wrongly incremented version is used for the calculation. Here again it does not produce the desired result.

It’s really easy to make a mistake like this with function macro definitions. You’re better off using an inline function which is not prone to these errors. The inline equivalents are:

inline int mult(const int x, const int y) { return (x * y); }
inline int power(const int x) { return (x * x); }
 

Now the values of x and y are evaluated before the function is called. The increment or arithmetic operators are no longer evaluated inside the actual function. Remember, an inline function does not produce a function call since it is inserted directly into the surrounding code.

In C, there is a loss of generality using inline over the macro. The inline functions shown only support integers. You can add similar functions for different data types, which the standard libraries do, but the names must reflect the data type. A few cases would be covered by mult_i, mult_f,  mult_l, and mult_d for integer, float, long and double, respectively.

This is less of a problem in C++ where there are two solutions. One is to implement separate functions, as in C, but the function names can all be mult relying on C++’s ability to overload function names.

A nicer C++ version is to use template functions. These really are straightforward for simple situations. Consider:

template <typename T>
inline T mult(const T x, const T y) { return (x * y); }
template <typename T>
inline T power(const T x) { return (x * x); }

You use these just like any other function call and the compiler figures out what to do. There is still one minor drawback. The mult cannot mix data types which MULT has no problem doing. You must use an explicit cast to make the types agree.

The code generated by the inline and template versions are going to be the same as the macro version, except they will be correct. You should restrict the use of macros to preprocessing of code,  not code generation. It’s safer and once you are used to the techniques it’s easy.

If these problems aren’t enough, take a look at the GNU preprocessor manual section which provides more details and examples of problems.

Stringification and Concatenation

The previous sections discussed the problems with macros and how to avoid them using C/C++ language constructs. There are a couple of valuable uses of macros that we’ll discuss in this section.

The first is stringification which converts a function macro argument into a C/C++ string. The second is concatenation which combines two arguments into a single string.

A string is created when a # appears before a token. The result is a string: #quit becomes “quit”.

Two arguments are concatenated when ## appears between them: quit ## _command becomes quit_command.

This is useful in building tables of data to use in a program. An illustration:

#define COMMAND(NAME) { #NAME, NAME ## _command }

struct command commands[] =
{
COMMAND (quit),
COMMAND (help),
...
};

expands to the code

struct command
{
char *name;
void (*function) (void);
};

struct command commands[] =
{
{ "quit", quit_command },
{ "help", help_command },
...
};

Wrapup

The C/C++ preprocessor is powerful and dangerous. The standards committees have followed Stroustrup’s lead in adding features that reduce the need to use the preprocessor. There is still a need for it and probably always will be since it is an inherent part of the languages. Be careful when and how you use #define, and use it sparingly.


Filed under: Hackaday Columns, Software Development, software hacks

Hackaday Links: October 11, 2015

[Kratz] just turned into a rock hound and has a bunch of rocks from Montana that need tumbling. This requires a rock tumbler, and why build a rock tumbler when you can just rip apart an old inkjet printer? It’s one of those builds that document themselves, with the only other necessary parts being a Pizza Hut thermos from the 80s and a bunch of grit.

Boot a Raspberry Pi from a USB stick. You can’t actually do that. On every Raspberry Pi, there needs to be a boot partition on the SD card. However, there’s no limitation on where the OS resides,  and [Jonathan] has all the steps to replicate this build spelled out.

Some guys in Norway built a 3D printer controller based on the BeagleBone. The Replicape is now in its second hardware revision, and they’re doing some interesting things this time around. The stepper drivers are the ‘quiet’ Trinamic chips, and there’s support for inductive sensors, more fans, and servo control.

Looking for one of those ‘router chipsets on a single board’? Here you go. It’s the NixCoreX1, and it’s pretty much a small WiFi router on a single board.

[Mowry] designed a synthesizer. This synth has four-voice polyphony, 12 waveforms, ADSR envelopes, a rudimentary sequencer, and fits inside an Altoids tin. The software is based on The Synth, but [Mowry] did come up with a pretty cool project here.


Filed under: Hackaday Columns, Hackaday links

Hackaday Dictionary: The ESP8266

In August of 2014, something new started showing up in the markets of Shenzen, the hi-tech area of China where the majority of the world’s electronics components are made. This is the ESP8266, a WiFi SoC (System on a Chip) that can connect to 802.11b/g/n networks on the 2.4GHz band. It can be addressed with SPI or a serial connection, and has an AT command set that makes it behave rather like an old-style modem. Basically, it has everything you would need to connect a device to a WiFi network, with the ESP8266 chip itself handling the complicated business of finding, joining and transmitting/receiving over a WiFi network.

That’s nothing particularly new in itself: WiFi connection devices like the TI CC3000 have been around for longer, and do much the same thing. The difference was the price. While the TI solution costs about $10 if you buy several thousand of them, the ESP8266 costs less than $7 for an individual board that can plug straight into an Arduino or similar. Buy the chip in bulk, and you can get it for less than $2.

The ESP8266 is more than just a WiFi dongle, though: it is a fully fledged computer in itself, with a megabyte of flash memory and a 32-bit processor that uses a RISC architecture. This can run applications, turning the ESP8266 into a standalone module that can collect and send data over the Internet. And it can do this while drawing a reasonably low amount of power: while receiving data, it typically uses just 60mA, and sending data over an 802.11n connection uses just 145mA. That means you can drive it from a small battery or other small power source, and it will keep running for a long time.

It wasn’t an easy ship to write applications for in the early days, though: it was poorly documented and required a dedicated toolchain to work with. This made it more of a challenge than many hackers were comfortable with.  That changed earlier this year, though, when the Arduino IDE (Integrated Development Environment) was ported to the chip. This meant that you could use the much easier to write Arduino functions and libraries to write code for the chip, bringing it within reach of even the most casual hacker.

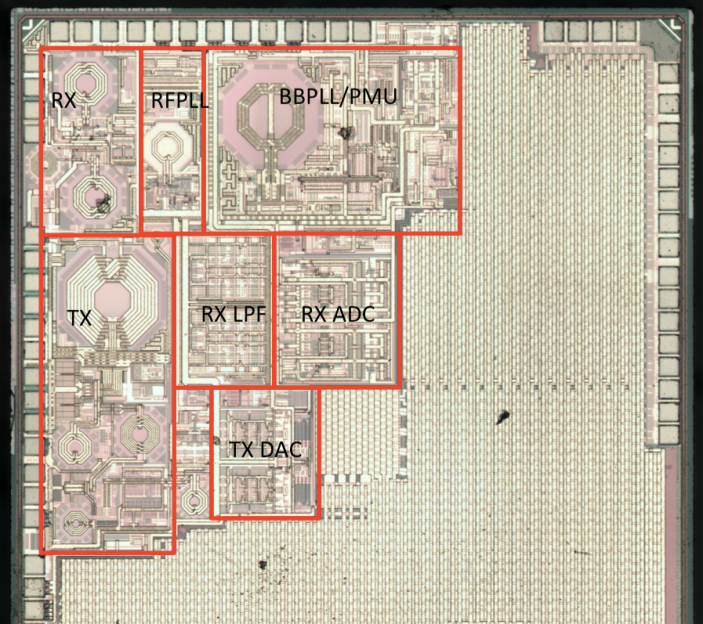
A decapped ESP8266, with area of interest marked by Reddit user swimmerdude. The big area on the right is memory

Why Is the ESP8266 Important?

The ESP8266 almost achieves the holy trifecta of electronics: cheap, powerful and easy to work with. Before this, if you wanted to add a wireless connection to a project, you had to use more power-hungry devices like USB WiFi dongles, or squish everything into a serial connection and use a wireless serial link. Either way added to the complexity of the project: you either needed a system that supported USB and had WiFI OS support, or you had to put up with the limitations of wireless serial links, which typically offer very limited bandwidth. The advent of WiFi SoCs removed these limitations because the SoC did the heavy lifting, and WiFi offered much more bandwidth. And the ESP8266 did this all at a very low cost: do some digging on eBay and you can get an ESP8266 board for less than $2. So, it is no surprise that we are starting to see the ESP8266 showing up in commercial products

How Can I Use the ESP8266?

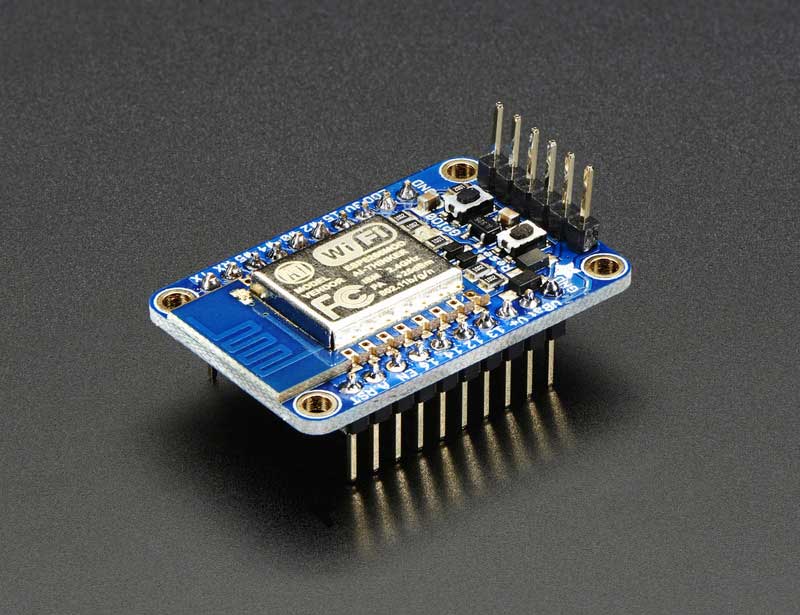
With the popularity of the ESP8266 for adding WiFi to projects, it is no surprise that there are a lot of options for trying it out. On the hardware side, ESP8266 development boards are available from a number of places, including Seeedstudio, Sparkfun and Olimex. Adafruit also has a nice ESP8266 board that breaks out all of the signals for easy breadboard use, and adds a 3.3V output, so it can drive an external device. It is also FCC approved, which is important if you are looking to sell or use the devices you build commercially. Some users have also been building their own development boards, which add features such as LCD displays and buttons.

The Adafruit Huzzah ESP8266 dev board

On the software side, the easiest way to get into the ESP8266 is to use the Arduino compatible mode. This involves loading custom firmware that turns the chip into a mid-range Arduino board, which makes for much easier programming. The people behind this project have produced a list of supported ESP8266 boards: buying one of these will make the installation process easier, as they have noted which data lines in the Arduino SDK correspond to the physical pins on the board. These boards also provide easy access to the reset lines that you have to use to install the Arduino compatible firmware.

This does include some limitations, though: it is rather complicated to upload new sketches over WiFi, and you can’t produce multiple PWM signals, which would make controlling multiple devices difficult. To get access to the full capabilities of the ESP8266, you’ll need to go to the source, and use the SDK that the manufacturers offer. [cnlohr] published an in-depth guide here on Hackaday for bare-metal programming the ESP8266 whih was mentioned earlier. Espressif also offer a pretty good getting started guide that covers creating a virtual Linux machine and connecting this to their chips.

The third option is to flash NodeMCU to the ESP8266 module. This turns it into a Lua interpreter. Scripting can be done in real-time to prototype your program, then flashed to the EEPROM to make your program persistent and remove the need for a serial connection.

Beginners will be comfortable with both the Arduino and NodeMCU approaches, but experienced users should be able to wade straight in and start writing code for this cheap, powerful and fairly easy to use chip.


Filed under: Arduino Hacks, Hackaday Columns, wireless hacks

We Have a Problem: Earthquake Prediction

Nepal | 25 April 2015 | 11:56 NST

It was a typical day for the 27 million residents of Nepal – a small south Asian country nestled between China and India. Men and women went about their usual routine as they would any other day. Children ran about happily on school playgrounds while their parents earned a living in one of the country’s many industries. None of them could foresee the incredible destruction that would soon strike with no warning. The 7.8 magnitude earthquake shook the country at its core. 9,000 people died that day. How many didn’t have to?

History is riddled with earthquakes and their staggering death tolls. Because many are killed by collapsing infrastructure, even a 60 second warning could save many thousands of lives. Why can’t we do this? Or a better question – why aren’t we doing this? Meet [Micheal Doody], a Reproductive Endocrinologist with a doctorate in physical biochemistry. While he doesn’t exactly have the background needed to pioneer a novel approach to predict earthquakes, he’s off to a good start.

He uses piezoelectric pressure sensors at the heart of the device, but they’re far from the most interesting parts. Three steel balls, each weighing four pounds, are suspended from a central vertical post. Magnets are used to balance the balls 120 degrees apart from each other. They exert a lateral force on the piezo sensors, allowing for any movement of the vertical post to be detected. An Arduino and some amplifiers are used to look at the piezo sensors.

The system is not meant to measure actual vibration data. Instead it looks at the noise floor and uses statistical analysis to see any changes in the background noise. Network several of these sensors along a fault line, and you have yourself a low cost system that could see an earthquake coming, potentially saving thousands of lives.

[Michael] has a TON of data on his project page. Though he’s obviously very skilled, he is not an EE or software guy. He could use some help with the signal analysis and other parts. If you would like to lend a hand and help make this world a better place, please get in touch with him.

He makes a great point during his narration in this video: earthquakes disproportionately affect the poor because they live and work in lower-cost structures unlikely to be outfitted to withstand earthquakes. Shoring up infrastructure is a huge and costly undertaking. Discovering early warning systems like the one [Michael] is testing here will have an immediate and wide-ranging impact at a minimum cost.


Filed under: Hackaday Columns

Embed with Elliot: the Static Keyword You Don’t Fully Understand

One of our favorite nuances of the C programming language (and its descendants) is the static keyword. It’s a little bit tricky to get your head around at first, because it can have two (or three) subtly different applications in different situations, but it’s so useful that it’s worth taking the time to get to know.

And before you Arduino users out there click away, static variables solve a couple of common problems that occur in Arduino programming. Take this test to see if it matters to you: will the following Arduino snippet ever print out “Hello World”?

void loop()
{
	int count=0;
	count = count + 1;
	if (count &gt; 10) {
		Serial.println(&quot;Hello World&quot;);
	}
}

If you said, “Yes” you absolutely need to read this article. If you said “No, you need to define count as a global variable outside of the loop(), silly!”, you got the answer right in principle, but defining the variable as static is yet better. And we’ll see why.

But the shortest possible summary of this article is the following: if you want a variable to retain its value between calls to the function that contains it, declare that variable static.

And the summary rationale is that declaring a variable to be static sets the scope to be local, but makes the variable stick around for the lifetime of the program, rather than just the function call in which it was defined. Which means that it’s not re-initialized on every call to the function, and that lets us effectively store data within a function. It’s a great trick to have in your programmers’ toolbag.

Scope and Duration

To understand static, we’ll have to tease apart two related concepts of a variable’s availability to our code: scope and duration (or lifetime).

Most of you will know about variable scope. In many languages, if you declare a variable within a function or block, it stays inside that function or block. That’s called “local scope” or “function scope” or similar. Other functions can’t use that variable without our function explicitly passing the variable out. This is great, because it means that you can name all your counter variables count and they won’t collide with each other across functions. You probably know this.

Variables in C & Co. also have a lifetime that they’re guaranteed to be available for, also called their “duration”. After their duration is up, you won’t be able to use the variable any more. This is closely related to the idea of “scope” which specifies in which functional blocks of code the variable is available, but you’re going to want to keep them separate in your mind. Easiest is to think of duration as being a time, and scope as being a location (in code-space).

The default duration of a variable is the current call of the function. That’s why something like:

int counter (void)
{
	int count=0;
	count=count+1;
	return count;
}

will always return 1. Each time you call the function, count gets re-initialized to zero, and when the function returns, that variable’s storage gets reallocated because it has function duration. (And this is exactly the problem with the Arduino snippet above.)

We want our counter() function to keep track of how many times it’s been called. We need the variable count to have program duration — it needs to stick around as long as our code is running, and not get reallocated after every function call.

Globals?

The brute-force method is to declare count as a global variable by defining it outside of any functions. Global variables live for the duration of the program, so the value contained in count will stay available. So far, so good. But variables with global scope have the side effect of making count available from any other function. Sometimes this is exactly what we want, but a lot of the time it’s not.

The problem with global scope is that you can’t use any other global variables of the same name, so you need pick the names carefully to be unique so that they don’t clash. This isn’t a huge problem if you just use long, specific names: My_Global_Loop_Counter instead of count, for instance.

A more subtle problem arises when you intend to use another variable named count in a second function, but forget to declare it. The second function thinks that you meant to use the globally defined count, and havoc ensues.

Finally, it’s tempting to use global variables to pass data among different functions. (This is especially true for people who haven’t yet made peace with pointers and structures.) If you spread the functions using a global variable across different files, it can take heroic feats of debugging to track down every location where a popular global variable is accessed or modified. That is to say, global variables can lead to fragmented, hard to debug code.

No, Static.

Anyway, if you buy the arguments above, what you really want is a variable with program duration but function scope. And that’s exactly what static does when it’s applied to a variable inside a function. The language has precisely the feature you want, so you might as well use it.

And to bring it on home, the Arduino snippet up above will work just fine with a globally defined count variable,

int count;
void loop()
{
	count = count + 1;
	if (count &gt; 10) {
		Serial.println(&quot;Hello World&quot;);
	}
}

but it’s also a lot cleaner when written using static:

void loop()
{
	static int count;
	count = count + 1;
	if (count &gt; 10) {
		Serial.println(&quot;Hello World&quot;);
	}
}

because the name “count” isn’t globally exposed. It’s also declared in the function that uses it, so there’s no question of to whom it belongs. And it works. You can’t beat that.

Static and global variables (all variables with program duration) are pre-initialized to zero by default, so we didn’t need to write static int count = 0; above. However, if we wanted the initial value to be non-zero, we could define the variable like so: static int count = 42;.

There’s something creepy about static int count = 42;, though. It looks like we’re declaring the variable and then setting its value on every pass through the code. But the static keyword prevents this. Trust us, or modify the demo code above to test it out for yourself.

Data Hiding and Singletons and Stuff

There’s a second, related, use of static to mention. When used outside of any functions, at the top-level of a file, static limits the scope to the file in question. Contrast this with global variables which have truly global scope and thus are available across files. Static variables defined outside of functions, then, are like a quasi-global variable: available for the duration of the program from every function defined within the file, but not reachable from outside the file.

Here’s an example where this quasi-global functionality is useful. Say we’d like to spin off the counter code into a counter library. We’re starting off with something like this:

int counter(void){
	static int count;
	count++;
	return count;
}

Every time you call counter() from other code, the function keeps the old value of count, adds one to it, and the counter behaves like it should. This is the function-scope static definition.

But now imagine that we’d also like to reset the counter. We might want a reset() function that will set the value back to zero. But count has function scope, so our reset() function won’t be able to touch it. The solution here is to use the static type declaration at file scope.

You could have something like this in your file “counter.c”:

static int count;

int counter(void){
	count++;
	return count;
}

void reset_count(void){
	count = 0;
}

static void my_secret_function(void){
	count = 42;
}

Because count is defined static at file scope, all the functions in the file will be able to use it, and the value will persist between function calls. Additionally, because my_secret_function() is defined static, it’s not callable from outside this file, though functions defined here can call it as usual.

Defining variables (and functions) static at file scope is perfect for storing library-specific stuff that is needed for the library, but that doesn’t need to be seen on the outside. This is a lot like what object-oriented languages do with public and private data and methods.

In contrast to the object-oriented pattern, though, we’ve only got one instance of our data. You can’t create a second one easily. This is what the software engineer types call a singleton.  These singletons are great for keeping track of global state, where you just write some simple functions to modify and access the data. Since the data is static and file-local, you know that you can’t mess it up from outside, and the manipulation functions are available anywhere you can #include them.

The drawback of singletons are that there’s only ever one of them. If you wanted two counters, for instance, this code wouldn’t help. When you get to such cases, you’ll want full-blown object-oriented support.

… and Arduino

This was a lot of heavy C theory, so you might think it’s not applicable if you’re programming in Arduino. If you think like that, you weren’t paying attention during the last “Embed”; Arduino is C/C++ with added convenience libraries. And in fact, the particular way that Arduino repeatedly calls the loop() function makes knowing a bit about scoping nearly mandatory: all of your function-call-duration variables get wiped each time through the loop unless you do something.

As we saw in the introductory example, you can’t initialize a variable inside the loop() without it resetting each time through the loop. If you didn’t know about the static keyword, you’d probably take the brute-force solution and define the variable as global. A bunch of the Arduino examples do just this.

What could go wrong?

int i;

void loop(){
	i++;
	Serial.println(i);
	delay(100);
	doSomethingTwice();
}

void doSomethingTwice(){
	for (i=0; i&lt;2; i++){
		Serial.println(&quot;twice?&quot;);
	}
}

Well, say you’ve gotten in the habit, as we have, of using i as a generic loop variable. And say you re-used it without definition in another function, maybe even in another “.ino” file, that you call from within the loop. Because i is a global variable, the accidental second use is actually perfectly kosher. The compiler won’t be able to help you find the mistake, but your program won’t work right. Instead of counting up, the poor Arduino will just keep printing “3”.

There are two causes of this problem: forgetting to declare i inside doSomethingTwice(), and creating a global variable with an easy-to-reuse name. You will forget to declare variables from time to time. We all do. And when we do, we want the compiler to let us know.

So there are two ways to avoid the problem. The first solution is to name your global variables something crazy so that they’re unlikely to be reused. “My_Amazing_Global_Loop_Counter” would work well. Even typing it once makes me never want to type it again.

The “right” solution solves the initial problem that led us to use a global variable in the first place. We simply define our counter variable as static inside loop() and then it has program duration but function scope and all’s well. Now we can even call the counter variable i with impunity, because it’s scoped to loop().


void loop(){
	static int i;
	i++;
	Serial.println(i);
	delay(100);
	doSomethingTwice();
}

void doSomethingTwice(){
	// You'll get an error here b/c i isn't declared.  Thanks, compiler!
	for (i=0; i&lt;2; i++){
		Serial.println(&quot;twice?&quot;);
	}
}

And what do you do if you want to share variables among different functions within a single “sketch”? One way is to pass them directly as arguments, but again you’ll see lots of folks resort to global variables that can be simply accessed from each relevant function. It’s not a huge problem if you take care to name the variables well, so we won’t insist.

But you could also do it “correctly” and define the global variables as static at the file level instead. You’ll still be able to make subtle mistakes within your own functions, but by declaring the variables static you won’t run the chance of confusing them up with variables defined elsewhere in the Arduino infrastructure. It’s a belt when you’re already wearing suspenders, but it doesn’t cost you anything except a tiny bit more typing.

Conclusion

Use the static keyword for variables within a function when you want the value to persist across function calls, but you don’t need to enlarge the scope. Use the static keyword for functions and variables at the file level when you want them to behave like quasi-globals, being accessible everywhere within the file but hidden from the outside.

See? That’s not so mysterious after all.


Filed under: Hackaday Columns

Hacklet 68 – Rocket Projects

There’s just something amazing about counting down and watching a rocket lift off the pad, soaring high into the sky. The excitement is multiplied when the rocket is one you built yourself. Amateur rocketry has been inspiring hackers and engineers for centuries. In the USA, modern amateur rocketry gained popularity after Sputnik-1, continuing on through the space race. Much of this history captured in the book Rocket Boys by Homer Hickam, which is well worth a read. This week’s Hacklet is dedicated to some of the best rocketry projects on Hackaday.io!

We start with [Sagar] and Guided Rocket. [Sagar] is building a rocket with a self stabilization system. Many projects use articulated fins for this, and [Sagar] plans to add fins in the future, but he’s starting with an articulated rocket motor. The motor sits inside a gimbal, which allows it to tilt about 10 degrees in any direction. An Arduino is the brain of the system. The Arduino gathers data from a MPU6050 IMU sensor, then determines how to steer the rocket motor. Steering is accomplished with a couple of micro servos connected to the gimbal.


Next up is [Howie], with Homemade rocket engine. [Howie] is cooking some seriously hot stuff on his stove. Rocket candy to be precise, similar to the fuel [Homer Hickam] wrote about in Rocket Boys. This solid fuel is so named because one of the main ingredients is sugar. The other main ingredient is stump remover, or potassium nitrate. Everything is mixed and heated together on a skillet for about 30 minutes, then pushed into rocket engine tubes. It goes without saying that you shouldn’t try this one at home unless you’re really sure of what you’re doing!


Everyone wants to know how high their rocket went. [Vcazan] created AltiRocket to record acceleration and altitude data. AltiRocket also transmits the data to the ground via a radio link. An Arduino Nano keeps things light. A BMP108 barometric sensor captures pressure data, which is easily converted into altitude. Launch forces are captured by a 3 Axis accelerometer. A tiny LiPo battery provides power. The entire system is only 23 grams! [Vcazan] has already flown AltiRocket, collecting data from several flights earlier this summer.


Finally we have [J. M. Hopkins] who is working on a huge project to do just about everything! High Power Experimental Rocket Platform includes designing and building everything from the rocket fuel, to the rocket itself, to a GPS guided parachute recovery system. [J. M. Hopkins] has already accomplished two of his goals, making his own fuel and testing nozzle designs. The electronics package to be included on the rocket is impressive, including a GPS, IMU, barometric, and temperature sensors. Data will be sent back to the ground by a 70cm transceiver. The ground station will use a high gain human-guided yagi tracking antenna with a low noise amplifier to pick up the signal.

If you want more rocketry goodness, check out our brand new rocket project list! Rocket projects move fast, if I missed yours as it streaked by, don’t hesitate to drop me a message on Hackaday.io. That’s it for this week’s Hacklet, As always, see you next week. Same hack time, same hack channel, bringing you the best of Hackaday.io!


Filed under: Hackaday Columns

Embed with Elliot: There is no Arduino “Language”

This installment of Embed with Elliot begins with a crazy rant. If you want to read the next couple of paragraphs out loud to yourself with something like an American-accented Dave-Jones-of-EEVBlog whine, it probably won’t hurt. Because, for all the good Arduino has done for the Hackaday audience, there’s two aspects that really get our goat.

(Rant-mode on!)

First off is the “sketch” thing. Listen up, Arduino people, you’re not writing “sketches”! It’s code. You’re not sketching, you’re coding, even if you’re an artist. If you continue to call C++ code a “sketch”, we get to refer to our next watercolor sloppings as “writing buggy COBOL”.

And you’re not writing “in Arduino”. You’re writing in C/C++, using a library of functions with a fairly consistent API. There is no “Arduino language” and your “.ino” files are three lines away from being standard C++. And this obfuscation hurts you as an Arduino user and artificially blocks your progress into a “real” programmer.

(End of rant.)

Let’s take that second rant a little bit seriously and dig into the Arduino libraries to see if it’s Arduinos all the way down, or if there’s terra firma just beneath. If you started out with Arduino and you’re looking for the next steps to take to push your programming chops forward, this is a gentle way to break out of the Arduino confines. Or maybe just to peek inside the black box.

Arduino is C/C++

Click on the “What is Arduino” box on the front page of arduino.cc, and you’ll see the following sentence:

“ARDUINO SOFTWARE: You can tell your Arduino what to do by writing code in the Arduino programming language…”

Navigate to the FAQ, and you’ll see

“the Arduino language is merely a set of C/C++ functions that can be called from your code”.

Where we come from, a bunch of functions written in a programming language is called a library. So which is it, Arduino?

(The Language Reference page is a total mess, combining parts of standard C with functions defined in the Arduino core library.)

Maybe that’s not as sexy or revolutionary as claiming to have come up with a new programming language, but the difference matters and it’s a damn good thing that it’s just a set of libraries. Because the beauty about the Arduino libraries is that you don’t have to use them, and that you can pick and choose among them. And since the libraries are written in real programming languages (C/C++), they’re a totally useful document if you understand those languages.

C and Assembly language, on the other hand, are different languages. If you’re writing assembler, you can easily specify exactly which of the chip’s native instructions to use for any particular operation — not so in C. Storing data in particular registers in the CPU is normal in assembler, but heroic in C. So if you start out writing your code in C, and then find out that you need some of the features of assembler, you’re hosed. You stop writing in C and port all your code over to assembler. You have to switch languages. You don’t get to pick and choose.

(Yes, there is inline assembler in GCC.  That’s cheating.)

This is not at all the case with Arduino: it’s not a programming language at all, and that’s a darned good thing. You’re writing in C/C++ with some extra convenience libraries on top, so where the libraries suck, or they’re just plain inconvenient, you don’t have to use them. It’s that simple.

A prime example is digitalWrite() in the Arduino’s core library, found in the “wiring_digital.c” file. It’s madness to use the ridiculously slow digitalWrite() functions when speed or timing matters. Compared to flipping bits in the output registers directly, digitalWrite() is 20-40x slower.

The scope shots here are from simply removing the delay statements from the Blink.ino example code that comes with Arduino — essentially toggling the LED pin at full speed. Upper left is using digitalWrite() to flip the pin state. Upper right is using direct bit manipulation in C: PORTB ^= (1 << LED_BIT); Because Arduino’s digitalWrite() command has a bunch of if...then statements in it that aren’t optimized away by the compiler, it runs 28 times slower.

(And worse, as you can see in the lower left, the Arduino code runs with occasional timing glitches, because an interrupt service routine gets periodically called to update the millisecond timer. That’s not a problem with digitalWrite() per say, but it’s a warning when attempting tight timing using the Arduino defaults.)

OK, so digitalWrite() is no good for timing-critical coding. If Arduino were a real language, and you were stuck with digitalWrite(), you wouldn’t be able to use the language for anything particularly sophisticated. But it’s just a convenience function. So you can feel free to use digitalWrite() in the setup() portion of your code where it’s not likely to be time critical. That doesn’t mean that you have to use it in the loop() portion when timing does matter.

And what this also means is that you’re no longer allowed to say “Arduino sucks”. Arduino is C/C++, and at least C doesn’t suck. (Zing! Take that, C++ lovers. De gustibus non disputandem est.) If you think that some of the Arduino libraries suck, you’re really going to have to specify which libraries in particular you mean, or we’ll call you out on it, because nobody’s forcing you to use them wholesale. Indeed, if you’re coding on an AVR-based Arduino, you’ve got the entire avr-libc project baked in. And it doesn’t suck.

The “.ino” is a Lie

So if Arduino is just C/C++, what’s up with the “.ino” filetype? Why is it not “.c” or “.cpp” like you’d expect? According to the Arduino build process documentation,

“The Arduino environment performs a few transformations to your main sketch file (the concatenation of all the tabs in the sketch without extensions) before passing it to the avr-gcc compiler.”

True C/C++ style requires you to declare (prototype) all functions that you’re going to use before you define them, and this is usually done in a separate header “.h” file. When C compiles your code, it simply takes each function and turns it into machine code. In a philosophically (and often practically) distinct step, references to a function are linked up with the compiled machine code representing them. The linker, then, only needs to know the names of each function and what types of variables it needs and returns — exactly the data in the function declaration.

Long story short: functions need prior declaration in C, and your “.ino” code defines setup() and loop() but never declares them. So that’s one thing that the Arduino IDE does for you. It adds two (or more, if you define more functions in your “.inos”) function prototypes for you.

The other thing the IDE’s preprocessor does is to add #include "Arduino.h" to the top of your code, which pulls in the core Arduino libraries.

(And then, for some mysterious reason, it also deletes all comments from your code, making it harder to debug later on. Does anyone out there know why the Arduino IDE does this?)

So that’s it. Three lines (or maybe a few more) of very simple boilerplate separate a “sketch” from valid C/C++ code. This was presumably done in the interest of streamlining the coding experience for newbies, but given that almost every newb is going to start off with the template project anyway, it’s not clear that this buys much.

On the other hand, the harm done to the microcontroller newbie is reasonably large. The newb doesn’t know that it’s actually C/C++ underneath the covers and doesn’t learn anything about one of the most introductory, although mindless, requirements of the language(s): function declarations.

When the newb eventually does want to include outside code, the newb will need to learn about #include statements anyway, so hiding #include "Arduino.h" is inconsistent and sets up future confusion. In short, the newb is blinded from a couple of helpful learning opportunities, just to avoid some boilerplate that’s templated out anyway.

Write C++ Directly in the Arduino IDE

And if you don’t believe that Arduino is C/C++, try the following experiment:

  1. Save a copy of the example Blink project.
  2. Go into the “sketch’s” directory and copy Blink.ino to Blink.cpp.
  3. Re-open the project in Arduino and delete everything from Blink.ino
  4. Add the required boilerplate to Blink.cpp. (One include and two function declarations.)
  5. Verify, flash, and whatever else you want.

You’ve just learned to write C/C++ directly from within the Arduino IDE.

(Note: for some reason, the Arduino IDE requires a Blink.ino file to be present, even if it’s entirely empty. Don’t ask us.)

main.cpp

So if Blink.ino turns into Blink.cpp, what’s up with the setup() and loop() functions? When do they ever get called? And wait a minute, don’t all C and C++ programs need a main() function to start off? You are on the path to enlightenment.

Have a look at the main.cpp file in hardware/arduino/avr/cores/arduino.

There’s your main() function! And although we’ve streamlined the file a little bit for presentation, it’s just about this straightforward.

The init() function is called before any of your code runs. It is defined in “wiring.c” and sets up some of the microcontroller’s hardware peripherals. Included among these tasks on the AVR platform is configuring the hardware timers for the milliseconds tick and PWM (analogOut()) functions, and initializing the ADC section. Read through the init() function and the corresponding sections of the AVR datasheet if you’ve never done any low-level initializations of an AVR chip; that’s how it’s done without Arduino.

And then we get to the meat. The setup() function is called, and in an endless for loop, the loop() function is continually called. That’s it, and it’s the same code you’d write in C/C++ for any other microcontroller on the planet. That’s the magic Arduino setup() and loop(). The emperor has no clothes, and the Wizard of Oz is just a pathetic little man behind a curtain.

If you want to dig around more into the internals of the Arduino core library, search for “Arduino.h” on your local install, or hit up the core library on Github.

The Arduino Compile Phase

So we’ve got C/C++ code. Compiling it into an Arduino project is surprisingly straightforward, and it’s well-documented in the Arduino docs wiki. But if you just want to see for yourself, go into Preferences and enable verbose logging during compilation. Now the entire build process will flash by you in that little window when you click “Verify”.

It’s a lot to take in, but it’s almost all repetitive. The compiler isn’t doing anything strange or unique at all. It’s compiling all of the functions in the Arduino core files, and putting the resulting functions into a big (static) library file. Then it’s taking your code and this library and linking them all together. That’s all you’d do if you were writing your own C/C++ code. It’s just that you don’t know it’s happening because you’re pressing something that looks like a play button on an old Walkman. But it’s not rocket science.

There is one more detail here. If you include a library file through the menu, and it’s not part of the core Arduino libraries, the IDE locates its source code and compiles and links it in to the core library for you. It also types the #include line into your “.ino” file. That’s nice, but hardly a deal-breaker.

If you’d like to see this build process in the form of a Makefile, here’s (our) primitive version that’s more aimed at understanding, and this version is more appropriate for production use.

Next Steps

If the Arduino is the embedded electronics world’s gateway drug, what are the next steps that the Arduino programmer should take to become a “real” embedded programmer slash oil-burning heroin junkie? That depends on you.

Are you already good at coding in a lower-level language like C/C++? Then you need to focus on the microcontroller-specific side of things. You’re in great shape to just dive into the Arduino codebase. Try to take a few of the example pieces, or even some of your own “sketches” and look through the included Arduino library’s source code. Re-write some simple code outside the IDE and make sure that you can link to the Arduino core code. Then replace bits of the core with your own code and make sure it still works. You’ll spend half of your time looking into the relevant micro’s datasheet, but that’s good for you.

Are you comfy with electronics but bewildered by coding? You might spend a bit of time learning something like C. Learn C the Hard Way is phenomenal, and although it’s aimed at folks working on bigger computers, it’s got a lot of the background that you’ll need to progress through and beyond the Arduino codebase. You’re going to need to learn about the (relatively trivial) language conventions and boilerplatey stuff to get comfortable in straight C/C++, and then you can dig in to the Arduino source.

Wherever you are, remember that Arduino isn’t a language: it’s a set of libraries written in C/C++, some of them really quite good, and some of them (we’re looking at you EEPROM) simply C++ wrappers on the existant avr-libc EEPROM library. And that means that for every Arduino project you’ve written, you’ve got the equivalent source code sitting around in C/C++, ready for you to dig into. Thank goodness they didn’t invent their own programming language!


Filed under: Hackaday Columns

Hackaday Links: July 19, 2015

Everybody needs an external USB drive at some time or another. If you’re looking for something with the nerd cred you so desperately need, build a 5 1/4″ half height external drive. That’s a mod to an old Quantum Bigfoot drive, and also serves as a pretty good teardown video for this piece of old tech.

The Woxun KG-UV2D and KG-UV3D are pretty good radios, but a lot of amateur radio operators have found these little handheld radios eventually wear out. The faulty part is always a 24C64 Flash chip, and [Shane] is here to show you the repair.

Last year there was a hackathon to build a breast pump that doesn’t suck in both the literal and figurative sense. The winner of the hackathon created a compression-based pump that is completely different from the traditional suction-based mechanism. Now they’re ready for clinical trials, and that means money. A lot of money. For that, they’re turning to Kickstarter.

What you really need is head mounted controls for Battlefield 4. According to [outgoingbot] it’s a hacked Dualshock 4 controller taped to a bike helmet. The helmet-mounted controller has a few leads going to another Dualshock 4 controller with analog sticks. This video starts off by showing the setup.

[Jan] built a modeling MIDI synth around a tiny 8-pin ARM microcontroller.  Despite the low part count, it sounds pretty good. Now he’s turned his attention to the Arduino. This is a much harder programming problem, but it’s still possible to build a good synth with no DAC or PWM.


Filed under: Hackaday Columns, Hackaday links

Ask Hackaday: Arduino in Consumer Products

Speak with those who consider themselves hardcore engineers and you might hear “Arduinos are for noobs” or some other similar nonsense. These naysayers see the platform as a simplified, overpriced, and over-hyped tool that lets you blink a few LEDs or maybe even read a sensor or two. They might say that Arduino is great for high school projects and EE wannabes tinkering in their garage, but REAL engineering is done with ARM, x86 or PICs. Guess what? There are Arduino compatible boards built around all three of those architectures. Below you can see but three examples in the DUE, Galileo, and Fubarino SD boards.

This attitude towards Arduino exists mainly out of ignorance. So let’s break down a few myths and preconceived biases that might still be lurking amongst some EEs and then talk about Arduino’s ability to move past the makers.

Arduino is NOT the Uno

When some hear “Arduino”, they think of that little blue board that you can plug a 9v battery into and start making stuff. While this is technically true, there’s a lot more to it than that.

  1. An Arduino Uno is justanAVR development board.AVRs are similar to PICs. When someones says “I used a PIC as the main processor”, does that mean they stuck the entire PIC development board into their project? Of course not. It’s the same with Arduino (in most cases), and design is done the same way as with any other microcontroller –
    • Use the development board to make, create and debug.
    • When ready, move the processor to your dedicated board.
  2. What makes an Arduino an “Arduino” and not justan AVR but the bootloader. Thus:
    • An Atmega328P is an AVR processor.
    • An Atmega328P with the Arduino bootloader is an Arduino.
  3. The bootloader allows you to program the AVR with the Arduino IDE. If you remove the bootloader from the AVR, you now have an AVR development board that can be programmed with AVR Studio using your preferred language.

There Is No Special Arduino Language

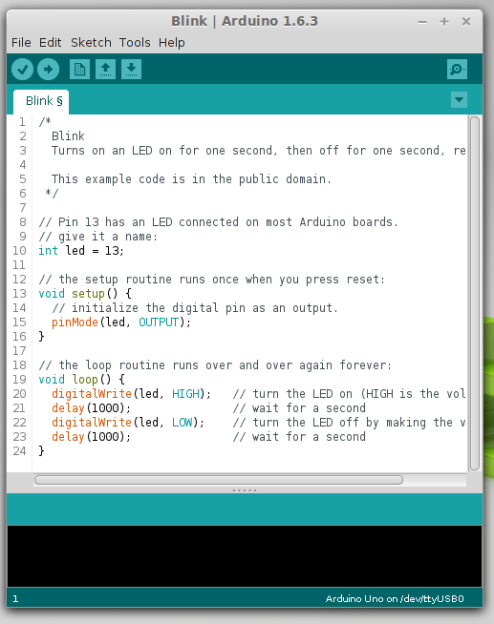
Arduino “blink” sketch should run on any Arduino compatible board.

Yes, I know they call them sketches, which is silly. But the fact is it’s just c++. The same c++ you’d use to program your PIC. The bootloader allows the IDE to call functions, making it easy to code and giving Arduino its reputation of being easy to work with. But don’t let the “easy” fool you. They’re real c/c++ functions that get passed to a real c/c++ compiler. In fact, any c/c++ construct will work in the Arduino IDE. With that said – if there is any negative attribute to Arduino, it is the IDE. It’s simple and there is no debugger.

The strength comes in the standardization of the platform. You can adapt the Arduino standard to a board you have made and that adaptation should allow the myriad of libraries for Arduino to work with your new piece of hardware. This is a powerful benefit of the ecosystem. At the same time, this easy of getting things up and running has resulted in a lot of the negative associations discussed previously.

So there you have it. Arduino is no different from any other microcontroller, and is fully capable of being used in consumer products along side PICs, ARMs etc. To say otherwise is foolish.

What is the Virtue of Arduino in Consumer Products?

This is Ask Hackaday so you know there’s a question in the works. What is the virtue of Arduino in consumer products? Most electronics these days have a Device Firmware Upgrade (DFU) mode that allows the end user to upgrade the code, so Arduino doesn’t have a leg up there. One might argue that using Arduino means the code is Open Source and therefore ripe for community improvements but closed-source binaries can still be distributed for the platform. Yet there are many products out there that have managed to unlock the “community multiplier” that comes from releasing the code and inviting improvements.

What do you think the benefits of building consumer goods around Arduino are, what will the future look like, and how will we get there? Leave your thoughts below!


Filed under: Arduino Hacks, Ask Hackaday, Hackaday Columns, rants