

Embed with Elliot: There is no Arduino “Language”
This installment of Embed with Elliot begins with a crazy rant. If you want to read the next couple of paragraphs out loud to yourself with something like an American-accented Dave-Jones-of-EEVBlog whine, it probably won’t hurt. Because, for all the good Arduino has done for the Hackaday audience, there’s two aspects that really get our goat.
(Rant-mode on!)
First off is the “sketch” thing. Listen up, Arduino people, you’re not writing “sketches”! It’s code. You’re not sketching, you’re coding, even if you’re an artist. If you continue to call C++ code a “sketch”, we get to refer to our next watercolor sloppings as “writing buggy COBOL”.
And you’re not writing “in Arduino”. You’re writing in C/C++, using a library of functions with a fairly consistent API. There is no “Arduino language” and your “.ino” files are three lines away from being standard C++. And this obfuscation hurts you as an Arduino user and artificially blocks your progress into a “real” programmer.
(End of rant.)
Let’s take that second rant a little bit seriously and dig into the Arduino libraries to see if it’s Arduinos all the way down, or if there’s terra firma just beneath. If you started out with Arduino and you’re looking for the next steps to take to push your programming chops forward, this is a gentle way to break out of the Arduino confines. Or maybe just to peek inside the black box.
Arduino is C/C++
Click on the “What is Arduino” box on the front page of arduino.cc, and you’ll see the following sentence:
“ARDUINO SOFTWARE: You can tell your Arduino what to do by writing code in the Arduino programming language…”
Navigate to the FAQ, and you’ll see
“the Arduino language is merely a set of C/C++ functions that can be called from your code”.
Where we come from, a bunch of functions written in a programming language is called a library. So which is it, Arduino?
(The Language Reference page is a total mess, combining parts of standard C with functions defined in the Arduino core library.)
Maybe that’s not as sexy or revolutionary as claiming to have come up with a new programming language, but the difference matters and it’s a damn good thing that it’s just a set of libraries. Because the beauty about the Arduino libraries is that you don’t have to use them, and that you can pick and choose among them. And since the libraries are written in real programming languages (C/C++), they’re a totally useful document if you understand those languages.
C and Assembly language, on the other hand, are different languages. If you’re writing assembler, you can easily specify exactly which of the chip’s native instructions to use for any particular operation — not so in C. Storing data in particular registers in the CPU is normal in assembler, but heroic in C. So if you start out writing your code in C, and then find out that you need some of the features of assembler, you’re hosed. You stop writing in C and port all your code over to assembler. You have to switch languages. You don’t get to pick and choose.
(Yes, there is inline assembler in GCC. That’s cheating.)
This is not at all the case with Arduino: it’s not a programming language at all, and that’s a darned good thing. You’re writing in C/C++ with some extra convenience libraries on top, so where the libraries suck, or they’re just plain inconvenient, you don’t have to use them. It’s that simple.
A prime example is digitalWrite() in the Arduino’s core library, found in the “wiring_digital.c” file. It’s madness to use the ridiculously slow digitalWrite() functions when speed or timing matters. Compared to flipping bits in the output registers directly, digitalWrite() is 20-40x slower.
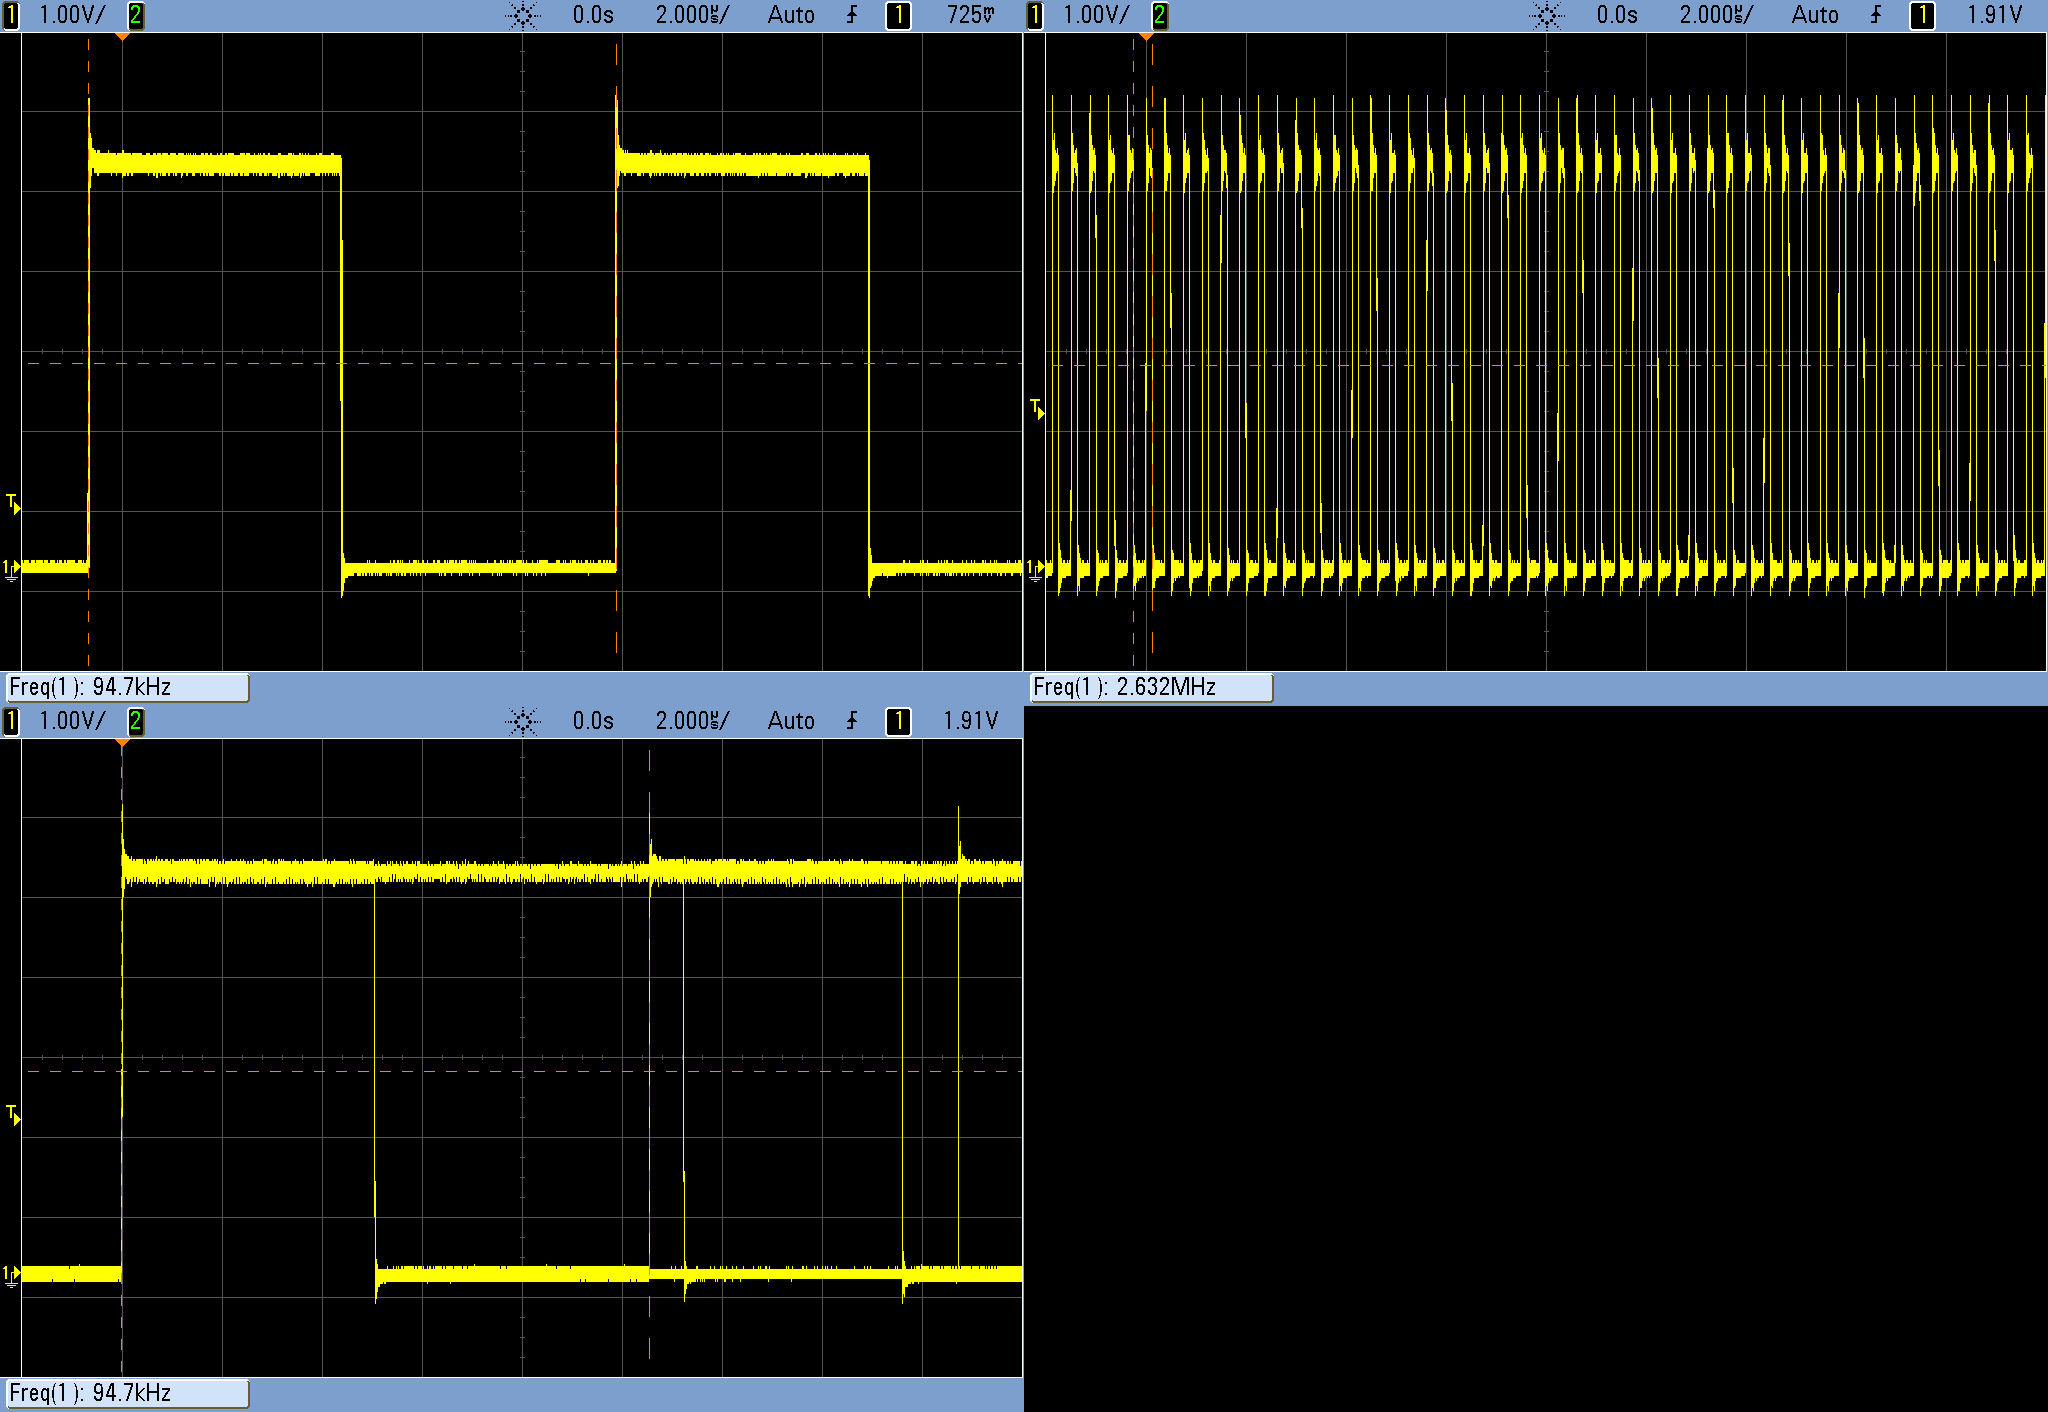 The scope shots here are from simply removing the delay statements from the Blink.ino example code that comes with Arduino — essentially toggling the LED pin at full speed. Upper left is using digitalWrite() to flip the pin state. Upper right is using direct bit manipulation in C:
 PORTB ^= (1 << LED_BIT); Because Arduino’s digitalWrite() command has a bunch of if...then statements in it that aren’t optimized away by the compiler, it runs 28 times slower.
(And worse, as you can see in the lower left, the Arduino code runs with occasional timing glitches, because an interrupt service routine gets periodically called to update the millisecond timer. That’s not a problem with digitalWrite() per say, but it’s a warning when attempting tight timing using the Arduino defaults.)
OK, so digitalWrite() is no good for timing-critical coding. If Arduino were a real language, and you were stuck with digitalWrite(), you wouldn’t be able to use the language for anything particularly sophisticated. But it’s just a convenience function. So you can feel free to use digitalWrite() in the setup() portion of your code where it’s not likely to be time critical. That doesn’t mean that you have to use it in the loop() portion when timing does matter.
And what this also means is that you’re no longer allowed to say “Arduino sucks”. Arduino is C/C++, and at least C doesn’t suck. (Zing! Take that, C++ lovers. De gustibus non disputandem est.) If you think that some of the Arduino libraries suck, you’re really going to have to specify which libraries in particular you mean, or we’ll call you out on it, because nobody’s forcing you to use them wholesale. Indeed, if you’re coding on an AVR-based Arduino, you’ve got the entire avr-libc project baked in. And it doesn’t suck.
The “.ino” is a Lie
So if Arduino is just C/C++, what’s up with the “.ino” filetype? Why is it not “.c” or “.cpp” like you’d expect? According to the Arduino build process documentation,
“The Arduino environment performs a few transformations to your main sketch file (the concatenation of all the tabs in the sketch without extensions) before passing it to the avr-gcc compiler.”
True C/C++ style requires you to declare (prototype) all functions that you’re going to use before you define them, and this is usually done in a separate header “.h” file. When C compiles your code, it simply takes each function and turns it into machine code. In a philosophically (and often practically) distinct step, references to a function are linked up with the compiled machine code representing them. The linker, then, only needs to know the names of each function and what types of variables it needs and returns — exactly the data in the function declaration.
Long story short: functions need prior declaration in C, and your “.ino” code defines setup() and loop() but never declares them. So that’s one thing that the Arduino IDE does for you. It adds two (or more, if you define more functions in your “.inos”) function prototypes for you.
The other thing the IDE’s preprocessor does is to add #include "Arduino.h" to the top of your code, which pulls in the core Arduino libraries.

(And then, for some mysterious reason, it also deletes all comments from your code, making it harder to debug later on. Does anyone out there know why the Arduino IDE does this?)
So that’s it. Three lines (or maybe a few more) of very simple boilerplate separate a “sketch” from valid C/C++ code. This was presumably done in the interest of streamlining the coding experience for newbies, but given that almost every newb is going to start off with the template project anyway, it’s not clear that this buys much.
On the other hand, the harm done to the microcontroller newbie is reasonably large. The newb doesn’t know that it’s actually C/C++ underneath the covers and doesn’t learn anything about one of the most introductory, although mindless, requirements of the language(s): function declarations.
When the newb eventually does want to include outside code, the newb will need to learn about #include statements anyway, so hiding #include "Arduino.h" is inconsistent and sets up future confusion. In short, the newb is blinded from a couple of helpful learning opportunities, just to avoid some boilerplate that’s templated out anyway.
Write C++ Directly in the Arduino IDE
And if you don’t believe that Arduino is C/C++, try the following experiment:
- Save a copy of the example Blink project.
- Go into the “sketch’s” directory and copy Blink.ino to Blink.cpp.
- Re-open the project in Arduino and delete everything from Blink.ino
- Add the required boilerplate to Blink.cpp. (One include and two function declarations.)
- Verify, flash, and whatever else you want.
You’ve just learned to write C/C++ directly from within the Arduino IDE.
(Note: for some reason, the Arduino IDE requires a Blink.ino file to be present, even if it’s entirely empty. Don’t ask us.)
main.cpp
So if Blink.ino turns into Blink.cpp, what’s up with the setup() and loop() functions? When do they ever get called? And wait a minute, don’t all C and C++ programs need a main() function to start off? You are on the path to enlightenment.
Have a look at the main.cpp file in hardware/arduino/avr/cores/arduino.
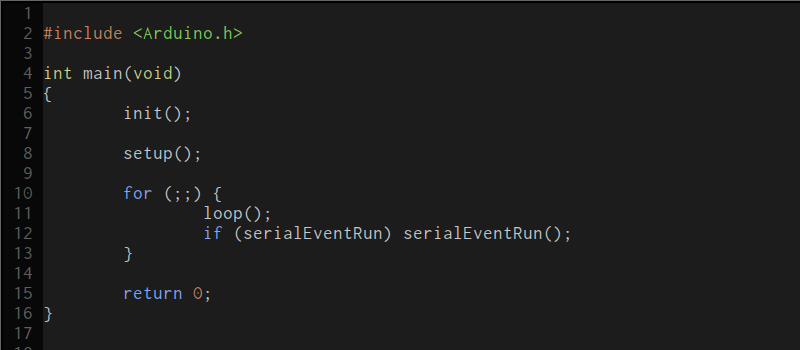
There’s your main() function! And although we’ve streamlined the file a little bit for presentation, it’s just about this straightforward.
The init() function is called before any of your code runs. It is defined in “wiring.c” and sets up some of the microcontroller’s hardware peripherals. Included among these tasks on the AVR platform is configuring the hardware timers for the milliseconds tick and PWM (analogOut()) functions, and initializing the ADC section. Read through the init() function and the corresponding sections of the AVR datasheet if you’ve never done any low-level initializations of an AVR chip; that’s how it’s done without Arduino.
And then we get to the meat. The setup() function is called, and in an endless for loop, the loop() function is continually called. That’s it, and it’s the same code you’d write in C/C++ for any other microcontroller on the planet. That’s the magic Arduino setup() and loop(). The emperor has no clothes, and the Wizard of Oz is just a pathetic little man behind a curtain.
If you want to dig around more into the internals of the Arduino core library, search for “Arduino.h” on your local install, or hit up the core library on Github.
The Arduino Compile Phase
So we’ve got C/C++ code. Compiling it into an Arduino project is surprisingly straightforward, and it’s well-documented in the Arduino docs wiki. But if you just want to see for yourself, go into Preferences and enable verbose logging during compilation. Now the entire build process will flash by you in that little window when you click “Verify”.
It’s a lot to take in, but it’s almost all repetitive. The compiler isn’t doing anything strange or unique at all. It’s compiling all of the functions in the Arduino core files, and putting the resulting functions into a big (static) library file. Then it’s taking your code and this library and linking them all together. That’s all you’d do if you were writing your own C/C++ code. It’s just that you don’t know it’s happening because you’re pressing something that looks like a play button on an old Walkman. But it’s not rocket science.
There is one more detail here. If you include a library file through the menu, and it’s not part of the core Arduino libraries, the IDE locates its source code and compiles and links it in to the core library for you. It also types the #include line into your “.ino” file. That’s nice, but hardly a deal-breaker.
If you’d like to see this build process in the form of a Makefile, here’s (our) primitive version that’s more aimed at understanding, and this version is more appropriate for production use.
Next Steps
If the Arduino is the embedded electronics world’s gateway drug, what are the next steps that the Arduino programmer should take to become a “real” embedded programmer slash oil-burning heroin junkie? That depends on you.
Are you already good at coding in a lower-level language like C/C++? Then you need to focus on the microcontroller-specific side of things. You’re in great shape to just dive into the Arduino codebase. Try to take a few of the example pieces, or even some of your own “sketches” and look through the included Arduino library’s source code. Re-write some simple code outside the IDE and make sure that you can link to the Arduino core code. Then replace bits of the core with your own code and make sure it still works. You’ll spend half of your time looking into the relevant micro’s datasheet, but that’s good for you.
Are you comfy with electronics but bewildered by coding? You might spend a bit of time learning something like C. Learn C the Hard Way is phenomenal, and although it’s aimed at folks working on bigger computers, it’s got a lot of the background that you’ll need to progress through and beyond the Arduino codebase. You’re going to need to learn about the (relatively trivial) language conventions and boilerplatey stuff to get comfortable in straight C/C++, and then you can dig in to the Arduino source.
Wherever you are, remember that Arduino isn’t a language: it’s a set of libraries written in C/C++, some of them really quite good, and some of them (we’re looking at you EEPROM) simply C++ wrappers on the existant avr-libc EEPROM library. And that means that for every Arduino project you’ve written, you’ve got the equivalent source code sitting around in C/C++, ready for you to dig into. Thank goodness they didn’t invent their own programming language!
Filed under: Hackaday Columns


[original story: Hack a Day]