Posts with «ask hackaday» label

Ask Hackaday Answered: The Tale of the Top-Octave Generator

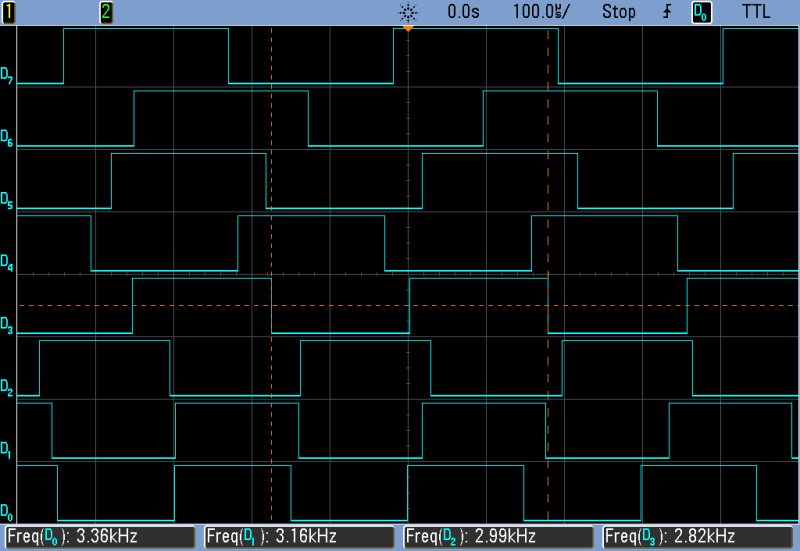
We got a question from [DC Darsen], who apparently has a broken electronic organ from the mid-70s that needs a new top-octave generator. A top-octave generator is essentially an IC with twelve or thirteen logic counters or dividers on-board that produces an octave’s worth of notes for the cheesy organ in question, and then a string of divide-by-two logic counters divide these down to cover the rest of the keyboard. With the sound board making every pitch all the time, the keyboard is just a simple set of switches that let the sound through or not. Easy-peasy, as long as you have a working TOG.

I bravely, and/or naïvely, said that I could whip one up on an AVR-based Arduino, tried, and failed. The timing requirements were just too tight for the obvious approach, so I turned it over to the Hackaday community because I had this nagging feeling that surely someone could rise to the challenge.

The community delivered! Or, particularly, [Ag Prismatic]. With a clever approach to the problem, some assembly language programming, and an optional Arduino crystalectomy, [AP]’s solution is rock-solid and glitch-free, and you could build one right now if you wanted to. We expect a proliferation of cheesy synth sounds will result. This is some tight code. Hat tip!

Squeezing Cycles Out of a Microcontroller

Let’s take a look at [AP]’s code. The approach that [AP] used is tremendously useful whenever you have a microcontroller that has to do many things at once, on a rigid schedule, and there’s not enough CPU time between the smallest time increments to do much. Maybe you’d like to control twelve servo motors with no glitching? Or drive many LEDs with binary code modulation instead of primitive pulse-width modulation? Then you’re going to want to read on.

There are two additional tricks that [AP] uses: one to fake cycles with a non-integer number of counts, and one to make the AVR’s ISR timing absolutely jitter-free. Finally, [Ag] ended up writing everything in AVR assembly language to make the timing work out, but was nice enough to also include a C listing. So if you’d like to get your feet wet with assembly, this is a good start.

In short, if you’re doing anything with hard timing requirements on limited microcontroller resources, especially an AVR, read on!

Taking Time to Think

The goal of the top-octave generator is to take an input clock and divide it down into twelve simultaneous sub-clocks that all run independently of each other. Just to be clear, this means updating between zero and twelve GPIO pins at a frequency of 1 MHz or so — updating every twenty clock cycles at the AVR’s maximum CPU speed. If you thought you could loop through twelve counters and decide which pins to flip in twenty cycles, you’d be mistaken.

But recognizing the problem is the first step to solving it. Although the tightest schedule might require flipping one pin exactly twenty clocks after flipping another, most of the time there are more cycles between pin updates — hundreds up to a few thousand. So the solution is to recognize when there is time to think, and use this time to pre-calculate a buffer full of next states.

[Ag]’s solution uses a few different loops that run exactly 20, 40, and 60 cycles each — the longer versions being just the 20-cycle one padded out with NOPs. These loops run inside an interrupt-service routine (ISR). When there are 80 or more cycles of thinking time until the next scheduled pin change, control is returned to the main loop and the next interrupt is set to re-enter the tight loops at the next necessary update time.

All the fast loop has to do is read two bytes, write them out to the GPIO pins, increment the pointer to the next row of data, and figure out if it needs to stall for 20 or 40 additional cycles, or set the ISR timer for longer delays and return to calculations. And this it can do in just twelve of the twenty cycles! Slick.

Buffers

Taking a step back from the particulars of the top-octave generator, this is a classic problem and a classic solution. It’s worth your time to internalize it, because you’ll run into this situation any time you have real-time constraints. The problem is that on average there’s more than enough time to complete the calculations, but that in the worst cases it’s impossible. So you split the problem in two parts: one that runs as fast as possible, and one that does the calculations that the fast section will need. And connecting together fast and slow processes is exactly why computer science gave us the buffer.

In [AP]’s code, this buffer is a table where each entry has two bytes for the state of the twelve GPIO pins, and one byte to store the number of clock cycles to delay until the next update. One other byte is left empty, yielding 64 entries or 256 bytes for the whole table. Why 256 bytes? Because the AVR has an 8-bit unsigned integer, wrapping around from the end of the table back to the beginning is automatic, saving a few cycles of wasteful if statements.

But even with this fast/slow division of labor, there is not much time left over for doing the pre-calculation. Sounding the highest C on a piano keyboard (4186 Hz) with a 20 MHz CPU clock requires toggling a GPIO pin every 2,390 cycles, so that’s the most time that the CPU will ever see. When the virtual oscillators are out of phase, this can be a lot shorter. By running the AVR at its full 20 MHz, and coding everything in assembly, [AP] can run the calculations fast enough to support twelve oscillators. At 16 MHz, there’s only time for ten, so every small optimization counts.

Some Optimization Required

Perhaps one of the cleverest optimizations that [AP] made is the one that makes this possible at all. The original top-octave chips divide down a 2 MHz square wave by a set of carefully chosen integer divisors. Running the AVR equivalent at 2 MHz resolution would mean just ten clocks per update and [AP]’s fast routine needed twelve, so the update rate would have to be halved. But that means that some odd divisors on the original IC would end up non-integral in the AVR code. For example, the highest C is reproduced in silicon as 2 MHz / 239, so to pull this off at 1 MHz requires counting up to 119.5 on an integer CPU. How to cope?

You could imagine counting to 119 half of the time, and 120 the other. Nobody will notice the tiny difference in duty cycle, and the pitch will still be spot on. The C programmer in me would want to code something like this:

uint8_t counter[12] = { 0, ... };
uint8_t counter_top[12] = { 119, ... };
uint8_t is_counter_fractional[12] = { 1, 0, ... };
uint8_t is_low_this_time[12] = { 0, ... };

// and then loop
for ( i=0 ; i<12; ++i){
  if ( counter[i] == 0 ){
    if ( is_counter_fractional[i] ){
      if ( is_low_this_time[i] ){
        counter[i] = counter_top[i];
    is_low_this_time = 0;
      else {
        counter[i] = counter_top[i] + 1;
    is_low_this_time = 1;
      }
    }
  }
}

That will work, but the ifs costs evaluation time. Instead, [AP] did the equivalent of this:

uint8_t counter[12] = { 0, ... };
uint8_t counter_top[12] = { 119, ... };
uint8_t phase[12] = { 1, 0, ... };

for ( i=0 ; i<12; ++i){
  if ( counter[i] == 0 ){
    counter[i] = counter_top[i] + phase[i];
    counter_top[i] = counter[i];
    phase[i] = -phase[i];
  }
}

What’s particularly clever about this construction is that it doesn’t need to distinguish between the integer and non-integer delays in code. Alternately adding and subtracting one from the non-integer values gets us around the “half” problem, while setting the phase variable to 0 means that the integer-valued divisors run unmodified, with no ifs.

The final optimization shows just how far [AP] went to make this AVR top-octave generator work like the real IC. When setting the timer to re-enter the fast loop in the ISR, there’s the possibility for one cycle’s worth of jitter. Because AVR instructions run in either one or two clock cycles, it’s possible that a two-cycle instruction could be running when the ISR timer comes due. Depending on luck, then, the interrupt will run four or five clocks later: see the section “Interrupt Response Time” in the AVR data sheet for details.

In a prologue to the ISR, [AP]’s code double-checks the hardware timer to see if it has entered on a one-cycle instruction, and adds in an extra NOP to compensate. This makes the resulting oscillator nearly jitter free, pushing out a possible source of 50 ns (one cycle at 20 MHz) slop. I don’t think you’d be able to hear this jitter, but the result surely looks pretty on the oscilloscope, and this might be a useful trick to know if you’re ever doing ultra-precise timing with ISRs.

The Proof of the Pudding

Naturally, I had to test out this code on real hardware. The first step was to pull a random Arduino-clone out of the closet and flash it in. Because “Arduinos” run at 16 MHz with the stock crystal, the result is that a nominal 440 Hz concert A plays more like a slightly sharp F, a musical third down. It sounds fine on its own, but you won’t be able to play along with any other instruments that are tuned to 440 Hz.

[AP]’s preferred solution is to run the AVR chip at 20 MHz. Since the hardware requirements are very modest, you could use a $0.50 ATTiny816 coupled with a 20 MHz crystal and you’d have a top-octave generator for literal pocket change — certainly cheaper than buying even an Arduino clone. I tested it out with an ATMega48P and a 20 MHz crystal on a breadboard because it’s what I had. Or you could perform crystalectomy on your Arduino to get it running at full speed.

We went back and forth via e-mail about all the other (firmware) options. [AP] had tried them all. You could trim the ISR down to 16 cycles and run at 16 MHz, but then there’s only enough CPU time in the main loop to support ten notes, two shy of a full octave. You could try other update rates than 1 MHz, but the divisors end up being pretty wonky. To quote [AP] from our e-mail discussion on the topic:

“After playing with the divider values from the original top octave generator IC and trying different base frequencies, it appears that the 2 MHz update rate is a “sweet spot” for getting reasonable integer divisors with < +/-2 cents of error. The original designers of the chip must have done the same calculations.”

To make a full organ out of this setup, you’ll also need twelve binary counter chips to divide down each note to fill up the lower registers of the keyboard, but these are easy to design with and cost only a few tens of cents apiece. All in all, thanks to [AP]’s extremely clever coding, you can build a fully-polyphonic noisemaker that spits out 96 simultaneous pitches, all in tune, for under $10. That’s pretty amazing.

And of course, I’ve already built a small device based on this code, but that’s a topic for another post. To be continued.

Ask Hackaday: How Do You Convert Negative Voltages to Positive?

I have a good background working with high voltage, which for me means over 10,000 volts, but I have many gaps when it comes to the lower voltage realm in which RC control boards and H-bridges live. When working on my first real robot, a BB-8 droid, I stumbled when designing a board to convert varying polarities from an RC receiver board into positive voltages only for an Arduino.

Today’s question is, how do you convert a negative voltage into a positive one?

In the end I came up with something that works, but I’m sure there’s a more elegant solution, and perhaps an obvious one to those more skilled in this low voltage realm. What follows is my journey to come up with this board. What I have works, but it still nibbles at my brain and I’d love to see the Hackaday community’s skill and experience applied to this simple yet perplexing design challenge.

The Problem

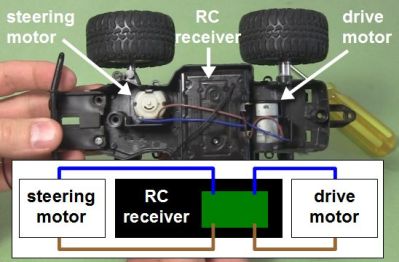
RC toy truck and circuit with no common

I have an RC receiver that I’ve taken from a toy truck. When it was in the truck, it controlled two DC motors: one for driving backwards and forwards, and the other for steering left and right. That means the motors are told to rotate either clockwise or counterclockwise as needed. To make a DC motor rotate in one direction you connect the two wires one way, and to make it rotate in the other direction you reverse the two wires, or you reverse the polarity. None of the output wires are common inside the RC receiver, something I discovered the hard way as you’ll see below.

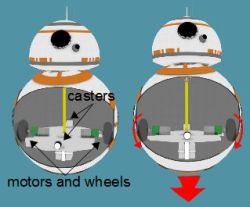
I wasn’t using the RC receiver with the toy truck. I extracted it from the truck and was using it to control my BB-8 droid. My BB-8 droid has two motors configured as what in the BB-8 builders world is called a hamster drive, though is more widely known as a tank drive or differential drive (see the illustrations). Rotate both wheels in the same direction with respect to the droid and the droid moves in that direction. Reverse both wheels and it drives in the opposite direction. Make the wheels rotate in opposite directions and it turns on the spot.

The big picture – RC to drill motors

The motors in my BB-8 are drill motors and are controlled by two H-bridge boards. An Arduino does pulse width modulation to the H-bridge boards for speed control, and controls which direction the motors should turn. Finally, the RC receiver is what tells the Arduino what to do. But a converter board, the subject of this article, is needed between the RC receiver and the Arduino. Note that the Arduino is necessary also for countering when the BB-8 droid wobbles and for synchronizing sounds with the movement, but those aren’t addressed here.

Since there are two motors and two directions for each motor, the RC receiver needs to control four pins on the Arduino to make the two drill motors behave as follows: motor 1/clockwise, motor 1/counterclockwise, motor 2/clockwise, motor 2/counterclockwise. And whatever voltages the receiver puts on those pins has to be relative to the Ardunio’s ground.

And herein lies the problem. The Arduino expects positive voltages with respect to its ground on all those pins. So I needed a way to map the RC receiver’s two sets of motor control wires, which can have either positive or negative voltages across them, to the Arduino pins which only want positive voltages. And remember, none of those RC receiver wires are common inside the receiver.

My Fumbling First Approach

Now, keep in mind, electronics is a general interest of mine and except for what we were taught in high school physics class, I’m self-taught. That means I’ve “read ahead” but much of my knowledge has been determined by what projects I’ve done. So I have gaps in my knowledge. I’d never turned negative voltages into positive before. It sounded simple enough. Searching online didn’t help though. The closest I got was in two old posts in forums where the answers were “It’s easy to do. I can do it with a single resistor.” But there was no further explanation and I didn’t ask my own question anywhere at that point.

Using a transistor

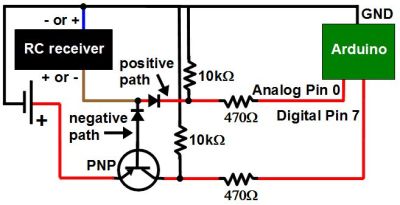
Instead I came up with my own approach with just one set of wires from the RC receiver first. The wires coming from the receiver were blue and brown and could have either polarity depending on which way the receiver is being told to rotate the motor: clockwise or counterclockwise. That meant I needed two diodes to create two possible paths for the different polarities the brown wire could be: positive or negative. I then added a battery for the one path that was negative, to turn it into a positive.

Next, I put a PNP transistor between the positive of the battery and the receiver. With no signal from the RC transmitter, the transistor’s base is negative with respect to the emitter, but not enough to turn the transistor on. That’s because the battery’s negative is connected to the receiver’s blue wire and since there’s no signal from the transmitter, the brown wire is also at the same potential as the blue wire, and with battery negative.

The idea was that when the transmitter sent a signal to make that brown wire negative with respect to the blue wire, it would become even more negative and turn on the PNP transistor. A positive signal would then go from the battery, through the transistor to the Arduino.

The most obvious problem was that the Arduino wanted to see 3 volts to register as a HIGH input, meaning the battery would have to be at least 3 volts and so even with no signal from the transmitter, that would be -3 volts to the transistor, turning it on when it wasn’t supposed to be on.

Using A Relay Instead

Using a relay

And so I immediately thought of using a relay instead. I’d use the current running through the negative path to energize the relay, closing a switch that was completely independent of the RC receiver. The Arduino has a 5V output pin, so I made that switch close a circuit between the 5V pin and the Arduino’s pin 7, giving pin 7 the needed positive voltage.

The 1 in the circle in the schematic shows where I wanted to put a resistor in order to limit the current going through the relay’s coil. However, I tried with resistors all the way down to 4.7 ohms but the coil didn’t have enough current to close the switch. With no resistor, it worked and the current was 70mA. The relay’s coil was rated for 3V/120mA so I left it.

Using a relay did seem very heavy-handed, but it was the only solution I could come up with and I already had the relay in stock.

The next step was to add a second relay, doing the same for the second set of wires coming from the RC receiver for the second motor.

No Common In The Receiver

Schematic with common blue RC wires

But the behavior was seemingly sporadic. And keep in mind that there was a whole dual H-bridge circuit that was also connected to the Arduino’s ground. I’d worked with relays a lot before, and the RC receiver came from a commercially made and functional toy so I had no reason to suspect that. On the other hand, I’d made the H-bridge circuit from scratch since I already had most of the parts, and I was new to H-bridges and MOSFETs. So at first I spent a good two weeks of spare time thinking my problem was with the H-bridge and drill motor side. I’m sure we’ve all experienced the same blindness, thinking the most likely culprit is the part you had a hand in.

But at some point I disconnected the H-bridge and tested just the RC receiver circuit, watching the voltages at the Arduino pins while I remotely turned on both “motors” in both directions in all combinations (no motors were connected at the time though). The only odd behavior I saw was when I turned the motors on in opposite directions.

Notice in the schematic that I’d connected together both blue wires coming from the RC receiver. Up to that point I’d been assuming that the blue wires were common inside the receiver and that it was only the brown wires that switched from positive to negative with respect to the blue wires. From the behavior I was seeing it looked like both wires were switching polarity, possibly around some other internal common reference.

Finished RC-to-Arduino converter schematic

So I added a third relay on one of the positive paths of one of the sets of wires. That meant the corresponding blue wire no longer needed to be grounded, keeping both of the receiver’s blue wires separate. Note that I didn’t bother putting in a fourth relay for the remaining positive path, and it turned out to not be necessary. At that point the circuits worked great and continue to do so.

The Ask

And so I ask, is there a better way to convert the RC receiver output to something the Arduino can use? Relays require power, so it would be nice if there was a solution that didn’t require any extra power. My relay solution seems very early 1900s. Or maybe it’s a good solution after all, but just one of many. Let us know in the comments below.


Filed under: Arduino Hacks, Ask Hackaday

Ask Hackaday: Arduino in Consumer Products

Speak with those who consider themselves hardcore engineers and you might hear “Arduinos are for noobs” or some other similar nonsense. These naysayers see the platform as a simplified, overpriced, and over-hyped tool that lets you blink a few LEDs or maybe even read a sensor or two. They might say that Arduino is great for high school projects and EE wannabes tinkering in their garage, but REAL engineering is done with ARM, x86 or PICs. Guess what? There are Arduino compatible boards built around all three of those architectures. Below you can see but three examples in the DUE, Galileo, and Fubarino SD boards.

This attitude towards Arduino exists mainly out of ignorance. So let’s break down a few myths and preconceived biases that might still be lurking amongst some EEs and then talk about Arduino’s ability to move past the makers.

Arduino is NOT the Uno

When some hear “Arduino”, they think of that little blue board that you can plug a 9v battery into and start making stuff. While this is technically true, there’s a lot more to it than that.

  1. An Arduino Uno is justanAVR development board.AVRs are similar to PICs. When someones says “I used a PIC as the main processor”, does that mean they stuck the entire PIC development board into their project? Of course not. It’s the same with Arduino (in most cases), and design is done the same way as with any other microcontroller –
    • Use the development board to make, create and debug.
    • When ready, move the processor to your dedicated board.
  2. What makes an Arduino an “Arduino” and not justan AVR but the bootloader. Thus:
    • An Atmega328P is an AVR processor.
    • An Atmega328P with the Arduino bootloader is an Arduino.
  3. The bootloader allows you to program the AVR with the Arduino IDE. If you remove the bootloader from the AVR, you now have an AVR development board that can be programmed with AVR Studio using your preferred language.

There Is No Special Arduino Language

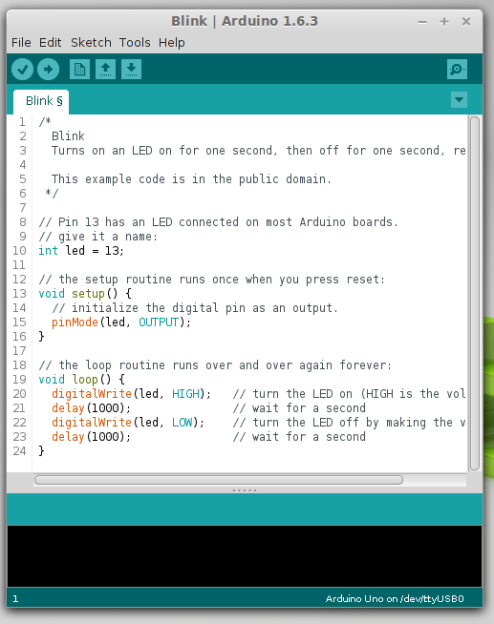
Arduino “blink” sketch should run on any Arduino compatible board.

Yes, I know they call them sketches, which is silly. But the fact is it’s just c++. The same c++ you’d use to program your PIC. The bootloader allows the IDE to call functions, making it easy to code and giving Arduino its reputation of being easy to work with. But don’t let the “easy” fool you. They’re real c/c++ functions that get passed to a real c/c++ compiler. In fact, any c/c++ construct will work in the Arduino IDE. With that said – if there is any negative attribute to Arduino, it is the IDE. It’s simple and there is no debugger.

The strength comes in the standardization of the platform. You can adapt the Arduino standard to a board you have made and that adaptation should allow the myriad of libraries for Arduino to work with your new piece of hardware. This is a powerful benefit of the ecosystem. At the same time, this easy of getting things up and running has resulted in a lot of the negative associations discussed previously.

So there you have it. Arduino is no different from any other microcontroller, and is fully capable of being used in consumer products along side PICs, ARMs etc. To say otherwise is foolish.

What is the Virtue of Arduino in Consumer Products?

This is Ask Hackaday so you know there’s a question in the works. What is the virtue of Arduino in consumer products? Most electronics these days have a Device Firmware Upgrade (DFU) mode that allows the end user to upgrade the code, so Arduino doesn’t have a leg up there. One might argue that using Arduino means the code is Open Source and therefore ripe for community improvements but closed-source binaries can still be distributed for the platform. Yet there are many products out there that have managed to unlock the “community multiplier” that comes from releasing the code and inviting improvements.

What do you think the benefits of building consumer goods around Arduino are, what will the future look like, and how will we get there? Leave your thoughts below!


Filed under: Arduino Hacks, Ask Hackaday, Hackaday Columns, rants

Hacking a floating RGB LED decorative ball

Knowing that I’m always happy to get something new and glowy, my wife brought home a cheap “floating pool light” that she found on sale for roughly $10. This is a large white floating ball that has LEDs inside and cycles through different colors. Meant to be put into a pool for neat effects, we found it to be much more interesting just used around the house.

However, it was a bit too bright and cycled colors too quickly for our taste. It was actually somewhat distracting when we were just trying to sit and have a few beers late at night on our patio. This gave me a perfect excuse to tear it apart and start hacking… like I wasn’t going to do that anyway.

What I found inside was extremely simple. There’s a single un-marked chip that holds the different display modes (there were 3 display modes: warm, cool, and white). The LEDs were arranged in an array of Reds, Blues, Greens, and Whites (half marked yellow).

My goal was to make this a little more tolerable as mood lighting, so I needed to draw up a plan. I have an arduino sitting here from the redbull contest, so I figured why not hook it up to that? It would allow full PWM control of the channels and I could do some pre-programmed sequences if I wanted.

This was ridiculously easy. All I needed to do was solder leads on to each of the LED channels. There are already great tutorials on how to run PWM from the arduino and a couple quick additions would give me direct controls over each channel via potentiometers. So problem solved right?

Well, sort of. It really bugs me that there’s an entire arduino there just for some PWM. I can go buy the components to do 555 timer PWM circuits if all I want is PWM. Then again, if I compare the price, that free arduino is a much cheaper solution than buying 2xcaps, 1×555, 1xtransistor, and assorted resistors and diodes, especially if consider that I’d have to buy it all in triplicate.

Ultimately if I wanted to just leave this as PWM control on each channel, I’d opt for the 555 circuit. What else is there to do with a glowing ball? Simple notification system? Sound reactive? Give me some ideas.


Filed under: Ask Hackaday
Hack a Day 08 Sep 20:01
555  arduino  ask hackaday  led  rgb