Posts with «hacklet» label

Hacklet 68 – Rocket Projects

There’s just something amazing about counting down and watching a rocket lift off the pad, soaring high into the sky. The excitement is multiplied when the rocket is one you built yourself. Amateur rocketry has been inspiring hackers and engineers for centuries. In the USA, modern amateur rocketry gained popularity after Sputnik-1, continuing on through the space race. Much of this history captured in the book Rocket Boys by Homer Hickam, which is well worth a read. This week’s Hacklet is dedicated to some of the best rocketry projects on Hackaday.io!

We start with [Sagar] and Guided Rocket. [Sagar] is building a rocket with a self stabilization system. Many projects use articulated fins for this, and [Sagar] plans to add fins in the future, but he’s starting with an articulated rocket motor. The motor sits inside a gimbal, which allows it to tilt about 10 degrees in any direction. An Arduino is the brain of the system. The Arduino gathers data from a MPU6050 IMU sensor, then determines how to steer the rocket motor. Steering is accomplished with a couple of micro servos connected to the gimbal.


Next up is [Howie], with Homemade rocket engine. [Howie] is cooking some seriously hot stuff on his stove. Rocket candy to be precise, similar to the fuel [Homer Hickam] wrote about in Rocket Boys. This solid fuel is so named because one of the main ingredients is sugar. The other main ingredient is stump remover, or potassium nitrate. Everything is mixed and heated together on a skillet for about 30 minutes, then pushed into rocket engine tubes. It goes without saying that you shouldn’t try this one at home unless you’re really sure of what you’re doing!


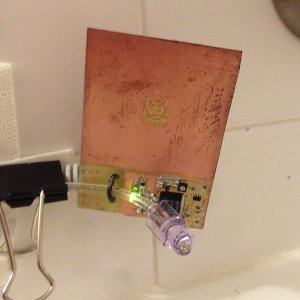
Everyone wants to know how high their rocket went. [Vcazan] created AltiRocket to record acceleration and altitude data. AltiRocket also transmits the data to the ground via a radio link. An Arduino Nano keeps things light. A BMP108 barometric sensor captures pressure data, which is easily converted into altitude. Launch forces are captured by a 3 Axis accelerometer. A tiny LiPo battery provides power. The entire system is only 23 grams! [Vcazan] has already flown AltiRocket, collecting data from several flights earlier this summer.


Finally we have [J. M. Hopkins] who is working on a huge project to do just about everything! High Power Experimental Rocket Platform includes designing and building everything from the rocket fuel, to the rocket itself, to a GPS guided parachute recovery system. [J. M. Hopkins] has already accomplished two of his goals, making his own fuel and testing nozzle designs. The electronics package to be included on the rocket is impressive, including a GPS, IMU, barometric, and temperature sensors. Data will be sent back to the ground by a 70cm transceiver. The ground station will use a high gain human-guided yagi tracking antenna with a low noise amplifier to pick up the signal.

If you want more rocketry goodness, check out our brand new rocket project list! Rocket projects move fast, if I missed yours as it streaked by, don’t hesitate to drop me a message on Hackaday.io. That’s it for this week’s Hacklet, As always, see you next week. Same hack time, same hack channel, bringing you the best of Hackaday.io!


Filed under: Hackaday Columns

Hacklet 39: The Kerbal Way Of Doing Things

Kerbal Space Program is a space flight simulator based on an extremely stupid race of green space frogs that have decided to dedicate all their resources towards the exploration of space. It is a great game, a better space simulator than just about anything except for Orbiter, and the game is extremely moddable. For this edition of the Hacklet, we’re going to be taking a look at some of the mods for KSP you can find over on hackaday.io.

Like most hardware builds for Kerbal Space Program, [lawnmowerlatte] is using a few user-made plugins for KAPCOM, a hardware controller and display for KSP. The Telemachus plugin is used to pull data from the game and display that data on a few screens [lawnmower] had sitting around.

There are a few very cool features planned for this build including seven-segment displays, a throttle handle, and neat enclosure.


[Gabriel] is working on a similar build for KSP. Like the KAPCOM, this one uses the Telemachus plugin, but this one adds three eight-digit, SPI-controlled, seven-segment displays, relegendable buttons, and a Kerbal-insipired frame made out of Meccano.


[Lukas]’ KSP Control Panel is another complicated control system that breaks immersion slightly less than a keyboard. He’s using a Raspberry Pi to talk to the Telemachus server to control every aspect of the craft. From staging to opening up the solar panels, it’s all right there in [Lukas]’ control panel.


You may have noticed a theme with these builds; all of them use the Telemachus plugin for KSP. Even though it’s fairly simple to create plugins for Unity, there really aren’t that many KSP plugins build for these immersive control panels and space flight simulators. Or rather, Telemachus is ‘good enough’. We’d like to see a fully controllable KSP command pod model, just like those guys with 737 flight simulators in their garage. If you have any idea how that could happen, leave a note in the comments.


Filed under: Hackaday Columns

Hacklet 29 – Altoids Mint Tin Projects

Altoids – they’ve been around since King George III was on the throne. These curiously strong mints have had a storied history, a copy of which is included in every tin. They taste pretty good, but most hackers and makers are more interested in the pocket-sized tin than the mints themselves. It may have been the ham radio operators who first used Altoids tins to hold their sensitive transmitter and receiver circuits. The metal case makes a perfect electromagnetic field shield. It wasn’t long before the tins found their way into thousands of projects. This week’s Hacklet features some of the best projects with Altoids (and other mint) tins on Hackaday.io!

We start with [Chad Lawson] and the Networking Group Timing Light. [Chad] has a networking meeting where each member has two minutes to introduce themselves. As is the case with most meetings, people tend to be a bit long-winded, running well beyond their allotted two minutes. The timing light contains an RGB LED which changes from green to yellow to red as a speaker’s time ticks away. The timer is reset by simply tilting the mint tin. [Chad] is hoping that the timer will serve as a gentle reminder to keep everyone on track time-wise.


Next up is [Rjpope42] and his AM/FM Transmitter Pair. [Rjpope42] loves vintage tube radios, and wants to send his own signals to his amber glowing projects. Wiring an external audio input to a tube radio is pretty easy, but nothing beats a simple AM transmitter for convenience. Small FM transmitters are commonly available to add an MP3 player input to cars without an AUX audio in, but their AM counterparts have become rare. [Rjpope42] has built AM and FM transmitters, each of which will fit in a Mint Tin case. The AM transmitter can run on 9V or 12V, and even includes a USB power output for charging an MP3 player or phone!

[John Hamann] entered Distance Analyzer 3000 in the Trinket EDC contest. While he didn’t win, it was still a great project, especially since this is [John’s] first serious Arduino project. The idea is to use a rotary encoder with a wheel to measure distances. Think of it like a mini version of a surveyor’s walking wheel. The Pro Trinket counts the pulses from the rotary encoder, then converts this to a distance in feet. We’d love to see [John] continue on the project. An ultrasonic distance sensor would be a great addition for multi-sensor distance reads!


Finally, we have [colonwq] with TTTOTP, a pro trinket Time based One Time Password (TOTP) generator. [colonwq] used the trinket to implement the well-known time based one time password algorithm. To implement a project like this, you need a stable time source. The ATmega328 isn’t very good at this, so [colonwq] used a Dallas DS1307 clock chip to keep track of things. The actual code is displayed on a 4 digit 7 segment display. When the button is pressed, the first half of the code is displayed. Once the button is released, the second half of the code is displayed for several seconds.


Need more mint? Check out our curiously awesome mint tin project list!

Hackaday.io Update and MeArm Giveaway

Hackaday.io has a few new features, including @username and #projectID. If you mention someone’s username with an @ in front of it, that user will get a notification in their stack. The same goes with mentioning a project ID with a # up front. To celebrate this, we’re giving away a pair of  special edition MeArms. All you have to do is leave a comment using the features on this project log. Huge thanks to [Jasmine] for setting all this up, and to [Ben] for letting us hijack his project for the week!

That’s it for this Hacklet, As always, see you next week. Same hack time, same hack channel, bringing you the best of Hackaday.io!


Filed under: Hackaday Columns

Hacklet #10 Cryptography and Reverse Engineering

In honor of DEFCON, this week we’re looking at some cryptography and reverse engineering projects over at Hackaday.io

Every hacker loves a hardware puzzle, and [Tom] has created a tool to make those puzzles. His Hardware Reverse Engineering Learning Platform consists of a shield with two ATmega328 chips and an I2C EEPROM. The two Atmel chips share a data bus and I2C lines. Right in the middle of all this is an ST Morpho connector, which allows an ST Nucleo board to act as a sniffer. The platform allows anyone to create a reverse engineering challenge!

To successfully reverse engineer a board, it sure helps to have good tools. [coflynn] is giving that to us in spaces with The ChipWhisperer. ChipWhisperer is an open source security research platform. The heart of the system is a Xilinx Spartan 6 FPGA. The FPGA allows very high speed operations for things like VCC and clock glitching. ChipWhisperer is an entire ecosystem of boards – from LNA blocks to field probes. The entire system is controlled from an easy to use GUI. The end result is a powerful tool for hardware attacks.

On the Encryption side of the house, we start by keeping the Feds at bay. The [Sector67] hackerspace has collectively created NSA AWAY. NSA AWAY is a simple method of sending secure messages over an insecure medium – such as email. A one-time use pad is stored on two SD cards, which are used by two Android devices. The message sender uses an Android device to encrypt the message. On the receive side, the message can be decoded simply by pointing an android device’s camera at the encrypted data. So easy, even a grandparent could do it!

Next up is [Josh's] Bury it under the noise floor. “Bury it” is an education for cryptography in general, and stenographic software in particular. [Josh] explains how to use AES-256 encryption, password hashing, and other common techniques. He then introduces stenography  by showing how to hide an encrypted message inside an image. Anyone who participated in Hackaday’s ARG build up to The Hackaday Prize will recognize this technique.

[yago] gives us encrypted voice communications with his ZRTP Hardphone. The hardphone implements the ZRTP, a protocol for encrypted voice over IP communications. The protocol is implemented by a Raspberry Pi using a couple of USB sound cards. User interface is a 16×2 Line character LCD, a membrane keypad, and of course a phone handset. Don’t forget that you need to build two units,or  whoever you’re trying to call will  be rather confused!

Finally we have the Mooltipass. Developed right here on Hackaday by [Mathieu Stephan] and the community at large, Mooltipass is a secure password storage system. All your passwords can be stored fully AES-256 encrypted, with a Smart Card key. Under the hood, Mooltipass uses an Arduino compatible ATmega32U4 microcontroller. UI is through a OLED screen and touch controls.


That’s it for this week! Be sure to check out next week’s Hacklet, when we bring you more of the best from Hackaday.io!


Filed under: Hackaday Columns

Hacklet #8: The Animals

This week on the Hacklet we’re looking at Hackaday.io projects that are all about animals! Hackers and makers are well-known animal lovers, in fact many a hacker can be found with a pet curled up at their feet, or on their keyboard!

[Brian's] cat Roger loves drinking from the bathtub faucet. Unfortunately Roger hasn’t learned how to operate the faucet himself, so it gets left on quite a bit. To keep Roger happy while saving water, [Brian] created the Snooty Cat Waterer. Cat’s still don’t have thumbs, so [Brian] turned to capacitive sensing in the form of a Microchip MTCH10 capacitive proximity sensor chip. Coupled with a home etched PC board, the waterer can detect a cat at 3 inches. A valve and water feed teed off the toilet provide the flow. The project is moving along well, though Roger has been slow to warm up to this new water source.


[Jsc] has the opposite problem. His cat has decided that bathtubs are the perfect litter boxes. [Jsc] is taking aim at this little problem with his Cat Dissuader. After a servo controlled squirt bottle proved too anemic for his needs, [Jsc] turned to the Super Soaker Hydrostorm. These electric water guns can be had for as little as $16 on sale. [JSC] didn’t want to permanently modify the gun, so he 3D printed a switchable battery pack.The replacement pack is actually powered by a simple wall wart. Power to the gun is controlled by an Arduino, which senses his cat with a passive infrared sensor. Since the dissuader was installed, [Jsc's] cat has been a model citizen!


Cat’s don’t get all the love though, plenty of engineers and hackers have dogs around the house. [Colin] loves his dog, but he and his family were forgetting to feed it. He created Feed the Dog to help the household keep its four-legged member from going hungry. [Colin] tried a microcontroller, but eventually settled on implementing the circuit with old-fashioned 4000 series CMOS logic chips. He used a 4060 (14-stage ripple counter w/ internal oscillator) as an 8 hour timer, and 4013 dual flip-flop. Operation of Feed the Dog is as simple as wagging your tail. Once the dog is feed, the human presses a button. A green “Just fed” LED will glow for 30 minutes, then go dark. After about 6 hours, a red LED turns on. After 8 hours, the red LED starts blinking, letting everyone know that it’s time to feed the dog.


[Steve] has outdoor pets. Chooks to be exact, or chickens for the non Australians out there. He loves watching his birds, especially Darth Vader, who is practicing to become a rooster. To keep track of the birds, he’s created What the Chook?, a sensor suite for the hen-house. He’s using a GCDuiNode with a number of sensors. Temperature, humidity, even a methane detector for when the bedding needs to be replaced. An OV528 JPEG camera allows [Steve] to get pictures of his flock. The entire project connects via WiFi. Steve hopes to power it from a couple of AA batteries. [Steve] also entered What the Chook? in The Hackaday Prize. If he wins, this will be the first case of flightless birds sending a human to space!


Hey – Did you know that Hackaday is building a Hackerspace in Pasadena California? We’re rounding up the local community while our space is being built out. Join us at a Happy Hour Show & Tell Meetup Event hosted by our own [Jasmine Brackett] August 18th! It’s an informal show and tell, so you don’t have to bring a hack to attend. If you’re local to Pasadena, come on down and say hello!


Filed under: Hackaday Columns