Posts with «xbee» label

Webmote: control anything with web-based remote

We’ve seen a lot of projects that let you control all of your devices from a smartphone. But this universal web-based remote control system looks like the most versatile we’ve seen yet. The project is called Webmote as the controls are served up as a web interface so that you’re not limited to say an Android device. The UI can be customized by choosing what buttons you will use and where to place them on the display. You can get a good feel for this by viewing this G+ album. Setup is made a bit easier thanks to an add-on system that has predefined layouts for common things like controlling XBMC.

The hardware seen above is the business end of Webmote. It’s an Arduino with an IR receiver, IR LED, and an XBee module. For your common home entertainment devices you can teach the system your codes using the IR receiver. The IR LED is used to transmit those codes back, and the Xbee gives you the ability to control X10 (home automation) devices. Right now the setup requires the hardware be connected to a server via USB, but it shouldn’t be hard to set up some type of wireless alternative.


Filed under: home entertainment hacks

Yellow Plane 2 with Inverted V Tail


[nickatredbox] keeps up to date with the improvements of his project [yellow plane]. As you can find on this blog, the project is evolving week by week. Let’s see what’s today submission

1200 mm Wing space
280 mm cord
14% Clark Y
Target AUW 1300 Grams

Missing battery and camera box have a design which should weigh 140 grams empty.
The assembly shown below weighs 684 Grams no motor or electronics.
Electronics shown weigh 110 grams ESC Arduino board, Xbee, antenna and Gyro board
Motor & prop another 120 Gram

Here you have a [video]  and there you can follow the project on the [website]

Yellow Jet


[nickatredbox] has a passion in building planes. Here the details of another work:

Yellow Jet 758 Grams with remaining Coroplast 2 X 7.4 V 1300 mAh batteries Arduino Nano RX Xbee with antenna, servos and misc hardware. Chamfered the top on the leading edges. All control surfaces cut and hinged. ESC mounted

Elevator mechanism for EDF jet carbon rod and ballpoint pen ink reservoir seems quite stiff with low backlash

See the video here http://www.youtube.com/watch?v=_Z9wEU6c1F0&hd=1

This plane flew pretty poorly unfortunately, but the controller worked well the EDF lacked thrust

You can find more on the [website]

Arduino project has Sega Rally cabinets steer RC cars: like the game with more bruised ankles (video)

We've seen attempts at recreating video game racing in real life. For Artica and The Arcade Man, there's no desire to preserve the illusion -- they've jury-rigged two Sega Rally cabinets to control the strictly real-world racing experiences of RC cars. Their two-machine setup from the recent Codebits VI event in Portugal yanks the original arcade computing power in favor of an Arduino-powered system that maps the steering wheel and pedals to the tiny vehicles through a wireless Xbee link. The setup does make a nod to traditional video games through the cameras, however: drivers can pick either an arcade-style overhead camera or jump to a cabin-level view. The only true challenge during the build process was to find viable displays for the rigs, as the original CRTs proved too problematic for the retrofit. Some might consider it sacrilege to gut a classic cabinet for the sake of some RC action, but the end result is a racing experience that's at once very familiar and yet surprisingly fresh. Spectators had better watch their feet, though -- the competition might get fierce out there.

Continue reading Arduino project has Sega Rally cabinets steer RC cars: like the game with more bruised ankles (video)

Filed under: Gaming, Transportation

Comments

Source: The Arcade Man

RC Sega Rally @ Codebits VI


Codebits is the most geekest event in Portugal and surroundings!

read more

Let's Make Robots 25 Nov 09:24
arcade  arduino  camera  car  control  game  rc  sega rally  xbee  

Arduino Controlled Yellow Plane

Another interesting project by [nickatredbox], you can find this and all others on the [website].

This project is a plane with the Arduino Xbee remote control working on its maiden flight. It worked well no technical issues, very happy with the results

Building the controller was a very interesting curve, learned a lot of practical usage solutions to problems and ended up with a simple piece of code which is always good in my experience, keep it simple but not to simple.


High tech tagging adds graffiti to poles

[Akira] looks to increase his urban canvas by tagging poles which some custom hardware. If you’re looking to add some art to a lamp post, height becomes a problem. That’s where this little guy comes in. The remote-controlled pole climber includes a marker that leaves a trail as the device climbs and descends.

The rig clamps around a pole, with omnidirectional bearings on three sides of the four-sided frame. That last side is occupied by a rubber wheel mounted at a bit of an angle. When the motor turns the angle of the wheel causes the jig to rotate around the pole and climb at the same time. To come back down the motor is simply reversed. Xbee modules are used to make a rudimentary wireless control with a button for up and another for down. It looks like the marker is also mounted on a servo but we didn’t see a way to control when it is actually touching the pole. Perhaps you can figure it out by studying the clip after the jump.

We’ve seen projects that climb poles before. Among our favorites is the one that takes your bicycle with it.


Filed under: robots hacks
Hack a Day 23 Nov 19:01

Arduino & Xbee Remote Control

[nickatredbox] has sent this interesting project with Arduino involving wireless comunication. The fun comes when you have to decide to buy something already done or DIY.

I wanted a remote control system of my own design for may various RC model projects planes and boats. I set about researching the options and and Xbee with / Arduino solution poped out as a viable option, having failed performance testing using both WiFi and TinyCLR. The other feature I get as the Xbee is a transceiver is real-time telemetery. I’m sure I could buy this functionality from HobbyKing but where is the fun in that.

More project on the [website]

Arduino UNO - XBee Setup

There are many XBee tutorials out there, but I could not find one that I could apply to my specific Arduino/Shield/Xbee configuration. While this particular configuration may not apply to you, perhaps it will send you in the right direction, so please read on.
Please note, that your XBee shield may require you to perform extra steps, so please do further reading before jumping in head first. I am not an expert, so don't blame me if you fry your board.

The following set of steps worked for me:


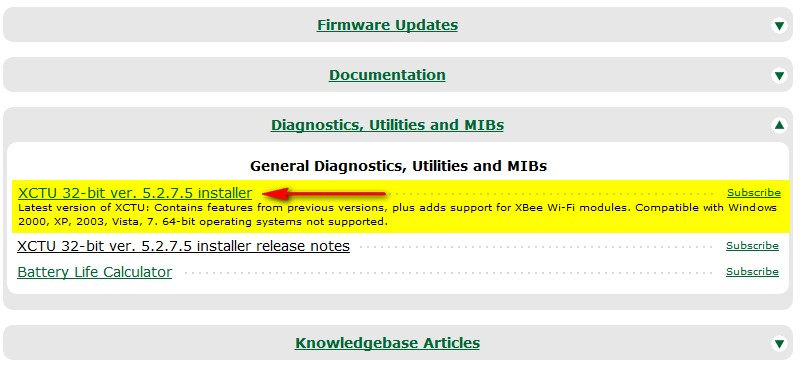
Step 1: Download and Install X-CTU

The easiest way to setup your XBee module is via the X-CTU software from Digi. It can be downloaded from their site here:  http://www.digi.com/support/productdetail?pid=3257

  • Select  the Diagnostics, Utilities and MIBs section


  • Download and install the XCTU 32-bit ver 5.2.7.5 installer (do a virus check after download)
  • Please note that this is for Windows platforms only

  • FYI: We will run the software later


Step 2: Upload the bare-minimum script on your Arduino controller

I perform this step to prevent any previous projects from interfering. This may not be necessary, but I tend to do this before wiring up any of my new projects. This is the script I load onto the Arduino:

Bare Minimum Arduino Sketch:
1
2
3
4
5
6
7
void setup() {

}

void loop() {

}


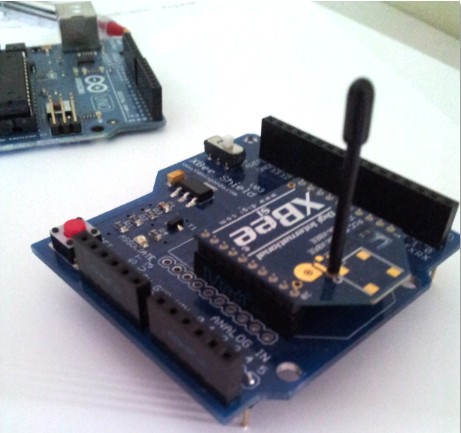
Step 3: Connect the Shield to Arduino, and XBee to Shield.


  • Disconnect the Arduino UNO from the computer. 

  • Insert the XBee module into the Shield.
  • This is the XBee Shield and XBee module side by side


    This is the XBee module on the XBee Shield


  • The pins from the XBee module should slot into the respective headers on the Shield.


  • Connect the XBee shield to the Arduino

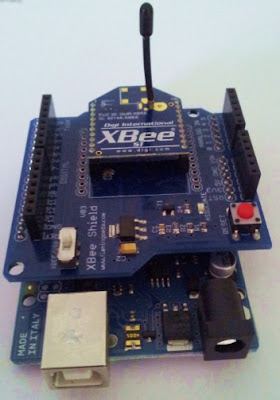
  • The pins from the XBee shield should slot into the respective headers on the Arduino board.


  • Move the little white switch in the corner to USB.

    • There are 2 options - USB mode and XBee mode.
    • We want USB mode which will allow the computer to communicate with the XBee module


Step 4: Connect Arduino to computer, and run the X-CTU Software


  • With the XBee module and Shield connected to the Arduino, and the Shield's white switch in USB mode;  connect the Arduino to the computer using a USB cable.
  • This Arduino board appears as COM7 on my computer.
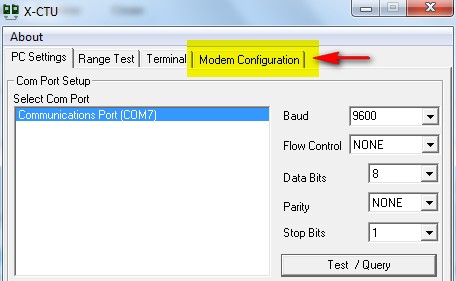
  • Here is what the X-CTU software looks like when it loads up


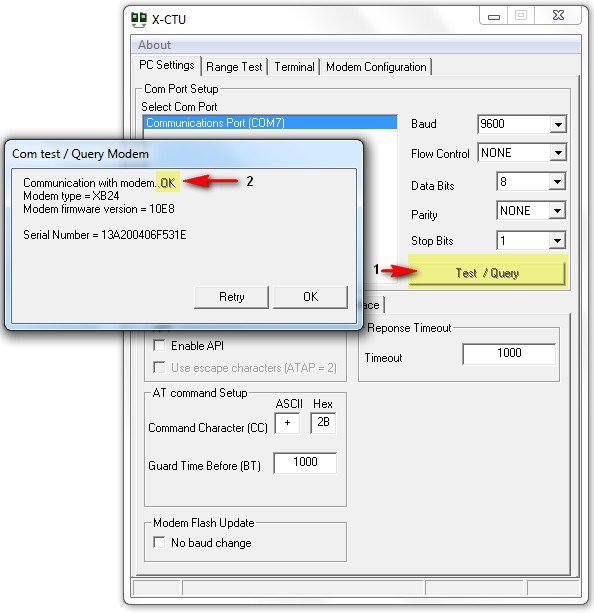
  • Press the Test / Query button to see if the computer can talk to the XBee module.
    • If successful, you should see something like this:


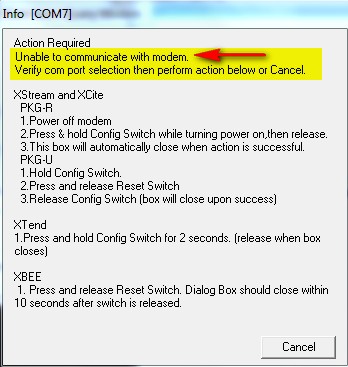
  • If you accidentally leave the XBee shield in XBee mode, or if your computer fails to communicate with the XBee module, you may encounter these screens.


If you get a successful Test / Query, then move onto the next step.


Step 5: Read XBee Firmware settings:

We can now try to read the XBee firmware settings by
  • Selecting the Modem Configuration Tab

  • Select the Read button to read the XBee firmware settings


Step 6: Download older version of firmware if necessary

  • If you did not have any issues with the previous step, then continue to step 7, otherwise read on.
  • In my case, the software could not find the firmware file necessary to read the firmware settings.
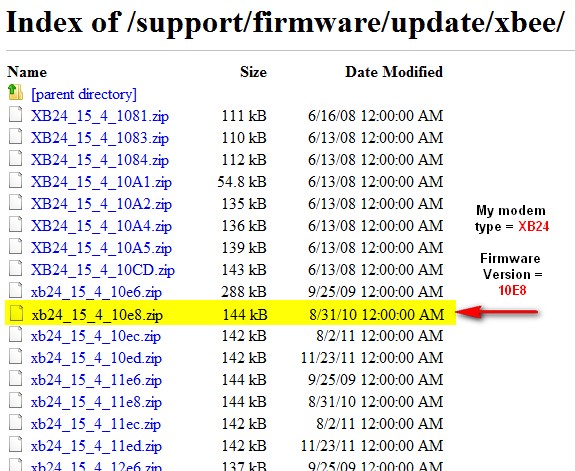
  • In step 4, I could see that I had the XB24 Modem type, and 10E8 firmware version,

  • I tried downloading new versions, but this did not seem to work, as the computer could not detect any newer updates available. The problem I had, was that I needed an "older version" of firmware to communicate with the XBee module in order to read/write new settings to it.
  • I could not select the firmware version from the drop down boxes, which indicated that this particular firmware version was not installed on my computer. So here is what I did.
    • I went back to the Digi site and selected the Firmware update section.
    • This provided a link to an FTP site with "previous versions" of firmware.


  • I then selected the relevant firmware version from the list, and downloaded the zip file to a logical folder on my hard-drive.  There is no need to unzip the file, because the X-CTU software will look for a zipped file.


  • In the X-CTU software, in the Modem Configurations tab, select the "Download new versions button", and select File. Navigate to the zip-file just downloaded and select it. 


  • The software should tell you that it has updated successfully or something to that effect.
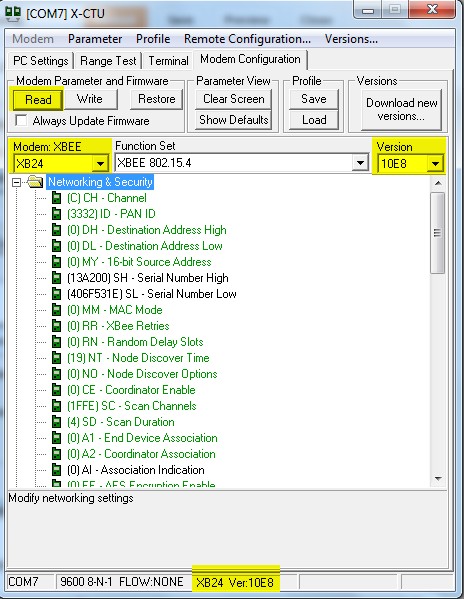
  • The modem type and version should now be an available option in the drop down boxes, however, we will continue where we left off (in step 5) and try an read the firmware settings from the XBee module, by pressing the Read button in the Modem Configurations tab on the X-CTU software.
  • It should look something like this:

TO BE CONTINUED.......

16×8 pixel laser projector

[Michiel] gave us a little shout-out by drawing the Hackaday logo with his recently completed 16×8 pixel laser projector. It uses a spinning set of mirrors mounted at slightly different angles to redirect the path of the red laser diode.

The projector is driven by an Arduino. To give it more than just a hard-coded existence [Michiel] included an Xbee module. This lets him connect to it with a computer in order to stream messages. One of the demo videos linked in his project log shows the web interface he coded which will push a message typed in the submission form out to the projector where it is scrolled like a marquee.

This type of spinning display is one of a few common methods for making laser projectors. In the image above you can see the optical sensor which is used to sync the diode with the spinning mirrors, each of which is responsible for a different row of pixels. He lists off several things that he learned when working on the project. We think the most important is the timing issues which go into something like this.


Filed under: laser hacks
Hack a Day 14 Sep 23:01