Posts with «training» label

Hack Your Cat’s Brain to Hunt For Food

This cat feeder project by [Ben Millam] is fascinating. It all started when he read about a possible explanation for why house cats seem to needlessly explore the same areas around the home. One possibility is that the cat is practicing its mobile hunting skills. The cat is sniffing around, hoping to startle its prey and catch something for dinner. Unfortunately, house cats don’t often get to fulfill this primal desire. [Ben] thought about this problem and came up with a very interesting solution. One that involves hacking an electronic cat feeder, and also hacking his cat’s brain.

First thing’s first. Click past the break to take a look at the demo video and watch [Ben’s] cat hunt for prey. Then watch in amazement as the cat carries its bounty back to the cat feeder to exchange it for some real food.

[Ben] first thought about hiding bowls of food around the house for his cat to find, but he quickly dismissed this idea after imagining the future trails of ants he would have to deal with. He instead thought it would be better to hide some other object. An object that wouldn’t attract pests and also wouldn’t turn rancid over time. The problem is his cat would have to know to first retrieve the object, then return it to a specific place in order to receive food as a reward. That’s where the cat hacking comes in.

[Ben] started out by training his cat using the clicker method. After all, if the cat couldn’t be trained there was no use in building an elaborate feeding mechanism. He trained the cat to perform two separate behaviors, one tiny bit at a time. The first behavior was to teach the cat to pick up the ball. This behavior was broken down into six micro behaviors that would slowly be chained together.

  • Look at the ball
  • Approach the ball
  • Sniff the ball
  • Bite the ball
  • Pick up the ball
  • Pick up the ball and hold it for a few seconds

[Ben] would press on the clicker and reward his cat immediately upon seeing the desired step of each behavior. Once the cat would perform that step regularly, the reward was removed and only given to the cat if the next step in the chain was performed. Eventually, the cat learned the entire chain of steps, leading to the desired behavior.

Next, [Ben] had to teach his cat about the target area. This was a separately trained behavior that was broken down into the following three steps.

  • Look at the target area
  • Approach the target area
  • Sniff the target area

Once the cat learned both of these behaviors, [Ben] had to somehow link them together. This part took a little bit of luck and a lot of persistence. [Ben] would place the ball near the target area, but not too close. Then, he would reward his cat only when the cat picked up the ball and started moving closer to the target area. There is some risk here that if the cat doesn’t move toward the target area at all, you risk extinguishing the old behaviors and they will have to be learned all over again. Luckily, [Ben’s] cat was smart enough to figure it out.

With the cat properly trained, it was time to build the cat feeder. [Ben] used an off-the-shelf electronic feeder called Super Feeder as the base for his project. The feeder is controlled by a relay that is hooked up to an Arduino. The Arduino is also connected to an RFID reader. Each plastic ball has an RFID tag inside it. When the cat places the ball into the target area, the reader detects the presence of the ball and triggers the relay for a few seconds. The system also includes a 315MHz wireless receiver and remote control. This allows [Ben] to manually dispense some cat food should the need arise.

Now whenever the cat is hungry, it can use those primal instincts to hunt for food instead of just having it freely handed over.

[Thanks Dan]


Filed under: home hacks
Hack a Day 08 Aug 18:00
315mhz  arduino  ball  behavior  brain  cat  clicker  control  feeder  food  home  home hacks  hunt  kitten  learn  psychology  remote  rfid  tag  teach  training  

Practice Your Service Return With This Arduino-Powered Automatic Ping-Pong Ball Machine

Friction wheel mechanism, frame made of VEX Robotics Design System components.

Read more on MAKE

Yellow Plane 2 with Inverted V Tail


[nickatredbox] keeps up to date with the improvements of his project [yellow plane]. As you can find on this blog, the project is evolving week by week. Let’s see what’s today submission

1200 mm Wing space
280 mm cord
14% Clark Y
Target AUW 1300 Grams

Missing battery and camera box have a design which should weigh 140 grams empty.
The assembly shown below weighs 684 Grams no motor or electronics.
Electronics shown weigh 110 grams ESC Arduino board, Xbee, antenna and Gyro board
Motor & prop another 120 Gram

Here you have a [video]  and there you can follow the project on the [website]

Review: Gooligum Electronics PIC Training Course and Development Board

Introduction

[Updated 18/06/2013]

There are many types of microcontrollers on the market, and it would be fair to say one of the two most popular types is the Microchip PIC series. The PICs are great as there is a huge range of microcontrollers available across a broad range of prices. However learning how to get started with the PIC platform isn’t exactly simple. Not that we expect it to be, however a soft start is always better. There are some older books, however they can cost more than $100 – and are generally outdated. So where do you start?

It is with this problem in mind that led fellow Australian David Meiklejohn to develop and offer his PIC Training Course and Development Board to the marketplace via his company Gooligum Electronics.

In his words:

There is plenty of material available on PICs, which can make it daunting to get started.  And some of the available material is dated, originally developed before modern “flash” PICs were available, or based on older devices that are no longer the best choice for new designs.  Our approach is to introduce PIC programming and design in easy stages, based on a solid grounding in theory, creating a set of building blocks and techniques and giving you the confidence to draw on as we move up to more complex designs.

So in this article we’ll examine David’s course package. First of all, let’s look at the development board and inclusions. Almost everything you will need to complete all the lessons is included in the package, including the following PIC microcontrollers:

You can choose to purchase the board in kit form or pre-assembled. If you enjoy soldering, save the money and get the kit – it’s simple to assemble and a nice way to spend a few hours with a soldering iron.

Although the board includes all the electronic components and PICs – you will need are a computer capable of running Microchip MPLAB software, a Microchip PICkit3 (or -2) programming device and an IC extractor. If you’re building the kit, a typical soldering iron and so on will be required. Being the  ultra-paranoid type, I bought a couple extra of each PIC to have as spares, however none were damaged in my experimenting. Just use common-sense when handling the PICs and you will be fine.

Assembly

Putting the kit board together wasn’t difficult at all. There isn’t any surface-mount parts to worry about, and the PCB is silk-screened very well:

The rest of the parts are shipped in antistatic bags, appropriately labelled and protected:

Assembly was straight forward, just start with the low-profile parts and work your way up. The assembly guide is useful to help with component placement. After working at a normal pace, it was ready in just over an hour:

The Hardware

Once assembled (or you’ve opened the packaging) the various sections of the board are obvious and clearly labelled – as they should be for an educational board. You will notice a large amount of jumper headers – they are required to bridge in and out various LEDs, select various input methods and so on. A large amount of jumper shunts is included with the board.

It might appear a little disconcerting at first, but all is revealed and explained as you progress through the lessons. The board has decent rubber feet, and is powered either by the PICkit3 programmer, or a regulated DC power source between 5 and 6V DC, such as from a plug-pack if you want to operate your board away from a PC.

However there is a wide range of functions, input and output devices on the board – and an adjustable oscillator, as shown in the following diagram:

The Lessons

There is some assumed knowledge, which is a reasonable understanding of basic electronics, some computer and mathematical savvy and the C programming language.

You can view the first group of lessons for free on the kit website, and these are included along with the additional lessons in the included CDROM. They’re in .pdf format and easy to read. The CDROM also includes all the code so you don’t have to transcribe it from the lessons. Students start with an absolute introduction to the system, and first learn how to program in assembly language in the first group of tutorials, followed by C in the second set.

This is great as you learn about the microcontroller itself, and basically start from the bottom. Although it’s no secret I enjoy using the Arduino system – it really does hide a lot of the actual hardware knowledge away from the end user which won’t be learned. With David’s system – you will learn.

If you scroll down to the bottom of this page, you can review the tutorial summaries. Finally here’s a quick demonstration of the 7-segment displays in action:

Update – 18/06/2013

David has continued publishing more tutorials for his customers every few months – including such topics as the EEPROM and pulse-width modulation. As part of the expanded lessons you can also get a pack which allows experimenting with electric motors that includes a small DC motor, the TI SN75441 h-bridge IC, N-channel and P-channel MOSFETS and more:

So after the initial purchase, you won’t be left on your own. Kudos to David for continuing to support and develop more material for his customers.

Where to from here? 

Once you run through all the tutorials, and feel confident with your knowledge, the world of Microchip PIC will be open to you. Plus you now have a great development board for prototyping with 6 to 14-pin PIC microcontrollers. Don’t forget all the pins are brought out to the row of sockets next to the solderless breadboard, so general prototyping is a breeze.

Conclusion

For those who have mastered basic electronics, and have some C or C-like programming experience from using other development environments or PCs – this package is perfect for getting started with the Microchip PIC environment. Plus you’ll learn about assembly language – which is a good thing. I genuinely recommend this to anyone who wants to learn about PIC and/or move into more advanced microcontroller work. And as the entire package is cheaper than some books –  you can’t go wrong. The training course is available directly from the Gooligum website.

Disclaimer – The Baseline and Mid-Range PIC Training Course and Development Board was a promotional consideration from Gooligum Electronics.

In the meanwhile have fun and keep checking into tronixstuff.com. Why not follow things on twitterGoogle+, subscribe  for email updates or RSS using the links on the right-hand column? And join our friendly Google Group – dedicated to the projects and related items on this website. Sign up – it’s free, helpful to each other –  and we can all learn something.

The post Review: Gooligum Electronics PIC Training Course and Development Board appeared first on tronixstuff.

Neural Network (Part 6) : Back Propagation, a worked example

A worked example of a Back-propagation training cycle.


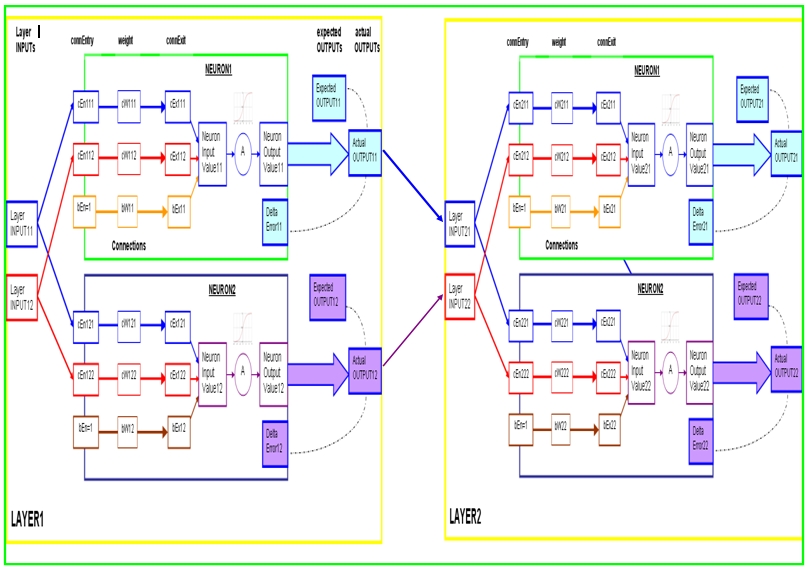
In this example we will create a 2 layer network (as seen above), to accept 2 readings, and produce 2 outputs. The readings are (0,1) and the expectedOutputs in this example are (1,0).

Step 1: Create the network

NeuralNetwork NN = new NeuralNetwork();   
NN.addLayer(2,2);
NN.addLayer(2,2);
float[] readings = {0,1};
float[] expectedOutputs = {1,0};
NN.trainNetwork(readings,expectedOutputs);

This neural network will have randomised weights and biases when created.
Let us assume that the network generates the following random variables:

LAYER1.Neuron1
Layer1.Neuron1.Connection1.weight = cW111 = 0.3
Layer1.Neuron1.Connection2.weight = cW112 = 0.8
Layer1.Neuron1.Bias = bW11 = 0.5

LAYER1.Neuron2
Layer1.Neuron2.Connection1.weight = cW121 =  0.1
Layer1.Neuron2.Connection2.weight = cW122 =  0.1
Layer1.Neuron2.Bias = bW12 = 0.2

LAYER2.Neuron1
Layer2.Neuron1.Connection1.weight = cW211 = 0.6
Layer2.Neuron1.Connection2.weight = cW212 = 0.4
Layer2.Neuron1.Bias = bW21 = 0.4

LAYER2.Neuron2
Layer2.Neuron2.Connection1.weight = cW221 = 0.9
Layer2.Neuron2.Connection2.weight = cW222 = 0.9
Layer2.Neuron2.Bias = bW22 = 0.5


Step 2: Process the Readings through the Neural Network

a) Provide the Readings to the first layer, and calculate the neuron outputs

The readings provided to the neural network is (0,1), which go straight through to the first layer (layer1).
Starting with Layer 1:
Layer1.INPUT1 = 0
Layer1.INPUT2 =1

   Calculate Layer1.Neuron1.NeuronOutput
   ConnExit (cEx111) = ConnEntry (cEn111)  x Weight (cW111) = 0 x 0.3 = 0;
   ConnExit (cEx112) = ConnEntry (cEn112)  x Weight (cW112) = 1 x 0.8 = 0.8;
   Bias (bEx11) = ConnEntry (1) x Weight (bW11) = 1 x 0.4 = 0.4
   NeuronInputValue11 = 0 + 0.8 + 0.4 = 1.2
   NeuronOutputValue11 = 1/(1+EXP(-1 x 1.2)) = 0.768525
  
  Calculate Layer1.Neuron2.NeuronOutput
   ConnExit (cEx121) = ConnEntry (cEn121)  x Weight (cW121) = 0 x 0.1 = 0;
   ConnExit (cEx122) = ConnEntry (cEn122)  x Weight (cW122) = 1 x 0.1 = 0.1;
   Bias (bEx12) = ConnEntry (1) x Weight (bW12) = 1 x 0.2 = 0.2
   NeuronInputValue12 = 0 + 0.1 + 0.2 = 0.3
   NeuronOutputValue12 = 1/(1+EXP(-1 x 0.3)) = 0.574443


b) Provide LAYER2 with Layer 1 Outputs.

Now lets move to  Layer 2:
Layer2.INPUT1 = NeuronOutputValue11 = 0.768525
Layer2.INPUT2 = NeuronOutputValue12 = 0.574443

   Calculate Layer2.Neuron1.NeuronOutput
   ConnExit (cEx211) = (cEn211)  x Weight (cW211) = 0.768525 x 0.6 = 0.461115;
   ConnExit (cEx212) = (cEn212)  x Weight (cW212) = 0.574443 x 0.4 = 0.229777;
   Bias (bEx21) = ConnEntry (1) x Weight (bW21) = 1 x 0.4 = 0.4
   NeuronInputValue21 = 0.461115 + 0.229777 + 0.4 = 1.090892
   NeuronOutputValue21 = 1/(1+EXP(-1 x 1.090892)) = 0.74855
  
  Calculate Layer2.Neuron2.NeuronOutput
   ConnExit (cEx221) = (cEn221)  x Weight (cW221) = 0.768525  x 0.1 = 0.076853;
   ConnExit (cEx222) = (cEn222)  x Weight (cW222) = 0.574443  x 0.1 = 0.057444;
   Bias(bEx22) = ConnEntry (1) x Weight (bW22) = 1 x 0.5 = 0.5
   NeuronInputValue22 = 0.076853 + 0.057444 + 0.5 = 0.634297  
   NeuronOutputValue22 = 1/(1+EXP(-1 x 0.634297)) = 0.653463


Step 3) Calculate the delta error for neurons in layer 2
     -Because layer 2 is the last layer in this neural network -
      we will use the expected output data (1,0) to calculate the delta error.
   
LAYER2.Neuron1:
Let Layer2.ExpectedOutput1 = eO21 = 1    
      Layer2.ActualOutput1= aO21 = NeuronOutputValue21= 0.74855         
      Layer2.Neuron1.deltaError1 = dE21

dE21 =     aO21       x      (1 - aO21)     x  (eO21 - aO21)
       =  (0.74855)  x  (1 - 0.74855)  x  (1 - 0.74855)
        = (0.74855)  x     (0.25145)     x    (0.25145)
        = 0.047329


LAYER2.Neuron2:
Let Layer2.ExpectedOutput2 = eO22 = 0         
      Layer2.ActualOutput2     = aO22 = NeuronOutputValue22 = 0.653463      
      Layer2.Neuron2.deltaError = dE22

dE22  =      aO22       x      (1 - aO22)       x  (eO22 - aO22)
        = (0.653463)  x  (1 - 0.653463)  x  (0 - 0.653463)
        = (0.653463)  x     (0.346537)     x    (-0.653463)
        = -0.14797


Step 4) Calculate the delta error for neurons in layer 1

LAYER1.Neuron1 delta Error calculation

Let              Layer1.Neuron1.deltaError  = dE11 
                            Layer1.actualOutput1  = aO11 = NeuronOutputValue11 =  0.768525
      Layer2.Neuron1.Connection1.weight = cW211   =  0.6
                     Layer2.Neuron1.deltaError = dE21 =  0.047329
      Layer2.Neuron2.Connection1.weight = cW221   =  0.9
                     Layer2.Neuron2.deltaError = dE22 = -0.14797

dE11 = (aO11)          x  (1 -   aO11)         x ( [cW211   x   dE21]      +   [cW221  x    dE22] )
           = (0.768525) x   (1 - 0.768525)     x   ([0.6        x  0.047329]  +   [  0.9      x  -0.14797]  )
           = -0.01864

LAYER1.Neuron2 delta Error calculation

Let              Layer1.Neuron2.deltaError  = dE12 
                            Layer1.actualOutput2  = aO12    = NeuronOutputValue12 =  0.574443
      Layer2.Neuron1.Connection2.weight = cW212   =  0.4
                     Layer2.Neuron1.deltaError = dE21 =  0.047329
      Layer2.Neuron2.Connection2.weight = cW222   =  0.9
                     Layer2.Neuron2.deltaError = dE22 = -0.14797

dE12  = (aO12)          x  (1 -   aO12)         x ( [cW212  x     dE21]      +   [cW222  x    dE22] )
           = (0.574443) x   (1 - 0.574443)  x     ([0.4      x  0.047329]  +      [  0.9      x  -0.14797]  )
           = -0.02793


Step 5) Update Layer_2 neuron connection weights and bias (with a learning rate (LR) = 0.1)


Layer 2, Neuron 1 calculations:

Let
Layer2.Neuron1.Connection1.New_weight = New_cW211
Layer2.Neuron1.Connection1.Old_weight   =   Old_cW211   = 0.6
Layer2.Neuron1.Connection1.connEntry =                 cEn211 = 0.768525
Layer2.Neuron1.deltaError =                                       dE21 = 0.047329

New_cW211 = Old_cW211 + (LR x cEn211 x dE21)
                     =    0.6            + (0.1 x 0.768525 x 0.047329)
                     =    0.6            + ( 0.003627)
                     =    0.603627


Layer2.Neuron1.Connection2.New_weight = New_cW212
Layer2.Neuron1.Connection2.Old_weight   =   Old_cW212 = 0.4
Layer2.Neuron1.Connection2.connEntry =                cEn212 = 0.574443
Layer2.Neuron1.deltaError =                                      dE21 = 0.047329

New_cW212 = Old_cW212 + (LR x cEn212 x dE21)
                     =    0.4            + (0.1 x 0.574443 x 0.047329)
                     =    0.4            + (0.002719)
                     =    0.402719


Layer2.Neuron1.New_Bias = New_Bias21
Layer2.Neuron1.Old_Bias =    Old_Bias21 = 0.4
Layer2.Neuron1.deltaError =             dE21 = 0.047329

New_Bias21 = Old_Bias21 + (LR x  1  x  de21)
                     =  0.4              + (0.1 x 1  x 0.047329)
                     =  0.4              + (0.0047329)
                     =  0.4047329


--------------------------------------------------------------------

Layer 2, Neuron 2 calculations:

Layer2.Neuron2.Connection1.New_weight = New_cW221
Layer2.Neuron2.Connection1.Old_weight =    Old_cW221 = 0.9
Layer2.Neuron2.Connection1.connEntry =               cEn221 = 0.768525
Layer2.Neuron2.deltaError =                                     dE22 = -0.14797

New_cW221 = Old_cW221 + (LR x cEn221 x dE22)
                     =    0.9            + (0.1 x 0.768525 x -0.14797)
                     =    0.9            + ( -0.01137)
                     =    0.88863


Layer2.Neuron2.Connection2.New_weight = New_cW222
Layer2.Neuron2.Connection2.Old_weight =    Old_cW222 = 0.9
Layer2.Neuron2.Connection2.connEntry =              cEn222 = 0.574443
Layer2.Neuron2.deltaError =                                    dE22 = -0.14797

New_cW222 = Old_cW222 + (LR x cEn222 x dE22)
                     =    0.9            + (0.1 x 0.574443 x -0.14797)
                     =    0.9            + (-0.0085)
                     =    0.8915


Layer2.Neuron2.New_Bias = New_Bias22
Layer2.Neuron2.Old_Bias =    Old_Bias22 =  0.5
Layer2.Neuron2.deltaError =             dE22 = -0.14797

New_Bias22 = Old_Bias22 + (LR x  1  x  de22)
                     =  0.5              + (0.1 x  1  x  -0.14797)
                     =  0.5            +   (-0.014797)
                     =  0.485203


--------------------------------------------------------------------------


Step 6) Update Layer_1 neuron connection weights and bias.

Layer 1, Neuron 1 calculations:

Let
Layer1.Neuron1.Connection1.New_weight = New_cW111
Layer1.Neuron1.Connection1.Old_weight   =   Old_cW111   =  0.3
Layer1.Neuron1.Connection1.connEntry =                 cEn111 = 0
Layer1.Neuron1.deltaError =                                       dE11 = -0.01864

New_cW111 = Old_cW111 + (LR   x  cEn111   x   dE11)
                     =  0.3              +   (0.1   x     0      x    -0.01864)
                     =  0.3              +   ( 0 )
                     =  0.3    


Layer1.Neuron1.Connection2.New_weight = New_cW112
Layer1.Neuron1.Connection2.Old_weight   =   Old_cW112 = 0.8
Layer1.Neuron1.Connection2.connEntry =               cEn112 = 1
Layer1.Neuron1.deltaError =                                      dE11 = -0.01864

New_cW112 = Old_cW112 + (LR   x  cEn112   x   dE11)
                     =  0.8    +            (0.1     x    1     x     -0.01864)
                     =  0.8    +            (-0.001864)
                     =  0.798136   


Layer1.Neuron1.New_Bias = New_Bias11
Layer1.Neuron1.Old_Bias =    Old_Bias11 = 0.5
Layer1.Neuron1.deltaError =             dE11 = -0.01864

New_Bias11 = Old_Bias11 + (LR   x  1   x  dE11)
                     =  0.5              + (0.1   x 1   x -0.01864 )
                     =  0.5              + (-0.001864)
                     =  0.498136

--------------------------------------------------------------------

Layer 1, Neuron 2 calculations:

Layer1.Neuron2.Connection1.New_weight = New_cW121
Layer1.Neuron2.Connection1.Old_weight =    Old_cW121 = 0.1
Layer1.Neuron2.Connection1.connEntry =               cEn121 = 0
Layer1.Neuron2.deltaError =                                     dE12 =   -0.02793

New_cW121 = Old_cW121 + (LR  x  cEn121 x dE12)
                     =  0.1               + (0.1  x     0     x  -0.02793 )
                     =  0.1   +   (0)
                     =  0.1


Layer1.Neuron2.Connection2.New_weight = New_cW122
Layer1.Neuron2.Connection2.Old_weight =    Old_cW122 = 0.1
Layer1.Neuron2.Connection2.connEntry =              cEn122 = 1
Layer1.Neuron2.deltaError =                                    dE12 =  -0.02793

New_cW122 = Old_cW122 + (LR  x  cEn122  x   dE12)
                     =  0.1                + (0.1   x    1      x  -0.02793)
                     =  0.1    +  (-0.002793)
                     =  0.097207


Layer1.Neuron2.New_Bias = New_Bias12
Layer1.Neuron2.Old_Bias =    Old_Bias12 =  0.2
Layer1.Neuron2.deltaError =             dE12 =  -0.02793

New_Bias12 = Old_Bias12 + (LR    x  1  x  de12)
                     =  0.2             +   (0.1  x  1  x  -0.02793)
                     =  0.2             +  (-0.002793)
                     =  0.197207


----------------------------------------------------------------------

All done. That was just one training cycle. Thank goodness we have computers !
A computer can process these calculations really quickly, and depending on how complicated your neural network is (ie. number of layers, and number of neurons per layer), you may find that the training procedure may take some time. But believe me, if you have designed it right, it is well worth the wait.
Because once you have the desired weights and bias values set up, you are good to go, and as you receive data, the computer can do a single forward pass in a fraction of a second, and you will get your desired output, hopefully :)

Here is a complete Processing.org script that demonstrates the use of my neural network.
Neural Network (Part 7): Cut and Paste Code (click here).

If you liked my tutorial - please let me know in the comments. It is sometimes hard to know if anyone is actually reading this stuff. If you use my code in your own project, I am also happy for you to leave a link to a YouTube video etc in the comments also.

To go back to the table of contents click here