First look – Arduino Yún
Introduction
After being announced in May this year, the new Arduino Yún has arrived in the crowded marketplace – and I snapped up one of the first to arrive in Australia for an initial review. The purpose of which is to run through the out of box experience, and to see how easy it was to get the Yún working with the promised new features.
[Update – over time we’ll publish tutorials specifically for the Yún, which are listed here.]
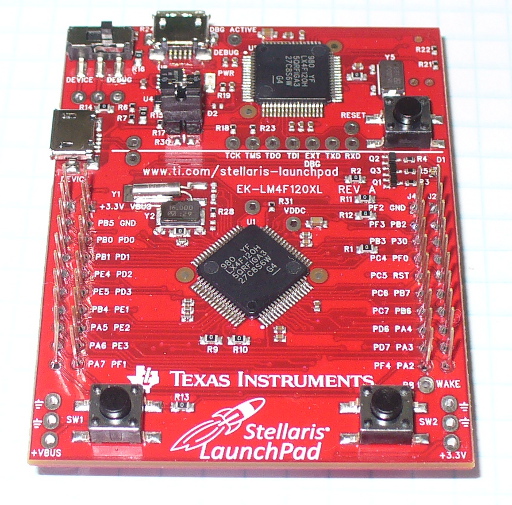
The Yún introduces some interesting new combinations of hardware and connectivity, all within the familiar form-factor. Which gives us plenty to examine and write about, so let’s get started. First, a quick look around the Yún:

Notice the stickers on the header sockets, useful for beginners or the absent-minded…

The usual TX/RX and D13 LEDs, plus notifiers for power, WiFi, LAN and USB use…

Ethernet, USB programming, USB host…

Again with the stickers…

The rear is quite busy. You can also see “Made in Taiwan” – a first for Arduino. I believe the reason for this was due to the new Atheros chipset requirements. Did you notice the multiple reset buttons? There are three – one for the Arduino, one for wifi and one to reboot Linino. As you can see there’s a lot of circuity on the bottom of the Yún, so it would be prudent to use some short standoffs to elevate the board and protect the bottom. Before moving on, you might like the following video where the Arduino team introduce the Yún:
Specifications
The Yún is based around the Arduino Leonardo-specification board – thus you have the ATmega32U4 microcontroller and the usual Leonardo functions. Note you cannot feed wild DC voltages into the Vin pin – it must be a regulated 5V. And the DC socket has gone, so for a solid connection you might want to make or buy your own power shield.
However there is so much more… underneath a small metal shield below the digital I/O pins is an Atheros AR9331 CPU running a Linux distribution based on OpenWRT named Linino. This Atheros part of the board is connected to a microSD socket, 10/100 Ethernet port, a USB 2.0 socket for host-mode functions and also has IEEE 802.11b/g/n WiFi, and Power-over-Ethernet support (with an optional adaptor).
And all of that is connected to the Arduino side of things via a simple serial “bridge” connection (with it’s own library) – which gives the Arduino side of the board very simple methods of controlling the other onboard hardware.
Getting started with the Yún WiFi
First thing is to download and install the new IDE, version 1.5.4. This is for Due and Yún, so keep your older installations as well. On the general Arduino side of things nothing has changed, so we’ll move on to the more interesting side of the board. The first of these is to setup and experiment with the onboard WiFi. After connecting your board to USB for power, you can connect to it with your PC’s WiFi:

… at which point you connect to the Yún network. Then visit 192.168.240.1 from a web browser, and you’re presented with a page that asks for the default password, which is … “arduino”:

At which point you’re presented with the relevant details for your Yún:

… such as the IP address, MAC address, etc. Make note of your MAC address, you might need it later. From here you can configure the Yún WiFi details, for example the name and password, and also the details of your existing WiFi network which can be used to access the Yún. Once you save those, the Yún reboots and tells you to connect the PC back to the existing WiFi network:

If for some reason it doesn’t work or you entered the wrong settings – hold down the “WLAN RST” button (next to the USB host socket) for five seconds. This sets the WiFi details in the Yun back to the default … and you can start all over again.
Note that the Yún’s preset IP of 192.168.240.1 may not be suitable for your own network. For example, if your home router is 10.1.1.1 you need to do some detective work to find out the IP address for the Yún. Head into your router’s administration pages and look for your DHCP Client Log. It will show a list of devices that are connected to the network, including their MAC and IP address – for example:
 Then it’s a simple matter of finding the MAC address in the list and the matching IP. Once you have the IP address, enter that into a web browser and after being prompted for the Yún’s password, you’re back to the welcome page with the IP, MAC addresses etc.
WiFi Sketch Uploading
Once your Yún is on the same WiFi network as the PC running the IDE – you can upload a sketch over WiFi! This is possible due to the bridge between the Atheros section on the board and the Arduino hardware. Just select the board type as normal in the IDE, and the port (the IP address version):

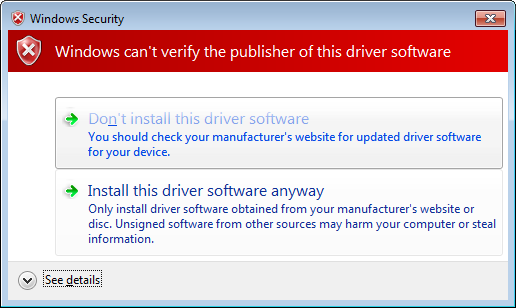
… then hit Upload as normal, enter the password:

and you’re done. Awesome.
Console-based control of Arduino over WiFi
There’s a neat example that demonstrates how you can control the Arduino over the WiFi using a console terminal on the PC. Upload this sketch (from http://arduino.cc/en/Guide/ArduinoYun#toc13):
#include <Console.h>

const int ledPin = 13; // the pin that the LED is attached to
int incomingByte;      // a variable to read incoming serial data into

void setup() {
  // initialize serial communication:
  Bridge.begin();
  Console.begin();

  while (!Console){
    ; // wait for Console port to connect.
  }
  Console.println("You're connected to the Console!!!!");
  // initialize the LED pin as an output:
  pinMode(ledPin, OUTPUT);
}

void loop() {
  // see if there's incoming serial data:
  if (Console.available() > 0) {
    // read the oldest byte in the serial buffer:
    incomingByte = Console.read();
    // if it's a capital H (ASCII 72), turn on the LED:
    if (incomingByte == 'H') {
      digitalWrite(ledPin, HIGH);
    }
    // if it's an L (ASCII 76) turn off the LED:
    if (incomingByte == 'L') {
      digitalWrite(ledPin, LOW);
    }
  }
}
Then load your terminal software. We use PuTTY on Windows. Run the terminal software, then login as root, then telnet to “localhost 6571”:

You can then send characters to the Yún just as you would with a USB-connected Arduino via the serial monitor. With the example above you’re turning the D13 LED on and off, but you can get the idea.
The “Internet of Things”
Arduino has teamed up with a service called “Temboo” – which gives you over 100 APIs that your Yún can hook up with to do a myriad of things, such as send tweets, get weather data from Yahoo, interact with Dropbox, etc. This is done easily and explained quite well at the Temboo website. After signing up for Temboo (one account seems to be free at the moment) we tried the Yahoo weather API.
You enter the parameters using an online form in Temboo (in our example, the address of the area whose weather forecast we required), and the Temboo site gives you the required Arduno sketch and header file to upload. And you’re done. With this particular example, I wanted the weather in Sydney CBD – and once running the data is returned to the serial monitor, for example:

It was great to see that work the very first time, and a credit to Temboo and Arduino for making it happen. But how?
There is a Temboo client in the Linino OS, which is the gateway to the API via WiFi, and also communicates with the Arduino via the serial bridge. The Arduino Temboo library can then interact with the Linino client without complex code. The weather data is then returned back from the Internet via the Temboo client and fed to the Arduino serial port, where you can parse it with your own code. This looks like a lot of fun, and also could be quite useful – for example capturing data and sending it to a Google Docs spreadsheet. For more information, check out the Temboo website.
However you can delve deeper and create your own APIs, matching code – and perhaps other services will develop their own APIs in the near future. But for now, it’s a good start.
Where to from here? And support?
This article has only scratched the surface (but not bad considering the board arrived a few hours ago). There’s plenty more examples on the getting started page, in the IDE (under “Bridge”) – plus a dedicated Arduino Yún forum. And check out this gmail notifier. In the near future we’ll create some of our own tutorials, so stay tuned.
Is the Yún a completely open-source product?
Well it says “open source electronics prototyping platform” on the rear, but is this true? The Arduino Leonardo-side of the board is. However the Atheros AR9331 chip is not. Nevertheless, are you really going to reproduce your own AR9331? So it doesn’t really matter. Being a pragmatist I propose that the Yún solves the problem of Arduino and Internet connectivity quite well for the non-advanced user – so not being totally OSHW isn’t an issue.
Support
This board is very new to us here, so for questions or support please ask on the dedicated Arduino Yún forum.
Conclusion
Since the popularity of various single-board computers has increased exponentially over the last few months, some may say that the Yún is perhaps too little, too late. After only having the Yún for a few hours before writing this article, personally I disagree with this statement – the Yún is a device that still gives us the wide range of hardware control, and what looks to be a very simple method of connectivity that surely is cheaper and less prone to issues than the original Arduino WiFi shield.
What the Yún gives us is a simple, well-executed method of getting our Arduino connected to the outside world – and in a manner that won’t confuse or put off the beginner or intermediate user. So for now, it’s a win.
What do you think? Leave a comment below.
And for more detail, full-sized images from this article can be found on flickr. And if you’re interested in learning more about Arduino, or want to introduce someone else to the interesting world of Arduino – check out my book (now in a third printing!) “Arduino Workshop” from No Starch Press.

In the meanwhile have fun and keep checking into tronixstuff.com. Why not follow things on twitter, Google+, subscribe for email updates or RSS using the links on the right-hand column? And join our friendly Google Group – dedicated to the projects and related items on this website. Sign up – it’s free, helpful to each other – and we can all learn something.
The post First look – Arduino Yún appeared first on tronixstuff.