Posts with «led hacks» label

L3D Cube Takes the Work out of Building an LED Cube

Building an LED cube usually means a heck of a lot of delicate soldering work. Bending jigs, assembly jigs, and lots of patience are the name of the game. The problem multiplies if you want to build with RGB LEDs. [Shawn and Alex] are hoping to change all that with their L3D cube. Yes, L3D is a Kickstarter campaign, but it has enough good things about it that we’re comfortable featuring it here on Hackaday. What [Shawn and Alex] have done is substitute WS2812b surface mount LEDs for the 5mm  or 3mm through hole LEDs commonly used in cubes. The downside is that the cube is no longer visible on all sides. The upside is that it becomes a snap to assemble.

The L3D cube is open source hardware. The source files are available from separate software and hardware Github repositories. Not next week, not when they hit their funding goal, but now. We seriously like this, and hope all crowdfunding campaigns go this route.

The L3D cube uses an open source Spark Core as its processor and WiFi interface. Using WS2812b’s means less I/O pins, and no LED driver chips needed. This makes it perfect for a board like Spark or Arduino.  On the software side, the team has created a Processing Library which makes it easy to create animations with no coding necessary.

L3D has all the features one would expect from an LED cube – a microphone for ambient sound visualizations, and lots of built in animations. It seems [Shawn and Alex] have also created some sort of synchronization system while allows multiple cubes to work together when stacked. The team is hoping someone will come up with a 3D printed light diffuser to make these cubes truly a 360 degree experience.

The L3D cube campaign is doing well, [Shawn and Alex] are close to doubling their $38,000 goal. Click past the break to check out their Kickstarter video!


Filed under: led hacks
Hack a Day 30 Nov 00:00

Changing Poi Colors Based on Speed and Velocity

LED toys have become synonymous with the underground rave culture as party-goers gaze into vortexes of spinning light known as poi. Most of these objects come pre-programmed, but some can be custom coded. However, only a few tap into an accelerometer changing the colorful circles of energy depending on how fast they move through space. One stunning example is this LED device called the ‘Center Flee’ that translates accelerometer data into sequences of alternating RGB colors.

The LED values are ‘printed’ to the tethered objects at specific points in the rotational arc. The devices are controlled with an Arduino, and a XBee wireless module transmits data to a computer nearby, eliminating the need to manually remove an SD card after each spinning session.

When spun, the poi acts like a colorful, twirling extension of the performer that produces a mesmerizing, vibrant effect. It’s nice to see the progression of glow sticks tied to shoelaces into g-force sensing devices that can captivate surrounding audiences.

Other examples of similar types of ideas include this accelerometer poi that was cut with a CNC machine and these LED staffs for the ultimate portable rave.

Below is a video playlist of the Center Flee being tested out.


Filed under: led hacks
Hack a Day 12 Sep 00:00
arduino  led hacks  led poi  xbee  

Arduino-based LED Wedding Lights

[Rob] created these amazing Bluetooth controlled LED lights for his daughter’s wedding adding a colorful ambient glow to the ceremony. Each item held a Neopixel ring and an Arduino microprocessor with a wireless module that could be individually addressed over a ‘mini-network.’ The main master station would receive commands from a Windows Phone. Usually we see Arduino-based projects being run with Android apps, so it’s nice to see that Microsoft is still present in the maker community.

The enclosures and translucent vases that sit atop the devices were 3D printed. All eight of the matrimonial units synchronized with each other, and the colors could be changed by sliding the settings bar on the app.  [Rob] says that it was a lot of fun to build, and jokingly stated that it kept him “out of all the less important aspects of the ceremony. (food choice, decor, venue, who to marry etc etc).” The outcome was a beautiful arrangement of tabletop lighting for the wedding. A demo of [Rob]‘s setup can be seen in the video below.


Filed under: led hacks

Voice Controlled RGB LED Lamp

[Saurabh] wanted a quick project to demonstrate how easy it can be to build devices that are voice controlled. His latest Instructable does just that using an Arduino and Visual Basic .Net.

[Saurabh] decided to build a voice controlled lamp. He knew he wanted it to change colors as well as be energy-efficient. It also had to be easy to control. The obvious choice was to use an RGB LED. The LED on its own wouldn’t be very interesting. He needed something to diffuse the light, like a lampshade. [Saurabh] decided to start with an empty glass jar. He filled the jar with gel wax, which provides a nice surface to diffuse the light.

The RGB LED was mounted underneath the jar’s screw-on cover. [Saurabh] soldered a 220 ohm current limiting resistor to each of the three anodes of the LED. A hole was drilled in the cap so he’d have a place to run the wires. The LED was then hooked up to an Arduino Leonardo.

The Arduino sketch has several built-in functions to set all of the colors, and also fade. [Saurabh] then wrote a control interface using Visual Basic .Net. The interface allows you to directly manipulate the lamp, but it also has built-in voice recognition functionality. This allows [Saurabh] to use his voice to change the color of the lamp, turn it off, or initiate a fading routing. You can watch a video demonstration of the voice controls below.


Filed under: Arduino Hacks, led hacks

POV Display Does it on the Cheap

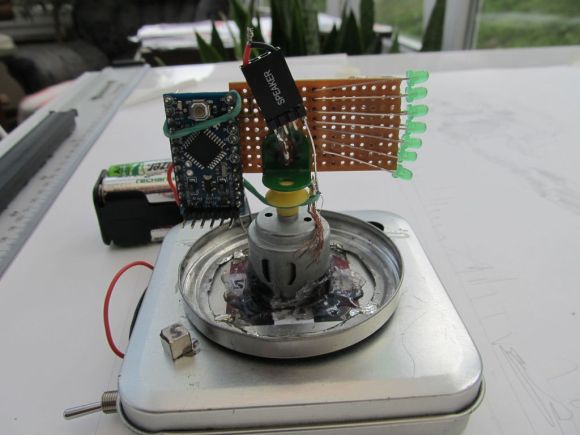
[Sholto] hacked together this ultra low-budget spinning display. He calls it a zoetrope, but we think it’s actually an LED based Persistence Of Vision (POV) affair. We’ve seen plenty of POV devices in the past, but this one proves that a hack doesn’t have to be expensive or pretty to work!

The major parts of the POV display were things that [Sholto] had lying around. A couple of candy tins, a simple brushed hobby motor, an Arduino Pro Mini, 7 green LEDs, and an old hall effect sensor were all that were required. Fancy displays might use commercial slip rings to transfer power, but [Sholto] made it work on the cheap!

The two tins provide a base for the display and the negative supply for the Arduino. The tins are soldered together and insulated from the motor, which is hot glued into the lower tin. A paper clip contacts the inside of the lid, making the entire assembly a slip ring for the negative side of the Arduino’s power supply. Some copper braid rubbing on the motor’s metal case forms the positive side.

[Sholto] chose his resistors to slightly overdrive his green LEDs. This makes the display appear brighter in POV use. During normal operation, the LEDs won’t be driven long enough to cause damage. If the software locks up with LEDs on though, all bets are off!

[Sholto] includes software for a pretty darn cool looking “saw wave” demo, and a simple numeric display. With a bit more work this could make a pretty cool POV clock, at least for as long as the motor brushes hold up!

[via Instructables]


Filed under: led hacks

The 200 LED Ring Clock

There are LED clocks, and then there are LED clocks that can blind you from 30 paces. [Stiggalicious's] LED ring clock is of the latter variety. 200 WS2812B/Neopixel RGB LEDs drive the ring clock to pupil searing levels. The clock runs on ATMega1284P, with timekeeping handled by an NXP PCF8563 real-time clock chip. Code is written in Arduino’s wiring language using Adafruit’s Neopixel library.

Building the clock with a single Printed Circuit Board (PCB) would be both expensive and wasteful. [Stiggalicious] cleverly designed his clock to be built with 8 copies of the same PCB. Each board makes up a 45° pie slice of the ring. All 8 PCBs have footprints for the CPU, clock chip, and other various discrete parts, but only the “master” section has these parts populated. 7 “slave” sections simply pass clock, data, power and ground through each LED. He used Seeedstudio’s board service to get 10 copies of his PCB made, just in case there were any mistakes.

[Stiggalicious] rolled the dice by buying exactly the 200 LEDs he needed. Either he got really lucky, or the WS2812 quality testing has improved, because only one LED had a dead blue LED.

If you’d like to find out more, [Stiggalicious] gives plenty of details in his Reddit thread. He doesn’t have a webpage setup for the clock but he’s uploaded his source code (pastebin link) and Altium schematic/PCB files (mega.nz link). We may be a bit biased, but hackaday.io would be a perfect spot for this or any other project!


Filed under: clock hacks, led hacks
Hack a Day 24 Jun 12:00

Custom Electronics and LED Panels Brighten Up a Nightclub

When [Robert] is presented with a challenge, he doesn’t back down. His friend dreamed of reusing some old LED panels by mounting them to the ceiling of the friend’s night club. Each panel consists of a grid of five by five red, green, and blue LEDs for a total of 75 LEDs per panel. It sounded like a relatively simple task but there were a few caveats. First, the controller box that came with the panels could only handle 16 panels and the friend wanted to control 24 of them. Second, the only input device for the controller was an infrared remote. The friend wanted an easy way for DJ’s to control the color of the panels and the infrared remote was not going to cut it. Oh yea, he also gave [Robert] just three weeks to make this happen.

[Robert] started out by building a circuit that could be duplicated to control each panel. The brain of this circuit is an ATtiny2313. For communication between panels, [Robert] chose to go with the DMX protocol. This was a good choice considering DMX is commonly used to control stage lighting effects. The SN75176 IC was chosen to handle this communication. In his haste to get this PCB manufactured [Robert] failed to realize that the LED panels were designed common cathode, as opposed to his 25 shiny new PCB’s which were designed to work with a common anode design. To remedy this, he switched out all of the n-channel MOSFET with p-channel MOSFET. He also spent a couple of hours manually cutting through traces and rewiring the board. After all of this, he discovered yet another problem. The LED’s were being powered from the same 5V source as the microcontroller. This lead to power supply issues resulting in the ATtiny constantly resetting. The solution was to add some capacitors.

Click past the break for more on [Robert's] LED panels.

As for software, [Robert] completely filled the ATtiny’s memory. He used three channels to control red, green, and blue. He added a fourth channel to control pre-designed animation effects such as fading, strobe, and random color. The DIP switches are normally used to set the address of the panel, but there is a second option to put the panel into standalone mode. In this mode, the switches are used to program the panel to perform specific effects with no DMX controller required.

Now that the panels were all designed and functioning, [Robert] still needed a way to control them. He used the laser cutter at Shackspace hackerspace to design the actual panel face and then mounted a bunch of buttons, switches, and potentiometers to it. All of those things were connected to a Teensy3 using perfboard and a hand wired circuit. Another SN75176 IC was used for the DMX communication from the control panel. The control panel allows the DJ to change between different pre-built animation effects, color effects, and also change the speed of the animations to match the speed of the music.


Filed under: led hacks
Hack a Day 31 May 12:00

A beautiful game of Lights Out

About a year ago, [Anthony] decided to embark on his biggest project to date. He wanted something with a ton of LEDs, so when the idea of recreating the classic electronic Lights Out game came to mind, he knew he had the makings of a killer project. The finished Lights Out arcade box is a wonderful piece of work with sixteen 17-segment displays and just as many LED illuminated arcade buttons.

By far the most impressive feature of [Anthony]‘s project are the two rows of 17-segment displays. These are controlled by two MAX6954 LED display drivers on a beautiful wire wrapped board. The 16 buttons for the game are translucent arcade buttons that compliment the RGB LED strip very nicely.

A great display and a whole bunch of LEDs don’t make a game, though. [Anthony] came across this article on JSTOR that told him how to create new 4×4 games of Lights Out and solve them algorithmically to get the total number of moves required to solve the puzzle. As you can see in this video, it’s a little hard to solve the puzzle in the minimum amount of moves. Still, we have to commend [Anthony] for a great project.


Filed under: arduino hacks, led hacks, toy hacks

LED cloud lamp in any color you can image

This lamp which [Bablondeemu] built will add a little whimsy to your home decor. The project started as coursework for a Digital Art and Installations class. But the remote controlled color changing cloud ended up being a pretty neat gift for his little brother.

The prototype uses an Arduino, breadboard, and a collection of LEDs to perform its tasks. [Bablondeemu] admits the next revision should have a standalone circuit board. The electronics are housed in a clear plastic container which was then adorned with Polyfill stuffing which would commonly be found inside a decorative pillow. The polyester fibers do a great job or filtering and diffusing the light. But they don’t seem to interfere with the incoming IR signals from the remote control.

If you like the idea of creatively shaped diffusers you should take a look at this giant LED lamp. It’s molded to look like a through-hole package with the leads hiding the power cord.


Filed under: led hacks
Hack a Day 17 Jan 18:01
arduino  cloud  led  led hacks  rgb  

A blinky fedora to ring in the New Year

[Garrett Mace] decided to dress festive for New Year’s Eve. What he came up with is a fedora ringed in LEDs that react to music. The hardware uses 5050 LEDs on strips. Three of them encircle the head-gear providing a total of 114 RGB pixels. Each is a WS2811 module — a part which we’re seeing more and more of lately.

The video clip after the break starts off with a few minutes of demonstration. [Garrett] managed to code all kinds of animations for the hardware including several different styles of color sweeps and fades. You may start to think that the three bands always display the same patterns but keep watching and you’ll see a sparkle pattern that proves each dot can be addressed individually.

About 2:20 seconds into the video [Garrett] explains how he pulled it off and shows off the driver hardware. The strips are glued to a band of webbing that slides over the hat. The wires that drive the lights were fed through the center of some paracord and connect to an Arduino housed in a 3D printed case. Power is provided by a portable USB battery with a ShiftBrite shield and an MSGEQ7 chip complete the parts list.

[via Reddit]


Filed under: led hacks, wearable hacks
Hack a Day 08 Jan 17:01