Posts with «led hacks» label

Color changing bag matches clothing color, tells you what’s inside

Adding some lights to your everyday items will certainly give you a style leaning toward the world of Blade Runner. But if you can add functionality to control the blinky components you’ve actually got something. A great example of this is [Kathryn McElroy's] Chameleon Bag. It’s a shoulder bag with a light-up flap. It can color match your clothing, but she also built some features that will let you know what is inside of the bag.

The project started by using a cardboard template in the size and shape of the bag’s flap. After adding an Arduino to control the LEDs and an RFID reader for an interactive element she sewed a replacement flap that also acts as a diffuser. In the video after the break she demonstrates matching the color of her scarf by reading a tag sewn in the end of it. She then starts loading up all the stuff needed for a day away from home. As the keys, phone, and computer are placed in the bag their tags are read, resulting in different combinations of color. Once everything she needs is inside, the flap turns green and she heads out the door.

This will go great with your illuminated umbrella.

[via Adafruit]


Filed under: led hacks, wearable hacks
Hack a Day 02 Jan 20:01

Animated holiday wreath from a string of LED lights

[Dennis Adams'] wreath lights project looks pretty good. But he did some amazing coding to produce a whole set of interesting animated patterns that really seal the deal for the project. Don’t miss the video after the break where he shows off all of his hard work.

He started with a string individually addressable LEDs. These are the 12mm variety like what Adafruit sells (we’ve seen them popping up in a number of projects). To mount each pixel he tried a several different prototypes before settling on a ring that was 14″ in diameter. The design was laser cut from acrylic, with sets of staggered holes to host each ring of LEDs. The final touch was to add ping-pong balls to diffuse the light.

As we mentioned earlier, the light patterns really add the finishing touch to the project, but there is more functionality there too. [Dennis] rolled in the ability to monitor a Twitter feed with the wreath. When he gets a new tweet, a different animation will let him know about it.

[Thanks Chris]


Filed under: Holiday Hacks, led hacks
Hack a Day 23 Dec 20:01

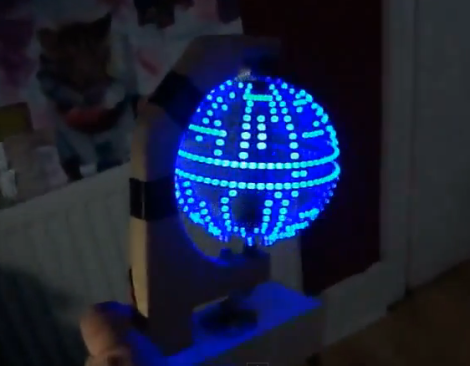
Build a POV Death Star, you will

Building a Persistence of Vision globe is pretty awesome, but overlaying a Death Star pattern on the display takes it to the next level of geekery. Like us, [Jason] has wanted to build one of these for a long time. His success pushes us one step closer to taking the plunge and we hope it will inspire you to give it a shot too.

As he mentions in the beginning of his write up, the mechanical bits of these displays are really where the problems lie. Specifically, you need to find a way to transfer power to the spinning display. In this case use went with some DC motor brushes. These are replacement parts through which he drilled a hole to accept the metal axles on top and bottom. We hadn’t seen this technique before, but since motor brush replacements are easy to find and only cost a few bucks we’d say it’s a great idea.

The 24 blue LEDs that make up the display are all on one side of the PCB. They’re driven by an ATmega328 running the Arduino bootloader. [Jason] uses an FTDI adapter to program the chip. Don’t miss the video embedded after the break.


Filed under: led hacks
Hack a Day 01 Oct 17:17

Helmet of many LEDs built for Burning Man

This motorcycle helmet was heavily altered to accept all of the hardware that goes into driving that huge array of LEDs. [Brian Cardellini] built it to wear at burning man. He claims to have been in over his head with the project, but we certainly don’t get that feeling when we see the thing in action. It’s light on build details, but there are plenty of demo shots in the video after the break. The animation and fading action really gets started about a minute and a half into it.

One of the early frames of the video is a shot of the parts order webpage. Since it’s an HD clip we were able to glean a few bits and pieces from that. It includes a MAX7219 LED Display Driver and fifteen 25-packs of Blue LEDs. Now that chip is a great choice, and one of the later shots shows two of them on breakout board driven by an Arduino. The look is very clean since he carved out most of the helmet’s padding to make room for the electronics.

[via Adafruit]


Filed under: led hacks, wearable hacks

It was only a matter of time before we saw Nixie modules for the Arduino

The Nixie tube, a neon-filled tube with a series of 10 cathodes shaped like numerals, is a classic display for any build wanting a unique, vintage, or steampunk aesthetic. We shouldn’t be surprised a factory in China is now turning out Arduino-compatable Nixie modules (English translation, but don’t get your hopes up), but there it is.

The modules are based on the QS30-1 Nixie tube capable of displaying the digits 0 through 9, and include an RGB LED behind the tube for some nice additional illumination. According to the manual, the modules themselves are based on a pair of 74HC595 shift registers, and are ‘stackable.’ By applying 12 volts to a pair of pins and connecting another 5 wires to an Arduino, it’s possible to drive as many of these Nixie modules as you’d like.

[Paul Craven] got his hands on a quartet of these modules and is planning on building a steampunk style alarm clock as a personal project. [Paul] was able to get the modules up and running fairly quickly, as seen after the break.

While they’re most certainly not the cheapest option, if you’re planning a build with Nixies, this probably is the easiest way to get a vintagey, steampunkey numerical display.


Filed under: arduino hacks, led hacks
Hack a Day 09 Sep 18:10

Lite Brites fade, but LED clocks are forever

Ahh, the Lite Brite.

What could be more fun than pushing dozens of little plastic pegs through a piece of black paper in order to create a pixelated, though colorful image? Well, I can think of quite a few things more engaging than that, and luckily so can [Lonnie Honeycutt] over at MeanPC.

While contemplating what to build with a pile of LEDs, his daughter came into the room with her portable Lite Brite. He thought that the pegs she was using looked awfully similar to the LEDs on his desk, so he did some test fitting and was surprised to see that they fit almost perfectly.

[Lonnie] thought that the toy would make an excellent clock, and his daughter happily agreed to let Dad do some tinkering. A few hours, an Arduino, and some Charlieplexing later, he had a nice looking clock that his kids were sure to enjoy.

If you’re interested in seeing more about how constructed, be sure to check out his YouTube channel and Instructable, where he happily provides all of the build details.


Filed under: arduino hacks, led hacks, toy hacks

Building an LED suit

[Rob] has been hard at work designing and building this LED suit which he can wear to parties. He’s got it working, although right now it’s just a pair of pants. It reacts to sound, and has the potential to be controlled from a smartphone via Bluetooth. You’ll find a video description of the build embedded after the break.

The planning started off by selecting driver hardware for the LEDs. [Rob] wanted the suit to pulse to the music in the room so he grabbed an MSGEQ7 chip. When connected to a microphone and opamp this chip will output a signal which can be used as a VU meter. He built the hardware into an Arduino shield, then got to work on the LED driver board. He’s using LED strips, but they’re not individually addressable. Instead he cut loops which wrap around the wearer’s legs. Each loop connects the pins of a TLC5947 LED driver chip which sinks a constant current and offers PWM abilities. He’s using PNP transistors on the high side.

For anyone that’s ever worked in a Tyvek suit before you’ll know they don’t breathe. Sweat will literally be pouring off of you. And we’d bet that’s what cause the short that burned the back of [Rob's] leg at a recent party. Then again, your light-up pimp coats are going to be hot to wear too.


Filed under: led hacks, wearable hacks
Hack a Day 16 Aug 20:01

Building an artificial moon for Burning Man

If you were lucky enough to score passes to this year’s Burning Man, be sure to keep a look out for [Laurence Symonds] and crew, who are putting together an ambitious fixture for the event. In reality, we’re guessing you won’t have to look far to find their giant moon replica floating overhead – in fact it will probably be pretty hard to miss.

They are calling the sculpture “Lune and Tide”, which of an 8 meter wide internally lit moon which hovers over a spinning platform that’s just as big across. The inflatable sphere is made up of giant ripstop nylon panels which are home to 36,000-odd sewn-in LEDs. The LEDs illuminate the sphere to reflect the natural color of the moon, though with a simple command, [Laurence] and Co. can alter the lighting to their heart’s content.

If Hack a Day’s [Jesse Congdon] makes his way out to the festival again this year, we’ll be sure he gets some footage of Lune and Tide in action. For now, you’ll have to satisfy your curiosity by checking out the project’s build log.


Filed under: arduino hacks, led hacks

A much larger rainbow board of many ping pongs

[George] started with an 8×8 grid, but just couldn’t help himself from upscaling to this 32×16 pixel ping pong ball display. That’s right, It’s a 512 pixel array of fully addressable RGB LEDs diffused with one ping pong ball each.

We featured the predecessor to this project back in January. That one was an 8×8 display using a Rainbowduino as the controller. [George] took what he learned from that build and expanded upon it. The larger display is modular. Each module starts as an 8×8 grid which connects back to the Arduino using a breakout shield with some Ethernet jacks used as quick connects. The LEDs are driven by 595 shift registers, with transistors which protect the logic chips from the currents being switched.

He had a lot of help soldering all the connections for the display and ended up bringing it to show off at the Manchester mini maker faire. See it in action in the video after the break.


Filed under: led hacks
Hack a Day 27 Jul 15:01

BlinkM gets upgraded to a USB mass-market device

[TodBot] has a new piece of hardware on the way up. His Blink(1) is currently about 50% funded on Kickstarter. It’s a USB nub that has an RGB LED inside of it. When plugged into a computer it can be used as a status indicator. At first that sounds like a let down, but his marketing is fantastic as the myriad of uses really caught our attention. If you’re on the road you can use it to report back your server statistic. Plug one into each rack-mounted servers for quick visual indication of which one has crashed. Or find your own use.

You probably remember [TodBot] as the creator of the BlinkM. Recently he was calling it the world’s smallest Arduino. Well this Blink(1) is being marketed as Arduino programmable as well. The board size is about the same, and both have an RGB LED module. The difference is that the BlinkM had an ATtiny85 and needed a serial converter to program it. This has a USB plug so we’d bet he’s swapped the tiny for an ATmega8u2 or something from the same family.

Don’t think one blinky LED is going to cut it? For folks that just need more resolution there are other hardware options out there. For instance, this project gives you a wireless 8×8 RGB led display to use as an indicator.


Filed under: led hacks
Hack a Day 11 Jul 14:01