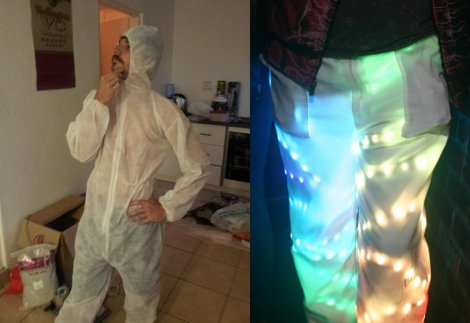
Posts with «suit» label

A Speed Suit Activated with Motion #ArduinoMicroMonday

Instructables user Beaconsfield posted a great project of a suit controlled by  Arduino Micro, lighting up EL wires when the wearer starts to walk and lights them up completely when the wearer runs or dances:

Most of the time EL wire is used as is, with manual on/off control. However, I wanted to control it with an Arduino, so it would react to results from a sensor. This motion-activated suit flashes when the wearer starts to walk and lights up completely when the wearer runs. Perfect for those late-night runs! (or dance parties – it lights up when the wearer moves, and this includes dancing)

The suit itself is a set of zip-up coveralls decorated with EL wire and controlled via an Arduino Micro. An accelerometer monitors the wearer’s motion and sends that data to the Arduino.

In 19 steps you can make yours: follow the instructions.

Arduino Blog 09 Jun 19:28
arduino  el wire  micro  suit  wearables  

Building an LED suit

[Rob] has been hard at work designing and building this LED suit which he can wear to parties. He’s got it working, although right now it’s just a pair of pants. It reacts to sound, and has the potential to be controlled from a smartphone via Bluetooth. You’ll find a video description of the build embedded after the break.

The planning started off by selecting driver hardware for the LEDs. [Rob] wanted the suit to pulse to the music in the room so he grabbed an MSGEQ7 chip. When connected to a microphone and opamp this chip will output a signal which can be used as a VU meter. He built the hardware into an Arduino shield, then got to work on the LED driver board. He’s using LED strips, but they’re not individually addressable. Instead he cut loops which wrap around the wearer’s legs. Each loop connects the pins of a TLC5947 LED driver chip which sinks a constant current and offers PWM abilities. He’s using PNP transistors on the high side.

For anyone that’s ever worked in a Tyvek suit before you’ll know they don’t breathe. Sweat will literally be pouring off of you. And we’d bet that’s what cause the short that burned the back of [Rob's] leg at a recent party. Then again, your light-up pimp coats are going to be hot to wear too.


Filed under: led hacks, wearable hacks
Hack a Day 16 Aug 20:01

Flight Suit Review

Since building my Flight Suit last year, I haven't posted many photos or videos of the finished suit or of its inner workings, so I will make a series of posts about it over the next few weeks. I would not have been able to complete the project without the generous sharing of the OSHW community, and I hope some bit of my project's details will be of some use to somebody.

All work on the suit revolved around a composite image I put together early to lay out the LED light strips, with each level numbered (0-11) and each segment getting a unique letter designation (A-X). Arms are shown up and down since the suit adapts to the arms' positions, lighting up each segment according to its current level.

From that composite image, I built a segment spreadsheet to keep track of the 22 LED strips through construction and programming. It includes all of the segments' lengths and progress steps, plus designations of levels, segment letters, and channels.

The system's electronic components are distributed throughout the suit using existing fittings on the suit when possible:
  • The 12V Li-ion battery pack which powers the suit fits nicely in the right thigh pocket.  Its switch acts as the main system on/off switch.  Spare battery packs fit in zippered ankle pockets.
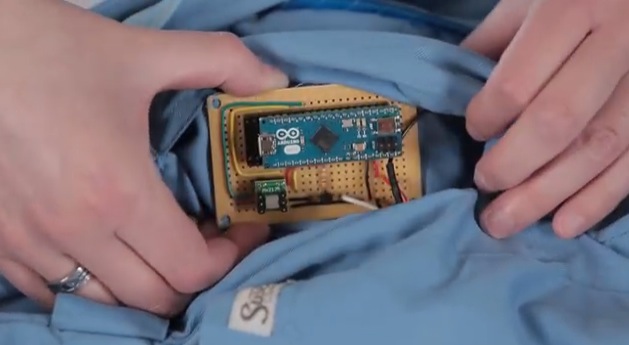
  • The main system board sits in the upper left arm pocket: an Arduino-compatible board with a shield containing the left arm accelerometer board and jacks for the right arm accelerometer, MOSFET boards, ZX-Sound, and remote control.
  • The right arm accelerometer sits in a small pocket sewed onto the right upper arm.
  • MOSFET boards hang in the chest pockets, attached to the leads routed through the suit to the LED strips.
  • The ZX-Sound audio board is mounted with Velcro to the included patch on the left chest.
  • The remote control dangles from its cat 5 cable or attaches to an existing Velcro strip at the waist.
I plan to post at least once on each of these topics:
  • System layout, schematics and final firmware
  • LED strips: planning, splitting/making, mounting
  • MOSFET boards: driving the LED strips
  • ZX-Sound: incorporating audio response into the system
  • Arm accelerometers: reading and filtering and controlling segment/level mapping
  • Remote control
  • Main program design: fast looping, modes, ShiftPWM
  • Wearability: marrying the system and the suit, sewing, gluing, maintenance
If there's something else you're curious about, please email me or post a comment. As I post more, I will continue to upload photos to my Flickr set.
Jeff's Arduino Blog 01 May 20:03
flight  suit  

(F)Light Suit Progress: Almost There!

So much progress in the last two weeks, the big milestones being...
  • I got the MOSFET boards and built three-- they worked right away! As expected I needed resistors between the 595 outputs and the MOSFETs; didn't notice that until I hooked up the third one and things weren't behaving. I'm not crazy about the screw terminals but they'll be OK.
  • Testing the MOSFET outputs with all 22 segments-- 53' of light, so bright! The first tests were just "All Fade" mode.
  • Expanding the program to sense arm angles. The routine automatically sets arm levels, either up/down or matching angle, and how many levels there are (since arms up can create a new level).
  • Adding a proper "Rolling" mode to sweep a band or bands over the whole suit, top to bottom, with variables delay (ms), brightness, direction, and number of bands (density). Seeing all the bands rolling through was a relief.
  • Sewing is awesome. I've sewn 10 out of 19 "loop" side Velcro bands into the suit: both legs and the hips and waist.
  • ZX-Sound works! Filtering and sampling will be the last things I dial in, but I have working bouncy light code, smoothed and at whatever Hz I want, dynamically computing the high and low so it will bounce if it's quiet or loud.
Still big items:
  • Integrate audio sketch into main line, finish filtering code, and use filtering code for gravity sketch,
  • Finish sewing hook-side Velcro strips onto the suit,
  • Cut the loop-side Velcro for the light strips and stick it on with silicone,
  • Measure and cut and route in-suit leads: 4 solder points each, 6 pieces of shrink,
  • Sew in conduit for left-to-right board, battery, audio, and accelerometer leads.
  • Address shoes, hat(s), headband mounting and routing...
That's all I can think of for now, back to sewing...
Jeff's Arduino Blog 25 Aug 04:43
flight  suit