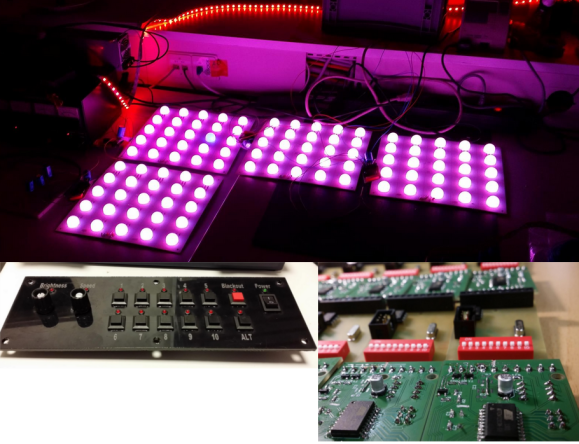
When [Robert] is presented with a challenge, he doesn’t back down. His friend dreamed of reusing some old LED panels by mounting them to the ceiling of the friend’s night club. Each panel consists of a grid of five by five red, green, and blue LEDs for a total of 75 LEDs per panel. It sounded like a relatively simple task but there were a few caveats. First, the controller box that came with the panels could only handle 16 panels and the friend wanted to control 24 of them. Second, the only input device for the controller was an infrared remote. The friend wanted an easy way for DJ’s to control the color of the panels and the infrared remote was not going to cut it. Oh yea, he also gave [Robert] just three weeks to make this happen.
[Robert] started out by building a circuit that could be duplicated to control each panel. The brain of this circuit is an ATtiny2313. For communication between panels, [Robert] chose to go with the DMX protocol. This was a good choice considering DMX is commonly used to control stage lighting effects. The SN75176 IC was chosen to handle this communication. In his haste to get this PCB manufactured [Robert] failed to realize that the LED panels were designed common cathode, as opposed to his 25 shiny new PCB’s which were designed to work with a common anode design. To remedy this, he switched out all of the n-channel MOSFET with p-channel MOSFET. He also spent a couple of hours manually cutting through traces and rewiring the board. After all of this, he discovered yet another problem. The LED’s were being powered from the same 5V source as the microcontroller. This lead to power supply issues resulting in the ATtiny constantly resetting. The solution was to add some capacitors.
Click past the break for more on [Robert's] LED panels.
As for software, [Robert] completely filled the ATtiny’s memory. He used three channels to control red, green, and blue. He added a fourth channel to control pre-designed animation effects such as fading, strobe, and random color. The DIP switches are normally used to set the address of the panel, but there is a second option to put the panel into standalone mode. In this mode, the switches are used to program the panel to perform specific effects with no DMX controller required.
Now that the panels were all designed and functioning, [Robert] still needed a way to control them. He used the laser cutter at Shackspace hackerspace to design the actual panel face and then mounted a bunch of buttons, switches, and potentiometers to it. All of those things were connected to a Teensy3 using perfboard and a hand wired circuit. Another SN75176 IC was used for the DMX communication from the control panel. The control panel allows the DJ to change between different pre-built animation effects, color effects, and also change the speed of the animations to match the speed of the music.
Filed under:
led hacks 


