Posts with «laser» label

Play like a spy with L.E.A.P. Engine


Toronto-based collaborative duo Hopkins Duffield created a gaming environment running on Arduino Mega in which the player battles a laser wielding A.I. security system gone awry. It’s like being in an action movie, walking in a pitch black room filled with the hollow sound of a machine breathing and a series of red laser fences slicing through the fog-filled air!

Laser Equipped Annihilation Protocol (The L.E.A.P. Engine) is a an installation that :

explores the personality of a snarky and mysterious game sentience who has infected a room with technological systems that challenge players and collect data. With a limited amount of time, the player must pass through a complicated series of changing and alternating laser patterns without tripping any of the lasers in order to deactivate the system and win the game. If the player trips a laser or if the timer runs out, it’s game over.

The gaming installation uses Max 6, Max For Live, an Arduino Mega 2560 R3 and custom electronic circuits. They also used a special modification of Lasse Vestergaard’s and Rasmus Lunding’s ArduinoInOutForDummies designed to allow communication between Arduino 2560 and Max 7. In Max, laser patterns are written using MIDI.

Take a look at the video to discover how they made it:

Arduino Blog 26 Aug 11:17

New Project: Build a Two-Octave Laser Harp

I find laser harps fascinating. The first time I saw one was when I stumbled across a video of a guy using using lasers to play the theme song to Tetris. I thought it was the coolest thing ever, but I couldn’t justify the cost of buying one. Instead, I decided […]

Read more on MAKE

The post Build a Two-Octave Laser Harp appeared first on Make: DIY Projects, How-Tos, Electronics, Crafts and Ideas for Makers.

'Space Invaders' with real lasers is delightful, dangerous

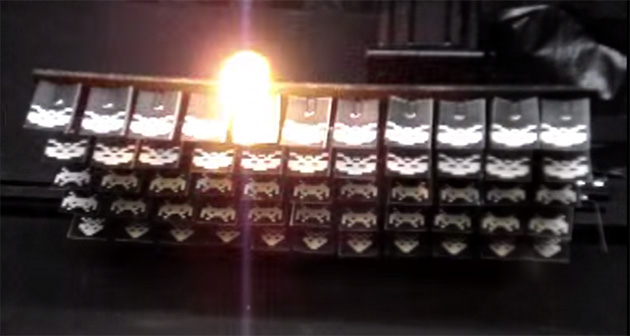
What do you get with a laser cutter, Arduino know-how and waaay too much time on your hands? A live action Space Invaders game that's an actual fire hazard, of course! Maker Martin Raynsford created a live action version of the classic arcade game just in time for Arduino Day, which falls on March 28th this year. The result is a silly but fun contraption: the paper invaders are clipped to a plate that uses stepper motors for left/right and up/down movement. Meanwhile, the 80W laser cutter is driven side-to-side by an Arduino Nano controller hooked up via USB to a PC.

Filed under: Gaming, Robots

Comments

Via: Boing Boing

Source: Just Add Sharks

Engadget 23 Mar 11:46

DIY Hot Wheels Drag Race Timer

[Apachexmd] wanted to do something fun for his three-year-old son’s birthday party. Knowing how cool race cars are, he opted to build his own Hot Wheels drag race timer. He didn’t take the easy way out either. He put both his electronics and 3D printing skills to the test with this project.

The system has two main components. First, there’s the starting gate. The cars all have to leave the gate at the same time for a fair race, so [Apachexmd] needed a way to make this electronically controlled. His solution was to use a servo connected to a hinge. The hinge has four machine screws, one for each car. When the servo is rotated in one direction, the hinge pushes the screws out through holes in the track. This keeps the cars from moving on the downward slope. When the start button is pressed, the screws are pulled back and the cars are free to let gravity take over.

The second component is the finish line. Underneath the track are four laser diodes. These shine upwards through holes drilled into the track. Four phototransistors are mounted up above. These act as sensors to detect when the laser beam is broken by a car. It works similarly to a laser trip wire alarm system. The sensors are aimed downwards and covered in black tape to block out extra light noise.

Also above the track are eight 7-segment displays; two for each car. The system is able to keep track of the order in which the cars cross the finish line. When the race ends, it displays which place each car came in above the corresponding track. The system also keeps track of the winning car’s time in seconds and displays this on the display as well.

The system runs on an Arduino and is built almost exclusively out of custom designed 3D printed components. Since all of the components are designed to fit perfectly, the end result is a very slick race timer. Maybe next [Apachexmd] can add in a radar gun to clock top speed. Check out the video below to see it in action.


Filed under: Arduino Hacks, toy hacks

Pew Pew! An Arduino Based Laser Rangefinder


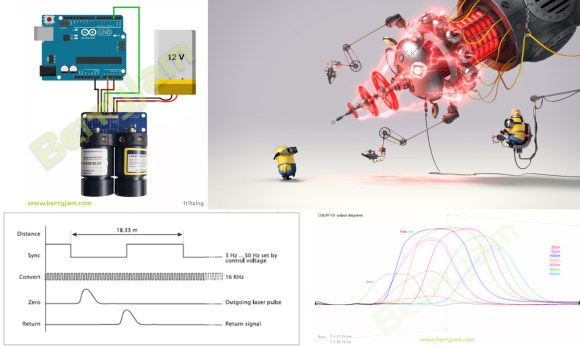
Lasers are some of the coolest devices around. We can use them to cut things, create laser light shows, and also as a rangefinder.[Ignas] wrote in to tell us about [Berryjam's] AMAZING write-up on creating an Arduino based laser rangefinder. This post is definitely worth reading.

Inspired by a Arduino based LIDAR system, [Berryjam] decided that he wanted to successfully use an affordable Open Source Laser RangeFinder (OSLRF-01) from LightWare. The article starts off by going over the basics of how to measure distance with a laser based system. You measure the time between an outgoing laser pulse and the reflected return pulse; this time directly relates to the distance of the object. Sounds simple? In practice, it is not as simple as it may seem. [Berryjam] has done a great job doing some real world testing of this device, with nice plots to top it all off. After fiddling with the threshold and some other aspects of the code, the resulting accuracy is quite good.

Recently, we have seen more projects utilizing lasers for range-finding, including LIDAR projects. It is very exciting to see such high-end sensors making their way into the maker/hacker realm. If you have a related laser project, be sure to let us know!


Filed under: laser hacks

Hackaday Links: April 27, 2014


The HackFFM hackerspace in Frankfurt finally got their CO2 laser up and running, and the folks there were looking for something to engrave. They realized the labels on IC packages are commonly laser engraved, so they made a DIP-sized Arduino. The pins are labelled just as they would be on an Arduino, and a few SMD components dead bugged onto the pins provide all the required circuitry. Video here.

A few years ago, we heard [David Mellis] built a DIY cell phone for an MIT Media Lab thingy. Apparently it’s making the blog rounds again thanks to the Raspi cell phone we featured yesterday. Here’s the Arduino cell phone again. Honestly we’d prefer the minimalist DIY Nokia inspired version.

The Raspberry Pi is now a form factor, with the HummingBoard, a Freescale i.MX6-powered clone, being released soon. There’s another form factor compatible platform out there, the Banana Pi, and you can actually buy it now. It’s an ARM A20 dual core running at 1GHz, Gig of RAM, and Gigabit Ethernet for about $60. That SATA port is really, really cool, too.

[Richard] has been working on a solar-powered sun jar this winter and now he’s done. The design uses two small solar panels to charge up two 500F (!) supercapacitors. There’s a very cool and very small supercap charging circuit in there, and unless this thing is placed in a very dark closet, it’ll probably keep running forever. Or until something breaks.

Here’s something awesome for the synth heads out there: it’s an analog modeling synthesizer currently on Indiegogo. Three DCOs, 18dB lowpass filter, 2 envelopes and an LFO, for all that classic Moog, Oberheim, and Roland goodness. It’s also pretty cheap at $120 USD. We really don’t get enough synth and musical builds here at Hackaday, so if you’re working on something, send it in.

A glass-based PCB? Sure. Here’s [Masataka Joei] put gold and silver on a piece of glass, masked off a few decorative shapes, and sandblasted the excess electrum away. [Masataka] is using it for jewelery, but the mind races once you realize you could solder stuff to it.


Filed under: Hackaday links

Laser Spirograph

Here’s a weekend junk bin project if we’ve ever seen one. [Pat] used a quartet of computer fans to make his laser Spirograph. Deciding to try this simple build for yourself will run you through a lot of basics when it comes to interfacing hardware with a microcontroller. In this case it’s the Arduino Nano.

The Spirograph works by bouncing a laser off of mirrors which are attached to the PC fans. When the fans spin the slight alignment changes cause the laser dot to bob and weave in visually pleasing ways. You can catch twenty minutes of the light show in the clip after the break.

Three of the fans have mirrors attached, the housing of the fourth is used to host the laser diode and make assembly easier. A TC4469 motor driver is used to connect the fans to the Arduino. The light show can be manually controlled by turning the trio of potentiometers which are read using the Arduino’s ADC.

If you manage your way through this build perhaps you’ll move on to a setup that throws laser light all over the room.


Filed under: laser hacks
Hack a Day 21 Feb 22:01

Laser for PCB Prototyping?

I've had a great time working on circuit designs in Eagle the last week or so-- after my surgery, my sciatic pain is mostly gone and I'm able to concentrate again! Still, I'm mostly confined to the neighborhood and can't lift or bend or exert myself for another few weeks, so I'm happily plugging away at a few projects, the main one of which is my latest coffee grinder timer.

The timer PCB's odd shape was dictated by enclosure's design, resulting in a 100mm x 74mm board. It needed to be double-sided, but traces were made wide and vias were kept to a minimum in the interest of home prototyping. I've had great success with toner transfer in the past, but not for 2-sided boards, and not for anything large.

A PCB-production process I've wondered about is using a laser engraver to remove an etch-resistant layer on copper before normal etching. The best and most successful example I've found is on Instructables: "Custom PCB Prototyping using a Laser Cutter," where the author uses flat black Krylon indoor/outdoor paint as the resist.

The example (at right) shows a single-sided board, but I'm primarily interested in using the process for excellent top-bottom registration. Before attempting the large board, I will first try some small pieces with test shapes, then I'll try a double-sided ATmega32u4 breakout board (my own design), then Grinder Timer 5. Stay tuned...
Jeff's Arduino Blog 17 Dec 22:38
eagle  homemade  laser  pcb  

Laser tag

Hello 

I am planning on building a lasar tag set with my arduino. does anyone know what I could use to detect the lasar ( some sort of reciever or cell of some sort) I want to be able to use it when there is light so a photo cell is already out of the picture.

Let's Make Robots 09 Dec 18:53
arduino  ideas  laser  tag  

Visual Navigator. Making it MOBILE !

Obstacle avoiding vehicle, continue in “3D Laser Range Finder” series ( project 1, project 2). The basic idea is the same, measuring distance using red laser pointers, CCD analog camera and Arduino UNO.  Modification was made in geometry.  Two lasers were set for “far field” obstacle detection, few meters in front of vehicle on left or right side. Primary mission is to trigger left / right turn before a car get too close to the “continuous” but not necessarily “high”  object, for example, sidewalk stone. Of course, this distance depends on the vehicle speed, and “alert” should be dispatched in right time “window”, or there would be no space left to making a turn ( proportional speed adaptation is not implemented yet). Low height of such road infrastructure is making useless ultrasound based range finder.


Two additional lasers were set in “cross” configuration, in order to detect any object that comes dangerously close to the front of vehicle. “Near field” obstacle detection or “head on collision” avoidance. Theirs two beams form reflective “trip-wires” and able to detect as narrow object as leg of a chair or desk, open door frame, anything that at least 1 mm wide.  One laser, pointed to the left, is also works as sidewalk / wall follow navigation system, keeping this distance constant.

Now couple words on “autopilot” algorithm. Three main feature of the project:

  1. wall / sidewalk following;
  2. “far field” obstacle avoidance;
  3. “near field” head on collision avoidance.

were classified in 3 priority levels: 1 – warning, 2 – major, 3 – critical.

0 – clear level, corresponds to normal  R/C radio control, or by  ”man / operator”  navigation via  remote R/C module. Operator is also has “authority” to decline warning class navigator status. But it’s not the case when navigator’s “autopilot” subroutine performs class 2 or 3 maneuver, with status “major” and “critical”. When vehicle performs maneuver 2, “left / right” command from R/C remote module are ignored, the same with “forward / backward” command in status “3 – critical”, making algorithm completely “fool – proof”.

More video will be posted, Link to Arduino UNO sketch: Visual_Navigator.

 5 August 2012.

I’d like to publish more pictures from “inside”, which show interface between arduino and R/C receiver module in the car. Well, not quite arduino, I build a “clone” using pre-programmed AtMega328. As you can see, the receiver was left almost intact, what I did, is just identified two on-board H-bridges which supply power to steering control motor and main vehicles motor-driver. Than, remove 4 resistors in series with controls lines, and routed 8 wires to the arduino ( 4 inputs from R/C receiver and 4 outputs to H-bridges ). Here you are, now arduino could intercept any command coming from R/C transmitter, and based on data from the sensors, make a decision if it makes sense to follow them. Also, “autopilot” function could “directly” address two motors in order to execute “obstacle avoiding” maneuver not asking anyone’s permission!.  What more, arduino control a power delivered to motors via software PWM,  making 7! different speed level available like in real vehicle. Unfortunately, the model I “hack” doesn’t use proportional steering control, but still PWM power management helpful to save a battery energy, limiting unnecessary current delivered to motor.