Posts with «laser cutter» label

Make Your Own MIDI Controller With An Arduino

Engineers create something out of nothing, and no where is this more apparent than in the creation of customized computer hardware. To make a simple MIDI controller, you need knowledge of firmware design and computer architecture, you need knowledge of mechanical design, and you need to know electronic design. And then you need the actual working knowledge and experience to wield a tool, be it a hammer, laser cutter, or an IDE. [Mega Das] brought together all of these skill to build a MIDI controller. Sure, it’s for bleeps and bloops coming out of a speaker, but take a step back and realize just how awesome it is that any one person could imagine, then implement such a device.

The electronics for this build include a printed circuit board that serves to break out the connections on an Arduino nano to a dozen arcade push buttons, four slide pots, two rotary pots, and a handful of screw terminals to connect everything together. Mechanically, this is a laser-cut box engraved with some fancy graphics and sized perfectly to put everything inside.

Yes, we’ve seen a lot of MIDI controllers built around the Arduino over the years, but this one is in a class by itself. This is taking off-the-shelf parts and customizing them to exactly what you want, and a prodigious example of what is possible with DIY hardware creation. You can check out the build video below.

Lasers, Mirrors, and Sensors Combine in an Optical Bench Game

Who would have thought you could make a game out of an optical bench? [Chris Mitchell] did, and while we were skeptical at first, his laser Light Bender game has some potential. Just watch your eyes.

The premise is simple: direct the beam of a colored laser to the correct target before time runs out. [Chris] used laser-cut acrylic for his playfield, which has nine square cutouts arranged in a grid. Red, green, and blue laser pointers line the bottom of the grid, with photosensors and RGB LEDs lining the grid on the other three sides. Play starts with a random LED lighting up in one of the three colors, acting as a target. The corresponding color laser comes on, and the player has to insert mirrors or pass-through blocks in the grid to create a path to the target. The faster you hit the CdS cell, the higher your score. It’s simple, but it looks really engaging. We can imagine all sorts of upgrades, like lighting up two different targets at once, or adding a beamsplitter block to hit two targets with the same color. Filters and polarizers could add to the optical fun too.

We like builds that are just for fun, especially when they’re well-crafted and have a slight air of danger. The balloon-busting killbots project we featured recently comes to mind.


Laser Cutter Alignment Mod Skips Beam Combiner

A lot of the DIY laser engravers and cutters we cover here on Hackaday are made with laser diodes salvaged from Blu-ray drives and projectors, which are visible lasers in the 400 – 450nm range (appearing as violet or blue). Unfortunately there is an upper limit in terms of power on visible diode lasers, most builds max out at 5W or so. If you need more power than that, you’ll likely find yourself looking at gas laser cutters like the K40. While the K40 is a great starting point if you’re looking to get into “real” lasers, it’s a very different beast from the homebrew builds using visible lasers.

With a gas laser the beam itself is invisible, making it much more difficult to align or do test runs. One solution is to add a visible laser to the K40 which can be used to verify alignment, but making sure it’s traveling down the same path as the primary laser usually requires an expensive beam combiner. Looking to avoid this cost, [gafu] wanted to see if it was possible to simply move the visible laser into the path of the primary beam mechanically.

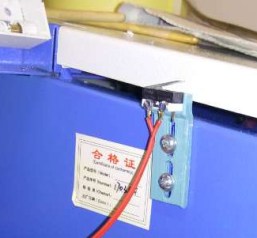
An adjustable microswitch detects when the lid has been opened.

In the setup that [gafu] has come up with, a cheap laser module (the type from a handheld laser pointer) is moved into the path of the primary laser on an arm that’s actuated by a simple hobby servo. To prevent the primary and visible lasers from firing at the same time, an Arduino is used to control the servo given the current state of the K40’s lid. If the lid of the K40 is open, the primary laser is shutoff and the visible laser is rotated into position so the operator can see where the primary laser’s beam would be hitting. Once the lid is closed, the visible laser rotates out of the way and the primary is powered back up.

Running the cutting or engraving job with the lid of the K40 machine open now let’s [gafu] watch a “dry run” of the entire operation with the visible laser before finally committing to blasting the target with the full power beam.

We’ve covered many hacks and modifications for everyone’s favorite entry-level CO2 laser cutter. From replacing the controller to making it bigger, K40 owners certainly seem like a creative bunch.


Filed under: Arduino Hacks, hardware, Laser Hacks

Walnut Guitar Back Yields Wood for Classy Word Clock

Word clocks are cool, but getting them to function correctly and look good is all about paying attention to the details. One look at this elegant walnut-veneered word clock shows what you can accomplish when you think a project through.

Most word clocks that use laser-cut characters like [grahamvinyl]’s effort suffer from the dreaded “stencil effect” – the font has bridges to support the islands in the middle of characters like “A” and “Q”. While that can be an aesthetic choice and work perfectly well, like in this word clock we featured a few months back, [grahamvinyl] was going for a different look. The clock’s book-matched walnut guitar back was covered in tape before being laser cut; the tape held the letters and islands in place. After painstakingly picking out the cutouts and tweaking the islands, he used clear epoxy resin to hold everything in place. The result is a fantastic Art Deco font and a clean, sleek-looking panel to sit on top of an MDF light box for the RGB LED strips.

The braided cloth cable adds a vintage look to the power cord, and [grahamvinyl] mentions some potential upgrades, like auto-dimming and color shifting. This is very much a work in progress, but even at this point we think it looks fabulous.

[via r/diy]


Filed under: clock hacks

Upcycle a Microwave into a Spot Welder

Long-time Maker Matthew Borgatti recently completed work on a homemade spot welder, built from a scrapped microwave and a few other parts.

Read more on MAKE

The post Upcycle a Microwave into a Spot Welder appeared first on Make: DIY Projects, How-Tos, Electronics, Crafts and Ideas for Makers.

Hypnotic Circular Knitting Machine Weaves Yarn Like Magic

Knitting is a popular needlecraft, but it can get tiring knitting larger pieces. Varvara Guljajeva and Mar Canet came up with a clever way to automate the process with this open source, open design, 3D printed circular knitting machine called the Circular Knitic. This idea didn’t just come out of thin […]

Read more on MAKE

The post Hypnotic Circular Knitting Machine Weaves Yarn Like Magic appeared first on Make: DIY Projects, How-Tos, Electronics, Crafts and Ideas for Makers.

'Space Invaders' with real lasers is delightful, dangerous

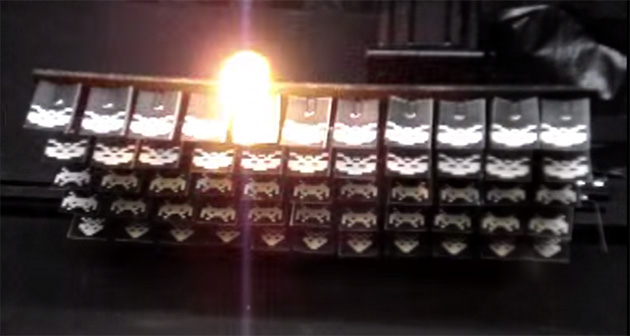
What do you get with a laser cutter, Arduino know-how and waaay too much time on your hands? A live action Space Invaders game that's an actual fire hazard, of course! Maker Martin Raynsford created a live action version of the classic arcade game just in time for Arduino Day, which falls on March 28th this year. The result is a silly but fun contraption: the paper invaders are clipped to a plate that uses stepper motors for left/right and up/down movement. Meanwhile, the 80W laser cutter is driven side-to-side by an Arduino Nano controller hooked up via USB to a PC.

Filed under: Gaming, Robots

Comments

Via: Boing Boing

Source: Just Add Sharks

Engadget 23 Mar 11:46