Posts with «hardware» label

An ARM-based GPS/GLONASS Tracker Board joining Arduino At Heart

We are excited to announce that OpenTracker v2 by Tigal is our new partner in the Arduino At Heart Program and ready to be backed in an Indiegogo campaign.

OpenTracker is a  fully open source commercial grade GPS/GLONASS vehicle tracker that comes with a free web interface for tracking it on Googlemaps or OpenStreetMaps.

The interface allows the tracking of a single vehicle or larger fleets simultaneously: currently it is possible to track the location, speed, altitude, heading, and address of the vehicle as well as save logs of location data for later use. With additional sensors it is also possible to track humidity, temperature and other parameters when desired.

The OpenTracker v2 is the second version of the original OpenTracker with many improved features, and a significant reduction in price.


Let’s have a look at some tech specs. The OpenTracker v2 is ready to run out-of-the-box and includes the same powerful 32-bit ATMEL SAM3A8C ARM controller as the Arduino Due, a Quectel M95 GSM/GPRS modem for wireless connectivity, a Quectel L76 GPS/GLONASS module with Assisted GPS, CAN-BUS, plenty of I/O options and a wide operating temperature range of -35°C to +80°C. The included CAN-BUS, plentiful I/O and on-board GSM/GPRS modem can be used to create many interesting applications such as CAN-BUS logger, SMS Gateway, SMS Remote Controller, and Weather Station with SMS notifications to name a few.

The OpenTracker v2 is available as a complete bundle including the Board, High-Quality Aluminum Enclosure, Power and Programming Cable as well as a GSM/GPS Antenna, or as a stand-alone board for those interested in using the board as an enhanced Arduino Due. The free online tracking interface is available at opentracker.tigal.com.

Support them on Indiegogo! (only a couple of days left but it’s flexible funding and going ahead with the manufacturing in any case!)

Arduino Blog 20 Aug 16:14

The Arduino Yun Shield

A few years ago, the most common method to put an Arduino project on the web was to add a small router loaded up with OpenWrt, wire up a serial connection, and use this router as a bridge to the Internet. This odd arrangement was possibly because the existing Arduino Ethernet and WiFi shields were too expensive or not capable enough, but either way the Arduino crew took notice and released the Arduino Yun: an Arduino with an SoC running Linux with an Ethernet port. It’s pretty much the same thing as an Arduino wired up to a router, with the added bonus of having tons of libraries available.

Since the Yun is basically a SoC grafted onto an Arduino, we’re surprised we haven’t seen something like this before. It’s an Arduino shield that adds a Linux SoC, WiFi, Ethernet, and USB Host to any Arduino board from the Uno, to the Duemilanove and Mega. It is basically identical to the Arduino Yun, and like the Yun it’s completely open for anyone to remix, share, and reuse.

The Yun shield found on the Dragino website features a small SoC running OpenWrt, separated from the rest of the Arduino board with a serial connection. The Linux side of the stack features a 400MHz AR9331 (the same processor as the Yun), 16 MB of Flash, and 64 MB of RAM for running a built-in web server and sending all the sensor data an Arduino can gather up to the cloud (Yun, by the way, means cloud).

All the hardware files are available on the Yun shield repo, with the Dragino HE module being the most difficult part to source.


Filed under: Arduino Hacks, hardware

The First Arduino Radar Shield

The very first fully operational radar Arduino shield was recently demonstrated at Bay area Maker Faire. It was built by [Daniel] and [David], both undergrads at UC Davis.

Many have talked about doing this, some have even prototyped pieces of it, but these undergrad college students pulled it off. This is the result from Prof. ‘Leo’ Liu’s full-semester senior design course based on the MIT Coffee Can radar short course, which has been going on for 2 years now. Next year this course will have 30 students, showing the world the interest and market-for project based learning. yet again showingWe  the influence of hackers on higher education.

Check out the high res ranging demo, where a wider band chirp was used to amazing results. Video below.


Filed under: Arduino Hacks, hardware

Small-Scale Projects Use Snail-Mail Mail-Scale

Stamps.com offers a free USB scale when you sign up for their service. The first versions of this scale did not have a display. In order to find the weight of an object the scale had to be connected to a computer running the stamps.com software. If you happen to have one of these old scales or are able to pick one up cheap, you may be interested in using it outside of the stamps.com service. There are several options on how to do that.


Stamps.com Scale Tool

Although ‘stamps.com’ is in the title, the two are not affiliated. This is a simple program that displays the scales output in both ounces and grams. There are 2 modes, Realtime that constantly updates the displayed output and Snapshot where the ‘Weigh’ button records and displays the weight at that moment.


Stamps.com USB Scale Reader

Here’s another similar Windows-based scale reader program. It claims to work with all stamps.com scale models. This has a unique feature where it hangs out in the system tray and pops up when it detects a change in weight. When an amount is displayed, the 3 lower buttons let you quickly copy the values to the clipboard.


Ultimate Scale

If you don’t own a Windows-based computer and/or you would like to weigh an apple, then Ultimate Scale is for you. This Android App automatically starts when the scale is connected and proceeds to display the weight on your phone. Tapping the main weight text zeros the scale. The amount is also spoken out loud for those too lazy to use their eyes. If you know the density of the object being weighed, this app will also calculate the volume!


Still not enough options for you? We’ve previously covered an Arduino project that displays the scale’s measurement on an LCD screen.


Filed under: hardware
Hack a Day 26 Apr 15:00

A LIN Bus Signal Injector

[Zapta] tipped us about his latest project: a LIN bus signal injector. For our unfamiliar readers, the LIN bus is a popular automotive bus that is used to interface with buttons, lights, etc. As [Zapta] was tired of having to press the Sport Mode button of his car each time he turned the ignition on, he thought it’d build the platform shown above to automatically simulate the button press.

The project is based around an ATMega328 and is therefore Arduino IDE compatible (recognized as an Arduino Mini Pro), making firmware customization easy. In the car, it is physically setup as a proxy between the LIN master and the slave (which explains the two 3-wires groups shown in the picture). It is interesting to note that the injection feature can be toggled by using a particular car buttons press sequence. The project is fully open source and a video of the system in action is embedded after the break.


Filed under: Arduino Hacks, hardware

Developed on Hackaday: Olivier’s Design Rundown

The Hackaday writers and readers are currently working hand-in-hand on an offline password keeper, the Mooltipass. A few days ago we presented Olivier’s design front PCB without even showing the rest of his creation (which was quite rude of us…). We also asked our readers for input on how we should design the front panel. In this new article we will therefore show you how the different pieces fit together in this very first (non-final) prototype… follow us after the break!

This is the bottom PCB, containing the main micro-controller, the Arduino headers and the FPC connector for the OLED screen. Finding low profile standard .1″ female connectors was one of our longest Google searches. The ones you can see above are pass-through connectors, which means that the pins can go through the PCB.

This is the CNC-milled prototype case. On the bottom you may notice two slots having a smaller depth to the other end, positioned right on top of the Arduino connectors. As previously mentioned in our Developed on Hackaday articles, we want to give the final users the ability to convert their secure password keeper into an Arduino platform. As you may have guessed, converting the Mooltipass will be as simple as cutting this thin plastic layer (see top of the picture) to access the Arduino headers and unlock the platform.

This is how the bottom PCB fits into the case. 4 screws can be used to keep everything in place. The large elevated plastic area serves as a flat surface for the smartcard:

The OLED screen then rests on the case’s sides:

Enough space is left behind the screen for the flex PCB to comfortably bend. Finally, the top board fits in the remaining space and the acrylic panel is put on top of the assembly:

As our last article stated, we obviously still have some things to perfect. In the meantime, we are going to hand solder a few prototypes and ship them out to our current developers.

Want to stay informed? You can join the official Mooltipass Google Group or follow us on Hackaday Projects.


Filed under: Featured, hardware

Using SIMMs to Add Some Extra RAM on your Arduino UNO


A Single In-line Memory Module (SIMM) is a type of memory module containing Random Access Memory (RAM) which was used in computers from the early 1980s to the late 1990s (think 386, 486, Macintoshs, Atari STE…). [Rafael] just made a little library that allows you to interface these modules to the Atmega328p-based Arduino UNO in order to gain some memory space. His work was actually based on the great Linux on the 8bit ATMEGA168 hack from [Dmitry Grinberg] but some tweaks were required to make it work with [Rapfael]‘s SIMM but also to port it to the Arduino platform. The 30-pin SIMM shown above is capable of storing up to (hold on to your chairs…) 16MB but due to limited amount of available IOs on the Atmega328p only 256KB can be used. Our guess it that an SPI / I2C IO extender could lift this limitation. A quick (shaky) video is embedded after the break.


Filed under: Arduino Hacks, hardware

Exceptionally Hard and Soft meeting at Berlin 28-30 December 2012 (Part2)

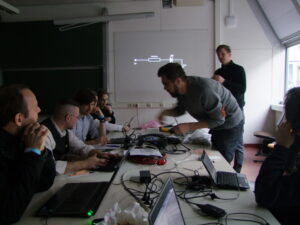
Arduino at EHSM 2012

We mentioned earlier about the very special geek way of entering new year 2013. So here is a first hand, un-altered account of Tricia Blickfeldt who participated in the Arduino workshop for kids held there. We now are richer by one more arduino user! Yay!

“Before I tell you about the conference, I have to say that I work in Special Education at an elementary school. I am surrounded by children all day every day. Many of them with disabilities. I am not an engineer. I am not a hacker. My gifts do not include technical things. I came to the conference as a friend of one of the presenters. Many of the presentations were foreign to me. I felt very welcomed though and learned a lot. The staff were all very helpful and kind.

I was excited and nervous to participate in the arduino workshop. My friend told me that the class was created for kids with no experience. This was comforting. Kid things are right up my alley. And I certainly had no experience. There had been some last minute changes in teachers for the class, but I was very impressed with the guys who presented the workshop. It was clear that they knew and were very experienced in what they were teaching. When we arrived and there were no kids and, much to my dismay, they changed up what/how they were going to teach. I was soon put at ease though as they began at the beginning and explained what arduino is, what it does, and why it is so amazing and useful. They adjusted to their audience without making it more complicated.

I got really anxious again as they started handing out several little parts for us to build on the arduino board. The directions however were clear and precise. Illustrations were shown and questions were welcomed and answered. I set up an LED light and programmed it to go! The programming was not difficult because we just had to look up the codes for the task we wanted and apply them to what built. To do this we had to name the light in the program so it knew where to apply the command.

Then we added a button and programmed that to make the light go when we pushed it! We had to make some modifications to the code to add the button. I was so excited. We had some time to add more lights and see what we could make them do. I lined them up and programmed them to flash in a row and then back! This was a little trickier to program because we had to name each light individually and tell it to go in sequence. Who knew that I was capable of that?

Finally, we added a knob to control the speed of the blinking. This was definitely the hardest for me to understand. We had to set a delay that corresponded to the position of the knob. I was so excited that I took pictures and videos to prove that I really did it and that it really worked!

I was very impressed at how professional the presentation was. It was given in a way that created meaning and understanding without being overwhelming. It allowed me to create things that I hadn’t ever imagined myself doing. I am motivated now to find a project to work on using what I learned in the arduino workshop.

The entire conference seemed to be a lot like the workshop. It was very pleasant and friendly to all who were there regardless of background or expertise. It was professional and the presenters were all very knowledgeable. I learned a lot and enjoyed my time at the conference.”

PS: Many many thanks Tomek and his friend, for filling in the last minute!

Arduino Blog 20 Jan 12:34

Enabling F-bus communications with Arduino

It’s always nice to see how creative makers approach communication issues in DIY projects, and today we would like to highlight the approach followed by Alex, from InsideGadgets.

On his website, he provides a detailed tutorial on how to use an old Nokia 6110 (or any derivatives) to send SMS messages by exploiting the Nokia’s F-bus, a simple bi-directional and full-duplex serial protocol.

After considerable reverse engineering work, made possible by useful online documentation, Alex finally managed to send a SMS from his Arduino board, connected to the phone, thanks to AVR libraries made available by AVRFreaks.

More information can be found on InsideGadget.

[Via: Inside Gadgets]

An Arduino-based ADB-to-USB adapter for NeXT keyboards

Have you ever wondered to use your old-fashioned NeXT keyboard with your current, non-ADB computer? The main issue that needs to be solved regards how to interface this ADB keyboard (standing for Apple Desktop Bus, an old protocol used in former NeXT and Apple computers) with a standard USB interface.

In this nice tutorial, Ladyada and Pt describe the approach they have used, based on an Arduino Micro board and… some luck in searching for the right information about the scancode table of the keyboard  ^^.

More information can be found here.

[Via: Adafruit Learning System]


Arduino Blog 10 Jan 11:40