Posts with «reverse engineering» label

IR Remote Tester Helps You Crack the Code

Even though some devices now use WiFi and Bluetooth, so much of our home entertainment equipment still relies on its own proprietary infrared remote control. By and large (when you can find them) they work fine, but what happens when they stop working?  First port of call is to change the batteries, of course, but once you’ve tried that what do you do next? [Hulk] has your back with this simple but effective IR Remote Tester / Decoder.

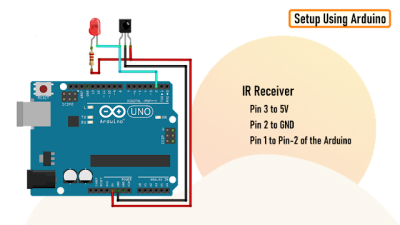
How to connect the TSOP4838 to an Arduino to read the transmitted codes

By using a cheap integrated IR receiver/decoder device (the venerable TSOP4838), most of the hard work is done for you! For a quick visual check that your remote is sending codes, it can easily drive a visible LED with just a resistor for a current-limit, and a capacitor to make the flickering easier to see.

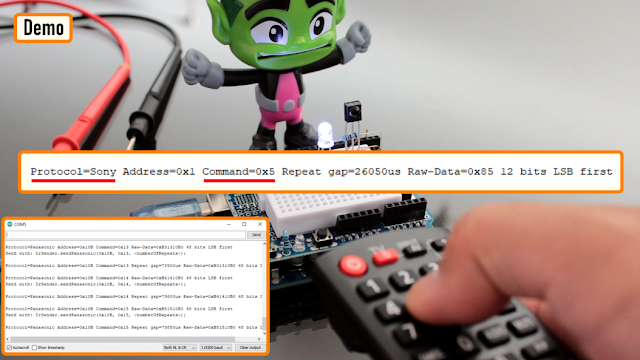
For an encore, [Hulk] shows how to connect this up to an Arduino and how to use the “IRremote” library to see the actual data being transmitted when the buttons are pressed.

It’s not much of a leap to imagine what else you might be able to do with this information once you’ve received it – controlling your own projects, cloning the IR remote codes, automating remote control sequences etc..

It’s a great way to make the invisible visible and add some helpful debug information into the mix.

We recently covered a more complex IR cloner, and if you need  to put together a truly universal remote control, then this project may be just what you need.

Hackaday Links: September 8, 2019

We start this week with very sad news indeed. You may have heard about the horrific fire on the dive boat Conception off Santa Cruz Island last week, which claimed 33 lives. Sadly, we lost one of our own in the tragedy: Dan Garcia, author of the wildly popular FastLED library. Dan, 46, was an Apple engineer who lived in Berkley; his partner Yulia Krashennaya died with him. Our community owes Dan a lot for the work he put into FastLED over the last seven years, as many an addressable LED is being driven by his code today. Maybe this would be a good chance to build a project that uses FastLED and add a little light to the world, courtesy of Dan.

In happier news, the biggest party of the hardware hacking year is rapidly approaching. That’s right, the 2019 Hackaday Superconference will be upon us before you know it. Rumor has it that there aren’t that many tickets left, and we haven’t even announced the slate of talks yet. That’s likely to clean out the remaining stock pretty darn quickly. Are you seriously prepared to miss this? It seems like a big mistake to us, so why don’t you hop over and secure your spot before you’re crying into your Club-Mate and wondering what all the cool kids will be doing in November.

Of course one of the highlights of Superconference is the announcement of the Hackaday Prize winner. And while we naturally think our Prize is the best contest, that doesn’t mean there aren’t others worth entering. MyMiniFactory, the online 3D-printing community, is currently running a “Design with Arduino” competition that should be right up the alley of Hackaday readers. The goal is simple: submit a 3D-printed design that incorporates Arduino or other electronics. That’s it! Entries are accepted through September 16, so you’ve still got plenty of time.

Sometimes you see something that just floors you. Check out this tiny ESP32 board. It doesn’t just plug into a USB port – it fits completely inside a standard USB Type A jack. The four-layer board sports an ESP32, FTDI chip, voltage regulator, an LED and a ceramic antenna for WiFi and Bluetooth. Why would you want such a thing? Why wouldn’t you! The board is coming soon on CrowdSupply, so we hope to see projects using this start showing up in the tipline soon.

Here’s a “why didn’t I think of that?” bench tip that just struck us as brilliant. Ever had to probe a board to trace signal paths? It’s a common enough task for reverse engineering and repairs, but with increasingly dense boards, probing a massive number of traces is just too much of a chore. Hackaday superfriend Mike Harrison from “mikeselectricstuff” makes the chore easier with a brush made from fine stainless wires crimped into a ring terminal. Attached to one probe of a multimeter, the brush covers much more of the board at a time, finding the general area where your trace of interest ends up. Once you’re in the neighborhood you can drop back to probing one pad at a time. Genius! We’d imagine a decent brush could also be made from a bit of coax braid too.

Another shop tip to wrap up this week, this one for woodworkers and metalworkers alike. Raw materials are expensive, and getting the most bang for your buck is often a matter of carefully laying out parts on sheet goods to minimize waste. Doing this manually can be a real test of your spatial relations skills, so why not automate it with this cut list optimizer? The app will overlay parts onto user-defined rectangles and snuggle them together to minimize waste. The program takes any units, can account for material lost to kerfs, and will even respect grain direction if needed. It’s built for wood, but it should prove useful for sheet metal on a plasma cutter, acrylic on a laser, or even PCBs on a panel.

Arduino into NAND Reader

[James Tate] is starting up a project to make a “Super Reverse-Engineering Tool”. First on his list? A simple NAND flash reader, for exactly the same reason that Willie Sutton robbed banks: because that’s where the binaries are.

As it stands, [James]’s first version of this tool is probably not what you want to use if you’re dumping a lot of NAND flash modules. His Arduino code reads the NAND using the notoriously slow digital_read() and digital_write() commands and then dumps it over the serial port at 115,200 baud. We’re not sure which is the binding constraint, but neither of these methods are built for speed.

Instead, the code is built for hackability. It’s pretty modular, and if you’ve got a NAND flash that needs other low-level bit twiddling to give up its data, you should be able to get something up and working quickly, start it running, and then go have a coffee for a few days. When you come back, the data will be dumped and you will have only invested a few minutes of human time in the project.

With TSOP breakout boards selling for cheap, all that prevents you from reading out the sweet memory contents of a random device is a few bucks and some patience. If you haven’t ever done so, pull something out of your junk bin and give it a shot! If you’re feeling DIY, or need to read a flash in place, check out this crazy solder-on hack. Or if you can spring for an FTDI FT2233H breakout board, you can read a NAND flash fast using essentially the same techniques as those presented here.


Filed under: Arduino Hacks, hardware

Reverse-Engineering a Superior Chinese Product

It makes an Arduino look like a 555.  A 364 Mhz, 32 bit processor. 8 MB RAM. GSM. Bluetooth. LCD controller. PWM. USB and dozens more. Smaller than a Zippo and thinner than corrugated cardboard. And here is the kicker: $3. So why isn’t everyone using it? They can’t.

Adoption would mandate tier after tier of hacks just to figure out what exact hardware is there. Try to buy one and find that suppliers close their doors to foreigners. Try to use one, and only hints of incomplete documentation will be found. Is the problem patents? No, not really.

[Bunnie] has dubbed the phenomenon “Gongkai”, a type of institutionalized, collaborative, infringementesque knowledge-exchange that occupies an IP equivalent of bartering. Not quite open source, not quite proprietary. Legally, this sharing is only grey-market on paper, but widespread and quasi-accepted in practice – even among the rights holders. [Bunnie] figures it is just the way business is done in the East and it is a way that is encouraging innovation by knocking down barriers to entry. Chinese startups can churn out gimmicky trash almost on whim, using hardware most of us could only dream about for a serious project.

He contrasts this with the West where only the big players like Apple and Google can step up to the plate. Everyone else is forced to use the embarrassingly obsolete hardware we are all familiar with. But [Bunnie] wants to get his foot in the door. “Can we find a way to still get ahead, yet still play nice?” he asks.

Part of his solution is reverse engineering so that hardware can simply be used – something the EFF has helped legally ensure under fair use. The other half is to make it Open Source. His philosophy is rooted in making a stand on things that matter. It is far from a solid legal foundation, but [Bunnie] and his lawyers are gambling that if it heads to a court, the courts will favor his side.

The particular board targeted is the one described above – the MT6260. Even spurred by the shreds of documentation he could gather, his company is a 2-man team and cannot hope to reverse engineer the whole board. Their goal is to approach the low-hanging fruit so that after a year, the MT6260 at least enters the conversation with ATMega. Give up trying to use it as a phone; just try to use like the Spark Core for now.

He is already much of the way there. After telling you what is on board and why we would all want to use it, [Bunnie] shows how far he has gone to reverse engineering and describes his plans for the rest. From establishing an electronic “beachhead” base of operations to further probe the device, to X-rays, photos, diagrams and the beginnings of an OS. If this type of thing interests you at all, the meticulous approach and easy-reading of this tech teardown will surely impress and inspire you. Every step of progress requires a new hack, a new solution, a new ingenious way to pry information out.

We’ve featured some awe-inspiring reverse engineering attempts in the past, but this is something that is still new and relevant. Rather than only exploit his discoveries for himself, [Bunnie] has documented and published everything he has learned. Everyone wins.

Thanks [David] for the tip.


Filed under: Cellphone Hacks, hardware, slider, teardown

Stepping Through Code on a Pace 4000 Set Top Box

[Lee] wrote in to tell us about a Set Top Box he hacked. Before the cable industry lawyers get out their flaming swords… he’s not stealing cable, or really doing much of anything. This is a hack just for the adventure and thrill of making someone else’s hardware design do your bidding without any kind of instructions.

He posted about the adventure in two parts. The first is finding the JTAG header and identifying the pins. Arduino to the rescue! No really, and this is the type of Arduino use we love. Using a package called JTAGenum the board becomes a quick tool for probing and identifying JTAG connections.

The image above shows a different piece of hardware. From looking at it we’re pretty sure this is a Bus Blaster which is specifically designed for JTAG debugging with ARM processors. This is the beginning of the second part of his documentation which involves code dumping and stepping through lines code (or instructions) using OpenOCD and GDB. It’s a chore to follow all that [Lee] discovered just to write his name to the display of the box. But we certainly found it interesting. The display has a convoluted addressing scheme. We assume that there are cascading shift registers driving the segments and that’s why it behaves the way it does. Take a look for yourself and let us know what you think in the comments.


Filed under: ARM, classic hacks

Enabling F-bus communications with Arduino

It’s always nice to see how creative makers approach communication issues in DIY projects, and today we would like to highlight the approach followed by Alex, from InsideGadgets.

On his website, he provides a detailed tutorial on how to use an old Nokia 6110 (or any derivatives) to send SMS messages by exploiting the Nokia’s F-bus, a simple bi-directional and full-duplex serial protocol.

After considerable reverse engineering work, made possible by useful online documentation, Alex finally managed to send a SMS from his Arduino board, connected to the phone, thanks to AVR libraries made available by AVRFreaks.

More information can be found on InsideGadget.

[Via: Inside Gadgets]

An Arduino-based ADB-to-USB adapter for NeXT keyboards

Have you ever wondered to use your old-fashioned NeXT keyboard with your current, non-ADB computer? The main issue that needs to be solved regards how to interface this ADB keyboard (standing for Apple Desktop Bus, an old protocol used in former NeXT and Apple computers) with a standard USB interface.

In this nice tutorial, Ladyada and Pt describe the approach they have used, based on an Arduino Micro board and… some luck in searching for the right information about the scancode table of the keyboard  ^^.

More information can be found here.

[Via: Adafruit Learning System]


Arduino Blog 10 Jan 11:40