Posts with «diy» label

Tertiarm - low cost, 3d printed robot arm based on Ikea lamp

Primary image

What does it do?

Move things, push buttons, etc.
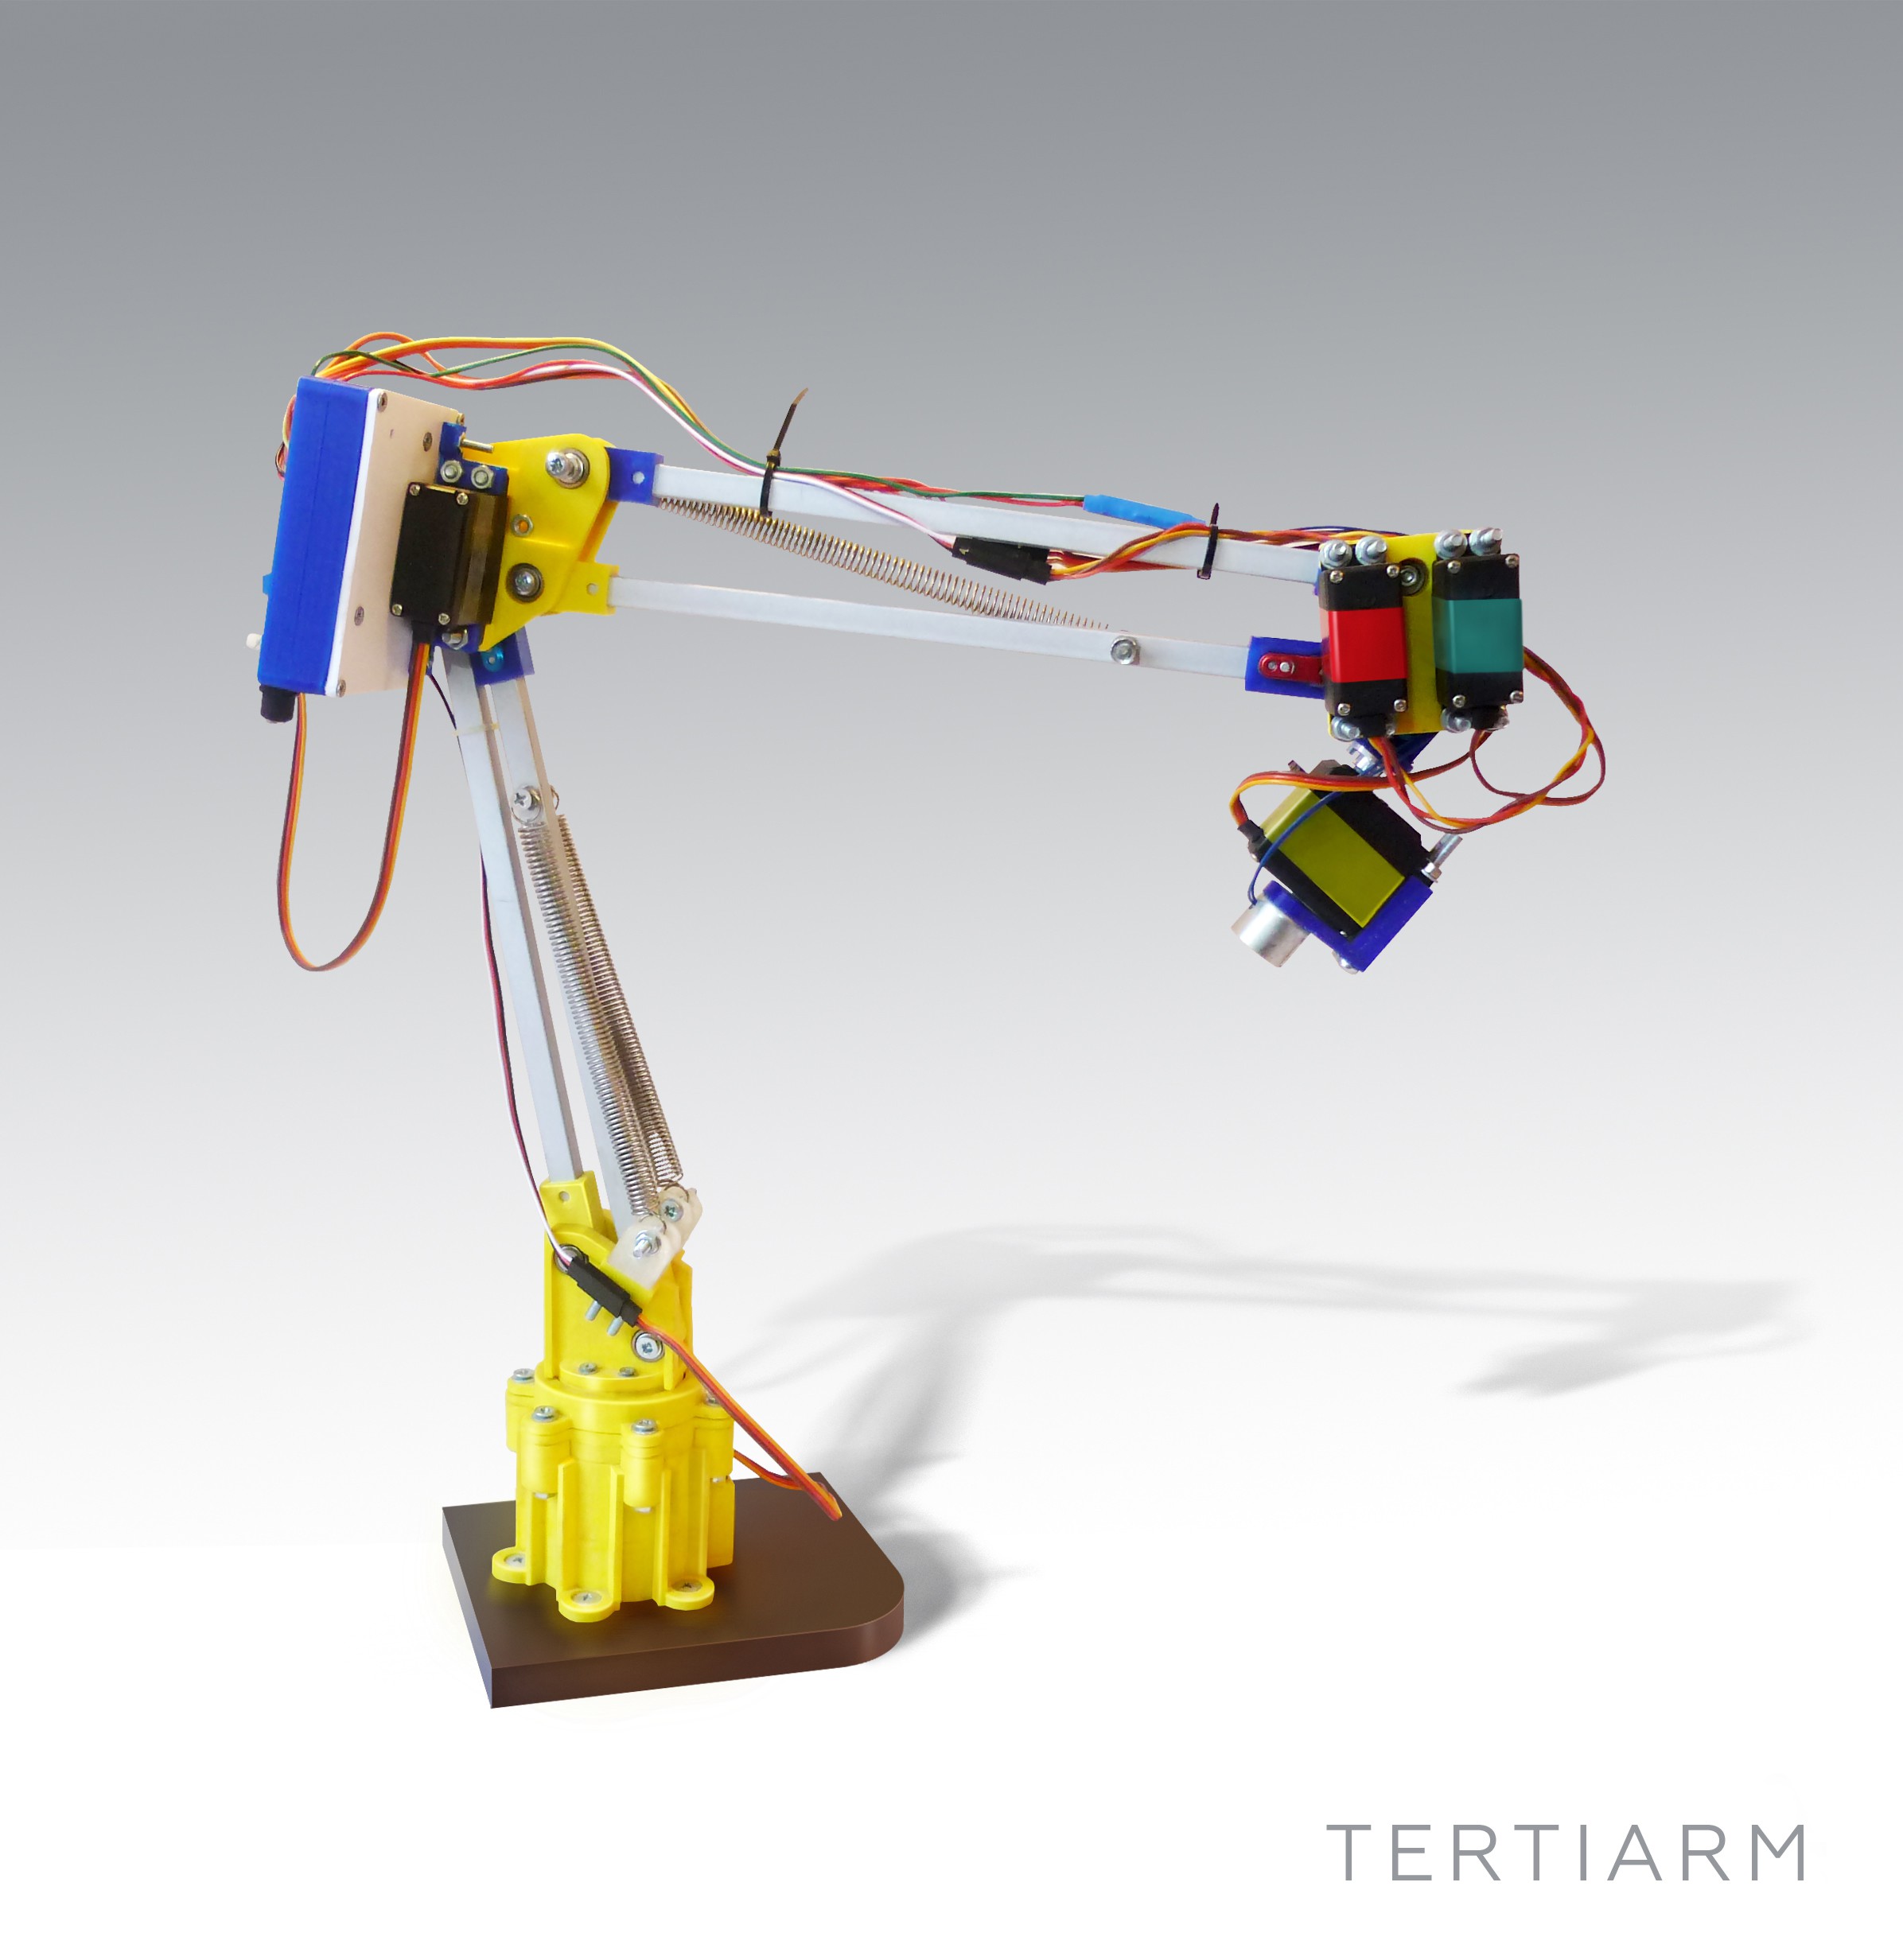
Cost to build

Embedded video

Finished project

Complete

Number

Time to build

Type

URL to more information

Weight

read more

Let's Make Robots 07 Feb 15:54

Interfacing 20*4 LCD with arduino

Hello Friends,

In this tutorial, we are going to interface 20*4 lcd with arduino uno. As the name suggests it has 4 rows and twenty columns. In total, we can show 80 characters. It has blue backlight. It has 16 pins just like 16*2. The pin configuration of 20*4 lcd is similar to that of 16*2 lcd.

Circuit Diagram:
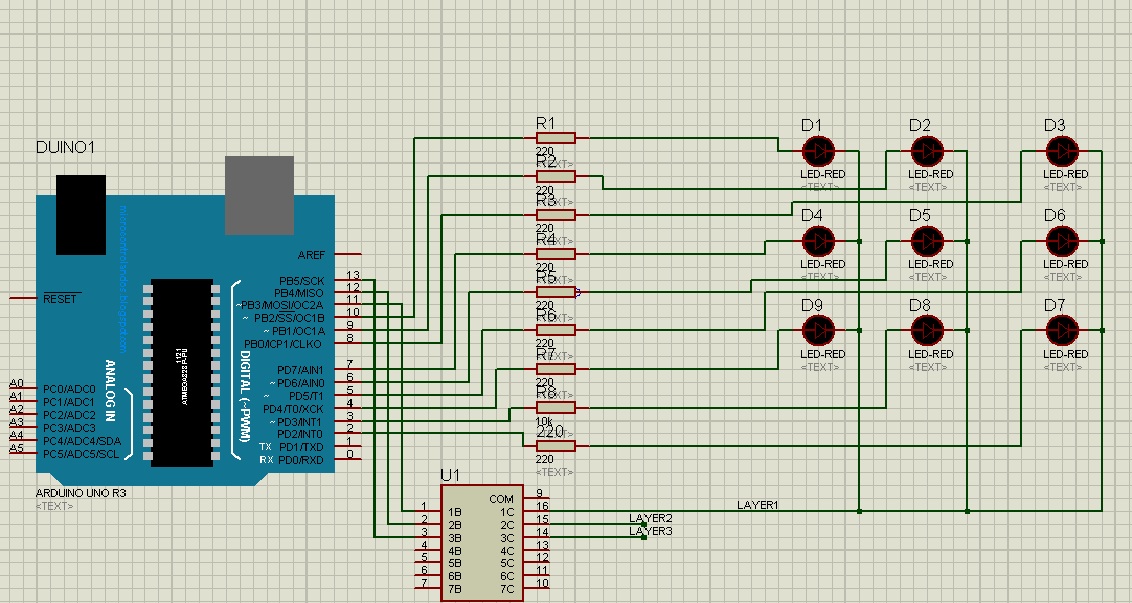
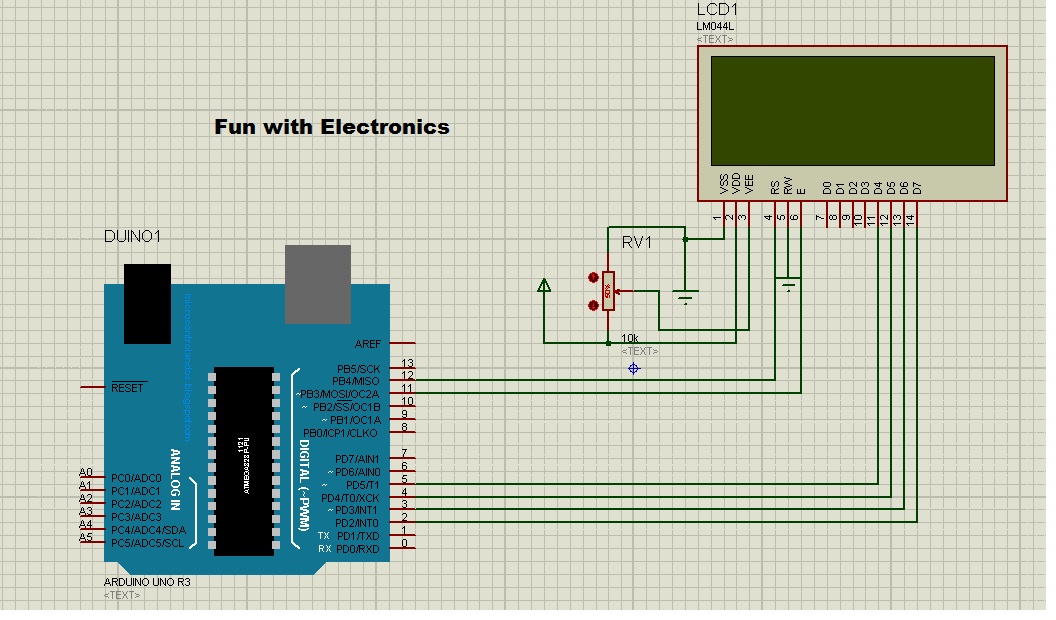
Connection on proteus


List of components:

  • Arduino Uno
  • LCD 20*4
  • 10k pot
  • jumper wires
  • Arduino IDE


Programming is quite simple. Let's start programming.


From Files > Examples > Liquid Crystal > Hello World

Make the following changes in the code:


Code:

#include <LiquidCrystal.h>

LiquidCrystal lcd(12, 11, 5, 4, 3, 2);

void setup() {
  lcd.begin(20, 4);   // for 20*4 lcd
//  lcd.print("hello, world!");   // this string will display on line 1
}

void loop() {
  lcd.setCursor(0, 0);
  lcd.print("     Welcome To     ");
  lcd.setCursor(0, 1);
  lcd.print("      Fun With      ");
  lcd.setCursor(0, 2);
  lcd.print("     Electronics    ");
  lcd.setCursor(0, 3);
  lcd.print("        v 1.0       ");
}

Check out the result:


Revealed: Homebrew Controller Working in Steam VR

[Florian] has been putting a lot of work into VR controllers that can be used without interfering with a regular mouse + keyboard combination, and his most recent work has opened the door to successfully emulating a Vive VR controller in Steam VR. He uses Arduino-based custom hardware on the hand, a Leap Motion controller, and fuses the data in software.

We’ve seen [Florian]’s work before in successfully combining a Leap Motion with additional hardware sensors. The idea is to compensate for the fact that the Leap Motion sensor is not very good at detecting some types of movement, such as tilting a fist towards or away from yourself — a movement similar to aiming a gun up or down. At the same time, an important goal is for any added hardware to leave fingers and hands free.

[Florian]’s DIY VR hand controls emulate the HTC Vive controllers in Valve’s Steam VR Tracking with a software chain that works with his custom hardware. His DIY controller doesn’t need to be actively held because by design it grips the hand, leaving fingers free to do other tasks like typing or gesturing.

Last time we saw [Florian]’s work, development was still heavy and there wasn’t any source code shared, but there’s now a git repository for the project with everything you’d need to join the fun. He adds that “I see a lot of people with Wii nunchucks looking to do this. With a few edits to my FreePIE script, they should be easily be able to enable whatever buttons/orientation data they want.”

We have DIY hardware emulating Vive controllers in software, and we’ve seen interfacing to the Vive’s Lighthouse hardware with DIY electronics. There’s a lot of hacking around going on in this area, and it’s exciting to see what comes next.


Filed under: Arduino Hacks, Virtual Reality

Arduino knight rider circuit using led bargraph

In this post, we are going to make knight rider circuit using led bargraph. Led graph, it consists of 10 leds.

Stuff required:

  1. Arduino uno
  2. LED bargraph
  3. 220 ohm resistor
  4. connecting wires
Connections:

First of all, make connections as given in the diagram below:

connections
Source code:

Upload the code below to your arduino board

/* Code starts from here */

const int led[]={4,5,6,7,8,9,10,11,12,13},d=5;

void setup() {
  for(int i=0;i<10;i++)
    pinMode(led[i],OUTPUT);
}

void loop() {
  for(int i=0;i<10;i++)
    {
    digitalWrite(led[i],HIGH);
    delay(d);
    digitalWrite(led[i],LOW);
    }

  for(int j=0;j<8;j++)
    {
    digitalWrite(led[8-j],HIGH);
    delay(d);
    digitalWrite(led[8-j],LOW);
    }
}

/* Code ends here */

Hope, you had enjoyed this post. Thanks for reading this post.

Check out the video:


Stay tuned for more tutorials.


Arduino based DC Voltmeter (0-50 volts)

In this post, we are going to make digital voltmeter using arduino uno. It's a DC voltmeter and it's range is 0 to 50 volt. As we know, arduino is an open source hardware prototyping platform used worldwide by the hobbyists, educators and students across the globe.
This is a handy voltmeter.

Stuff required:

  1. Arduino uno
  2. 16*2 lcd
  3. 10k pot
  4. voltage source

Objective of the project: To make a digital voltmeter, which can measure voltage from 0 to 50 volt DC and thereafter it can display on 16*2 LCD.

Connections:

Make the connections as given in the figure below:

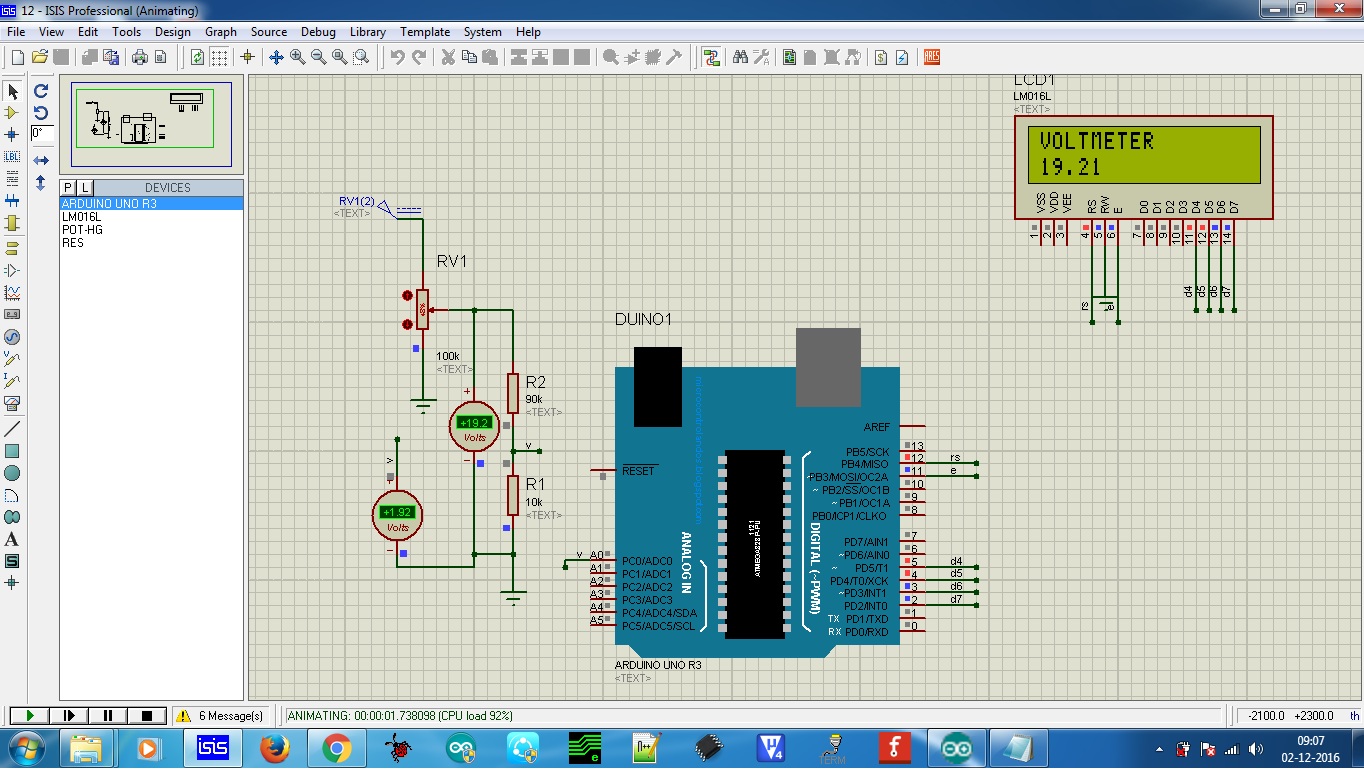
Arduino based voltmeter
Once the connection is made, upload the source code.

/* Source code */

const int volt=A0;

float val=0.0;

#include <LiquidCrystal.h>

LiquidCrystal lcd(12, 11, 5, 4, 3, 2);

void setup() {
  lcd.begin(16, 2);
  lcd.print("VOLTMETER");
}

void loop() {
  val=analogRead(volt);
  val=val*4.887;     // convert digital count into millivolt
  val=val/1000;      // convert millivolt into volts
  val=val*10.0;
  lcd.setCursor(0, 1);
  lcd.print(val);
}

/* End of source code */

Check out the video:


Hope you guys have enjoyed the post.

Thanks for reading the post.

3*3*3 LED cube using arduino uno

Hello Friends,

In this post, we are going to make 3d led cube using arduino. It's 3*3*3 led cube, so require a total of 27 leds. For driving 27 leds we require driver IC like ULN2003.


List of components:
  • Arduino uno
  • 27 LEDs
  • ULN2003
  • Perfboard
  • 8 220 ohms resistor
  • Jumper wires
Connections:

Schematics
In 3*3*3 led cube, basically there are three layers. In first layer, ground is common for 9 leds and same for layer 2 and layer 3.

There are 9+3 output pins, 9 for anode and three for 3 layers.


We are using ULN2003 IC, since arduino can't provide enough current to drive all the 27 led simultaneously.

Check out the video:

Arduino is making an Internet of Things kit with your help

Arduino boards can certainly be used to create homebrew connected devices, but that doesn't mean it's easy. What if you're a rookie who has yet to master programming or wiring? That's where Arduino's new, crowdfunded ESLOV kit might save the day. All you have to do to create a basic Internet of Things device is snap in some plug-and-play modules, connect your creation to your PC and draw connections between those modules in an editor. You only have to dive into serious programming if you have specific needs -- there's ready-made code for common devices like air quality sensors, baby monitors and remote-controlled thermostats.

Source: Kickstarter, Arduino Blog

Engadget 28 Sep 21:42

Arduino is making an Internet of Things kit with your help

Arduino boards can certainly be used to create homebrew connected devices, but that doesn't mean it's easy. What if you're a rookie who has yet to master programming or wiring? That's where Arduino's new, crowdfunded ESLOV kit might save the day. All you have to do to create a basic Internet of Things device is snap in some plug-and-play modules, connect your creation to your PC and draw connections between those modules in an editor. You only have to dive into serious programming if you have specific needs -- there's ready-made code for common devices like air quality sensors, baby monitors and remote-controlled thermostats.

Engadget 28 Sep 21:42

Build your own Lego drone with these affordable kits

Lego bricks have been the foundation of so many awesome and elaborate creations, it's no wonder people have already had the idea to send them skyward in drone form. But while there are plenty of DIY tutorials around, as well as the odd prebuilt model, we haven't seen anything quite as accessible and affordable as these new Lego UAV kits from Flybrix.

Source: Flybrix

Engadget 22 Sep 17:00

Build your own Lego drone with these affordable kits

Lego bricks have been the foundation of so many awesome and elaborate creations, it's no wonder people have already had the idea to send them skyward in drone form. But while there are plenty of DIY tutorials around, as well as the odd prebuilt model, we haven't seen anything quite as accessible and affordable as these new Lego UAV kits from Flybrix.

Engadget 22 Sep 17:00