Posts with «lcd interfacing» label

Interfacing 20*4 LCD with arduino

Hello Friends,

In this tutorial, we are going to interface 20*4 lcd with arduino uno. As the name suggests it has 4 rows and twenty columns. In total, we can show 80 characters. It has blue backlight. It has 16 pins just like 16*2. The pin configuration of 20*4 lcd is similar to that of 16*2 lcd.

Circuit Diagram:
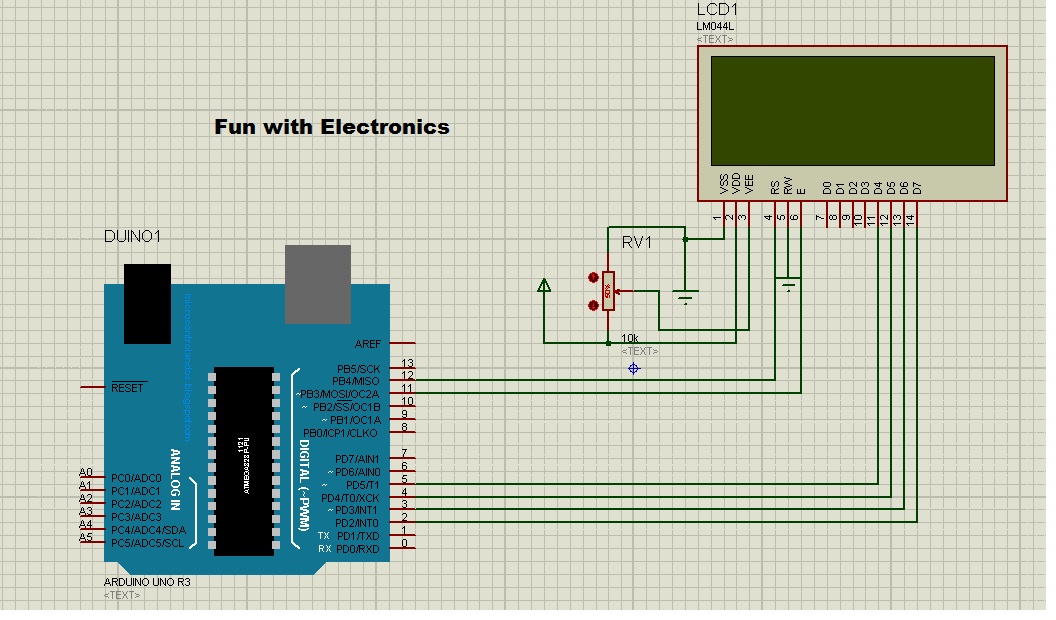
Connection on proteus


List of components:

  • Arduino Uno
  • LCD 20*4
  • 10k pot
  • jumper wires
  • Arduino IDE


Programming is quite simple. Let's start programming.


From Files > Examples > Liquid Crystal > Hello World

Make the following changes in the code:


Code:

#include <LiquidCrystal.h>

LiquidCrystal lcd(12, 11, 5, 4, 3, 2);

void setup() {
  lcd.begin(20, 4);   // for 20*4 lcd
//  lcd.print("hello, world!");   // this string will display on line 1
}

void loop() {
  lcd.setCursor(0, 0);
  lcd.print("     Welcome To     ");
  lcd.setCursor(0, 1);
  lcd.print("      Fun With      ");
  lcd.setCursor(0, 2);
  lcd.print("     Electronics    ");
  lcd.setCursor(0, 3);
  lcd.print("        v 1.0       ");
}

Check out the result:


Interfacing temperature sensor with arduino

Interfacing temperature sensor (LM35) with arduino:

In this post, we will learn how to interface temperature sensor (LM35) with arduino uno.

Arduino Uno is an open-source electronic prototype board used by beginners, hobbyists and developers across the globe, Arduino have so many forums, if you need any help, guidance.
Arduino uno is based on atmega 328p microcontroller. Arduino uno comes in two pckages:
Through-hole package and SMD package.

For the time being, we are considering through-hole package. It's a 28-pin DIP (dual inline package) IC.  There are 14-digital I/O pins and 6-analog input pins.
Arduino has a rich library support. For example: led blinking, lcd interfacing, etc. all these program can br found in library.

In order to display data received from temperature esnsor, we need display device like seven segment display or lcd or alternatively we can use serial monitor.

LM-35 is a temperature sensor. It's sensitivity is 10mV/°C which literally means with rise in temperature by 1° Celsius the voltage is increased by 1 millivolts. It's graph is linear.
It's range is from -55° Celsius to +150° Celsius.

Arduino have 6-adc channels viz, A0-A5. These are 10-bit adc means 0-5 analog volt is converted into digital count ranging from 0-1023

Resolution = Vref/((2^10)-1) = Vref/1023

We are taking Vref as 5 volt. Now, the resolution comes out to be 4.887 mV

In order to convert digital count into voltage, we have to multiply it by 4.887. Now we have voltage. We have to convert this voltage into temperature. This is known as calibration.

Temperature in ° C = 4.887 * digital count (0-1023) /10.0

Here are the screenshots of prteus simulation and code:

Proteus simulation


Download arduino code and simulation from the link given below:

https://drive.google.com/file/d/0B4Px6Drl6Zz_RFB2MEM4YUdPRGM/view?usp=sharing

Stay tuned for more updates !!


Interfacing lcd with arduino

How to interaface lcd (4-bit interface) with arduino?

In this tutorial, we are going to discuss , how to interface lcd with arduino.

We are using 16*2 lcd, means it have two rows and 16 columns. Overall, we can display 32 characters.

16*2 LCD

Lcd have 16 pins, out of which six are connected to arduino. D4-D7 are data pins. RS, RW and EN pins are also there. RW pin is permanently grounded since we are writing to lcd.
Pin no 3 is connected to pot (10k) in order to change the contrast. Pin no 15 and 16 are for backlight.
Since lcd don't have any backlight.

Code:

// include the library code:
#include <LiquidCrystal.h>

// initialize the library with the numbers of the interface pins
LiquidCrystal lcd(12, 11, 5, 4, 3, 2);

void setup() {
  // set up the LCD's number of columns and rows:
  lcd.begin(16, 2);
  // Print a message to the LCD.
  lcd.print("hello, world!");
}

void loop() {
  // set the cursor to column 0, line 1
  // (note: line 1 is the second row, since counting begins with 0):
  lcd.setCursor(0, 1);
  // print the number of seconds since reset:
  lcd.print(millis() / 1000);
}

Simulation in proteus
Hope, you had enjoyed the tutorial.

Stay tuned for more updates !!