Posts with «lm35» label

Temperature on GUI using visual studio and arduino

In this post, first we will interface LM35 with arduino uno and then  upload this data through serial communication. With the help of visual studio we can make computer gui application and though this gui application, we can do lot of stuffs like temperature logger, humidity monitoring. The

Stuff we require:

  1. Arduino uno with usb cable
  2. LM35
  3. Jumper wires
  4. Visual Studio (I had used VS 2012)
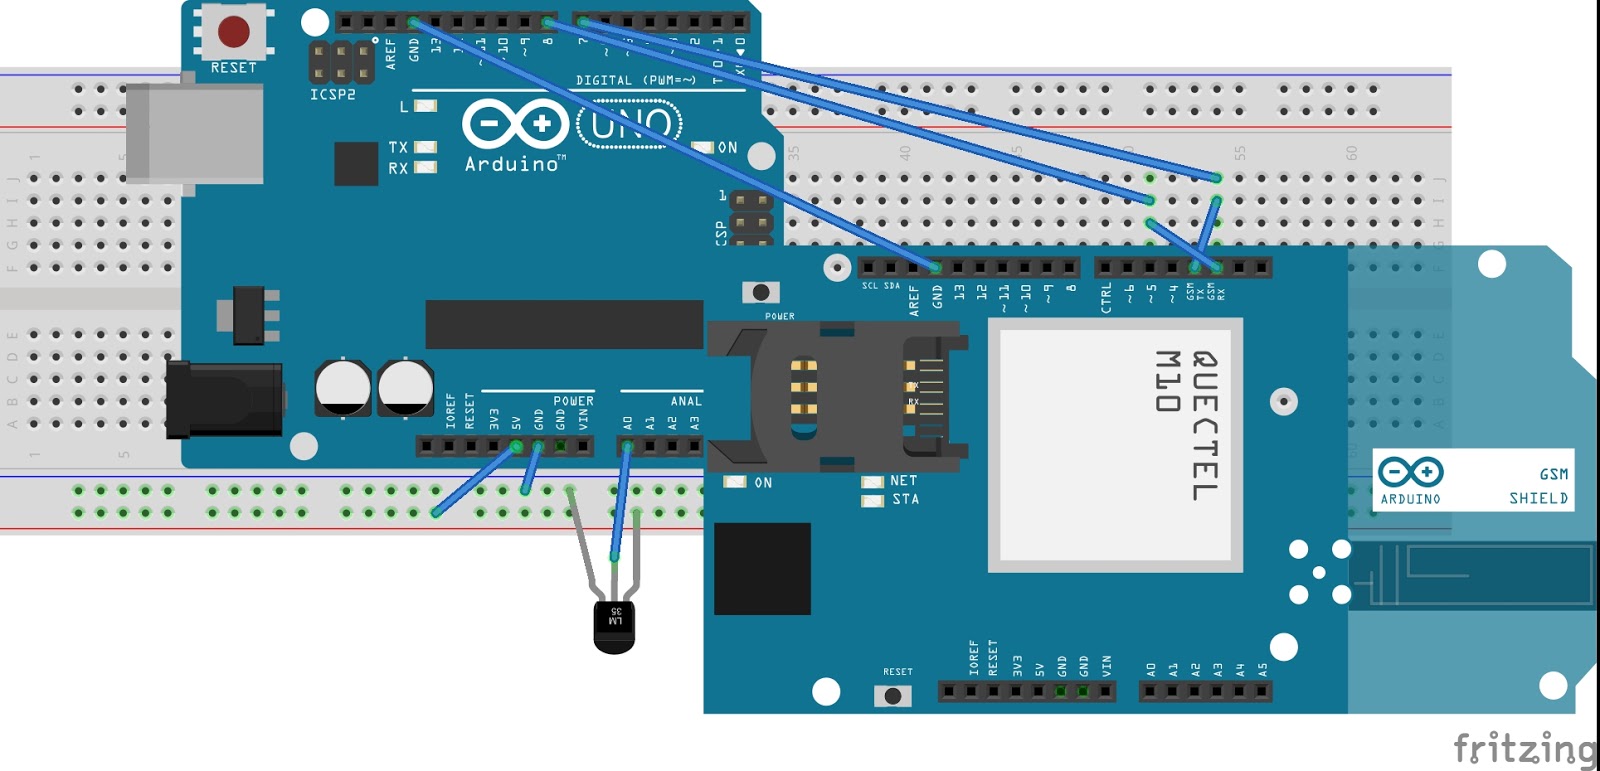
Make connections as follows:

LM35 interfacing with arduino


Simply provide, Vcc and GND to temperature sensor (LM35) and it's output should be connected to A0 of arduino. You can connect it to any channel from A0 to A5.

Calculation part:

There is little bit calculation. LM35 gives analog output. It's linearity is 10 mV/°C
which literally means for rise in temperature of 1°C, there be an increment of mV from output of lm35. It's graph is linear. It's temperature range is from: -55°C to +150°C.
Since, we are using LM35 it is calibrated in terms of degree celsius. There are other variants available like lm235 and lm335.

Arduino Code: 

The code is very simple

/*
Code Starts
*/


float val=0.0;

void setup() {
Serial.begin(9600);
}

void loop() 
{
val=analogRead(A0);
val=(0.4887*val);
Serial.println("VALUE OF TEMPERATURE IS: " + String(val) );
delay(1500);
}

/*
Code Ends
*/

Check out the video:


Visit this blog for more updates !!


Temperature updation on thingspeak using sim900

Hello friends,

In this post we are going to discuss how to upload temperature on thingspeak channel using sim 900 and arduino uno. As I had already uploaded the data on thingspeak channel using sim 900 and terminal software.

Introduction:

This project is a wireless temperature logger on thingspeak channel using gsm module and arduino.
For temperature sensor, we are using lm35, that gives output in millivolt which can be easily calibrated in  terms of  °C. We have to use adc module, since it's an analog sensor. Once the raw data is converted into temperature, we can upload the data.

Now, we are ready to upload the data on thingspeak channel. Thingspeak provides api for uploading of data. Before this, we have to use activate GPRS on sim900. We also to provide APN for accessing the internet. After activating the GPRS, we have to use GET like this:

GET http://api.thingspeak.com/update?api_key=QZFXXXXXXXXXXX&field1=data

Replace this api with yours, and data is the data you want to be upload. You can upload a number of field like temperature, pressure, humidity, etc.
 

Stuff you need:

  1. SIM900A
  2. Arduino uno
  3. LM35 (it's output is in degree celsius)
  4. 12 volt adapter (for GSM module)
  5. Jumper wires
  6. Account on thingspeak


Connections:

Arduino                              GSM module
Pin no. 7     ======>         Tx
Pin no. 8     ======>         Rx
Gnd            ======>          Gnd

Output of LM35 is connected to A0 of arduino uno.


Download the code from here:


Temperature controlled dc fan

In this post, we will control the speed of dc fan based on the temperature.

List of components:

1. Arduino Uno
2. LM 35 temperature sensor
3. LCD 16*2
4. 10k potentiometer
5. ULN 2003
6. DC motor
7. Breadboard/ perfboard

First of all, we will monitor the temperature by using lm35 i.e. temperature sensor. It's scale factor is +10mV/°C which means with increment in temperature by 1° Celsius, the voltage is rise by 10 mV.
We can read adc count by analogRead(A0); // we are using channel A0

This will give us a digital count of adc which varies from 0 to 1023, we have to convert these count into voltage and then into temperature. First of all, we will convert into voltage:
In arduino uno, adc is of 10-bit.
Resolution = Vref/(2^n-1), where n is bit (in our case it's 10)
Resolution = 5000 / 1023, ( Verf = 5000 mV and 2^10 is 1024 minus 1 is 1023)

Resolution = 4.887 mV
Now, we have to convert voltage into temperature:
Temperature (in °C) = Voltage (in mV) / 10.0
With this temperature monitoring is over.

LCD interfacing is simple since we have library for the same with proper documentation.

Now coming to pwm part. In arduino, we can control output voltage by pulse width modulation (pwm).
Duty Cycle = Ton / (Ton + Toff)
Duty Cycle = Ton / T

Duty Cycle (in %age) = (Ton / T)*100

In arduino, for pwm we have analogWrite function :

In arduino uno, we have six pwm channels viz, pin no. 3, 5, 6, 9, 10 and 11.

analogWrite(pin no, value)

Pin no may be 3, 5, 6, 9, 10 and 11
Value varies from 0 to 255 since pwm resolution is of 8-bit (2^8-1)

0 for 0% duty cycle                  0 volts
64 for 25% duty cycle              1.25 volts            if(val<=40.0)
127 for 50% duty cycle            2.50 volts            if(val>40.0 && val<=50.0)
192 for 75% duty cycle            3.75 volts            if(val>50.0 && val<=60.0)
255 for 100% duty cycle          5.00 volts            if(val>60.0)

where val is temperature in °C

Vavg = Duty Cycle  * 5.0 volts
 
Schematic of temperature controlled fan
Download the source code from the link below:


Stay tuned for more updates !!


Interfacing temperature sensor with arduino

Interfacing temperature sensor (LM35) with arduino:

In this post, we will learn how to interface temperature sensor (LM35) with arduino uno.

Arduino Uno is an open-source electronic prototype board used by beginners, hobbyists and developers across the globe, Arduino have so many forums, if you need any help, guidance.
Arduino uno is based on atmega 328p microcontroller. Arduino uno comes in two pckages:
Through-hole package and SMD package.

For the time being, we are considering through-hole package. It's a 28-pin DIP (dual inline package) IC.  There are 14-digital I/O pins and 6-analog input pins.
Arduino has a rich library support. For example: led blinking, lcd interfacing, etc. all these program can br found in library.

In order to display data received from temperature esnsor, we need display device like seven segment display or lcd or alternatively we can use serial monitor.

LM-35 is a temperature sensor. It's sensitivity is 10mV/°C which literally means with rise in temperature by 1° Celsius the voltage is increased by 1 millivolts. It's graph is linear.
It's range is from -55° Celsius to +150° Celsius.

Arduino have 6-adc channels viz, A0-A5. These are 10-bit adc means 0-5 analog volt is converted into digital count ranging from 0-1023

Resolution = Vref/((2^10)-1) = Vref/1023

We are taking Vref as 5 volt. Now, the resolution comes out to be 4.887 mV

In order to convert digital count into voltage, we have to multiply it by 4.887. Now we have voltage. We have to convert this voltage into temperature. This is known as calibration.

Temperature in ° C = 4.887 * digital count (0-1023) /10.0

Here are the screenshots of prteus simulation and code:

Proteus simulation


Download arduino code and simulation from the link given below:

https://drive.google.com/file/d/0B4Px6Drl6Zz_RFB2MEM4YUdPRGM/view?usp=sharing

Stay tuned for more updates !!