Posts with «diy» label

Complex, Beautiful Device is Limited to Text-speak and Cat Pictures (WTF, LOL)

Beautifully documented, modular, and completely open-source, this split flap display project by [JON-A-TRON] uses 3D printing, laser cutting and engraving, and parts anyone can find online to make a device that looks as sharp as it is brilliantly designed. Also, it appears to be a commentary on our modern culture since this beautifully engineered, highly complex device is limited to communicating via three-letter combos and cat pictures (or cat video, if you hold the button down!) As [JON-A-TRON] puts it, “Why use high-resolution, multi-functional devices when you can get back to your industrial revolution roots?” Video is embedded below.

The only limitation is that the device has no way of knowing the state of individual displays, so it’s unable to spell out specific messages – an operator simply holds a button to scroll through letters, and stops when the correct letter is displayed. For a similar project that has serious control hardware (but none of the cheeky commentary) check out this scratch-built alphanumeric split flap display.

[via Adafruit Blog]


Filed under: classic hacks

The little Arduino robot arm that could!

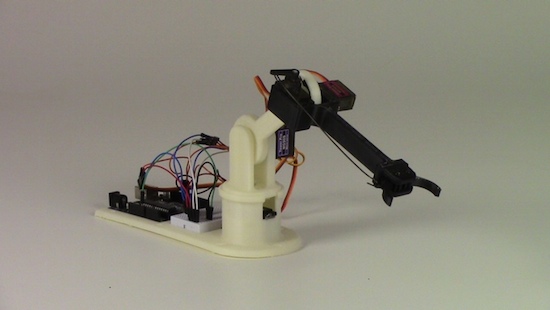
As its name would suggest, the LittleArm is a mini 3D-printed robot that began as a weekend project. Its creator Gabe Bentz wanted a small arm that was easy to work with, and one that wouldn’t require him to dig deep into his wallet. So, as any Maker would do, he decided to design his own low-cost device.

After showing the LittleArm off, it wasn’t before long that he was approached by some STEM teachers in the area who wondered if the kit was something they could use in their classrooms. Ideally, every student should have one to tinker with, but unfortunately today’s systems tend to be too expensive and quickly loose parts and pieces. This is a problem that LittleArm is looking to solve.

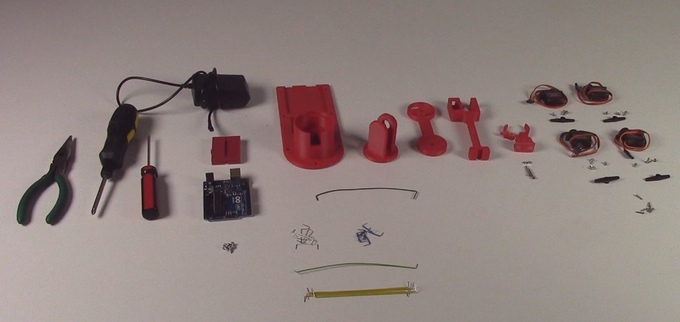
The arm is powered by an Arduino Uno and four identical metal-geared micro servos, while all other mechanical components are 3D-printed. There’s also a modular gripper that’s actuated by a servo along with rigid end-effectors for various tasks. What’s more, a basic GUI enables you to control the arm, its gripper, the speed, as well as use its record function to train the robot to perform a specific task and then watch it play out the sequence.

The entirely open-source gadget comes as a DIY kit that can be purchased or built from scratch. Want one of your own? Check out Bent’z Kickstarter page here, and see the LittleArm in action below (including some of its dance moves).

DIY dtmf module and interfacing with arduino uno


In this post, we are going to make dtmf module and interface it using arduino.

My prototype

Theory of  DTMF:
Full form of dtmmf is dual tone multi frequency. The DTMF telephone keypad is laid out in a 4×4 matrix of push buttons in which each row represents the low frequency component and each column represents the high frequency component of the DTMF signal. Pressing a key sends a combination of the row and column frequencies. For example, the key 1 produces a superimposition of tones of 697 and 1209 hertz (Hz). Initial pushbutton designs employed levers, so that each button activated two contacts. The tones are decoded by the switching center to determine the keys pressed by the user.
DTMF keypad frequencies (with sound clips)
1209 Hz1336 Hz1477 Hz1633 Hz
697 Hz123A
770 Hz456B
852 Hz789C
941 Hz*0#D
We have to decode the dtmf tone generated by the phone. We can decode it using decoder ic i.e. MT8870.

Circuit diagram of  dtmf decoder ic:

Schematics

where 104 is 0.1 uF ceramic capacitor.
If it is not working with you android, then download this android app.


Arduino code:

Proteus design
/* DOCUMENTATION: 
 *  INTERFACING DTMF MODULE WITH ARDUINO
 *  IT HAS FOUR DIGITAL OUTPUT'S i.e. Q0, Q1, Q2 AND Q3
 *  Q3 IS CONNECTED TO DIGITAL PIN 2
 *  Q2 IS CONNECTED TO DIGITAL PIN 3
 *  Q1 IS CONNECTED TO DIGITAL PIN 4
 *  Q0 IS CONNECTED TO DIGITAL PIN 5
 *  
 *  We will check the output using serial monitor
 *  By- Chandan Kumar 
 *  Contact: chandan90420@gmail.com
 */
int val=0;

boolean q0=LOW,q1=LOW,q2=LOW,q3=LOW;

void setup() {
  pinMode(2, INPUT);
  pinMode(3, INPUT);
  pinMode(4, INPUT);
  pinMode(5, INPUT);
  Serial.begin(9600);
}

void loop() {
q0=digitalRead(5); 
q1=digitalRead(4); 
q2=digitalRead(3); 
q3=digitalRead(2); 

val=q0+(q1*2)+(q2*4)+(q3*8);

Serial.println(val);

delay(400);
}

Thanks for visiting my blog.

Stay tuned for more updates !! 


FunWithElectronics 23 Jun 21:21

A DIY digital Arduino clock designed for and by teachers

Project-based lessons are a great way to introduce students to the world of electronics. Clearly Jenna Debois agrees, as she has built a DIY classroom clock based on an Arduino Nano. What’s even cooler is that it’s optimized for teachers! 

The device is made using laser-cut wood pieces, NeoPixels, a real-time clock module, and packs plenty of customizable features like:

  • An additional digit that keeps track of the block or period- an especially useful feature for rotating block schedules
  • The ability to program holidays into the code to prevent the block from advancing on days when school is not in session
  • LED digits that fade from green to red as the end of the period or block approaches so that a single glance can convey the remaining class time
  • A countdown timer triggered 6 minutes before the period ends that flashes between the time and the remaining time- a useful feature for signaling cleanup time
  • Other light effects that can be triggered during lunch, free periods, after school, or other special occasions

Debois not only created a step-by-step guide, but also shared all the documentation on GitHub and a detailed video of the build process.

How Does a Buck Converter Work Anyway?

[Great Scott] should win an award for quickest explanation of a buck converter. Clocking in at five and a half minutes, the video clearly shows the operating principles behind the device.

It starts off with the question, what should you do if you want to drop a voltage? Many of us know that we can dim and brighten an LED using the PWM on an Arduino, but a closer inspection with an oscilloscope still shows 5V peaks that would be dangerous to a 3.3V circuit. He then adds an inductor and diode, this keeps the current from dropping too fast, but the PWM just isn’t switching fast enough to keep the coil energized.

A small modification to the Arduino’s code, and the PWM frequency is now in the kHz range. The voltage looks pretty good on the oscilloscope, but a filter cap gets it to look nice and smooth. Lastly, he shows how when the load changes the voltage out looks different. To fix this a voltage divider feeds back the information to the Arduino, letting it change the PWM duty to match the load.

In the last minute of the video he shows how to hook up off-the-shelf switching regulators, whose support components are now completely demystified as the basic principles are understood. Video after the break.


Filed under: classic hacks, parts

Otto - build you own robot in two hours!

Primary image

What does it do?

Otto walks, dances, makes sounds and avoids obstacles, is completely open source, Arduino compatible, 3D printable, and with a social impact mission to create an inclusive environment for all kids.

Otto was inspired by another robot instructable BoB the BiPed and programmed using code from another open source biped robot called Zowi.

CC-BY-SA

Otto's differences are in the assembled size (11cm x 7cm x12cm), cleaner integration of components and expressions.

Cost to build

$49, 00

Embedded video

Finished project

Complete

Number

Time to build

2 hours

Type

URL to more information

Weight

250 grams

read more

Arduino clone is as small as an AA battery

What do you do if even the smallest Arduino boards (or their clones) are too big for your homebrew project? If you're Johan Kanflo, you find a way to make them even smaller. His AAduino project turns the already miniscule Tiny328 Arduino clone into an even smaller computing device that's about as big as an AA battery. Through creative wiring, it even fits inside a typical battery holder and draws power from the batteries in the remaining slots. He had to underclock the processor to extend to the battery life, but it's otherwise as capable as its normal counterparts.

Via: TechCrunch

Source: Johan Kanflo, GitHub

Arduino clone is as small as an AA battery

What do you do if even the smallest Arduino boards (or their clones) are too big for your homebrew project? If you're Johan Kanflo, you find a way to make them even smaller. His AAduino project turns the already miniscule Tiny328 Arduino clone into an even smaller computing device that's about as big as an AA battery. Through creative wiring, it even fits inside a typical battery holder and draws power from the batteries in the remaining slots. He had to underclock the processor to extend to the battery life, but it's otherwise as capable as its normal counterparts.

Engadget giveaway: Win an mCookie Family Kit courtesy of Microduino!

Getting your STEM skills up to speed is now easier than ever with Microduino's mCookie. These Arduino-compatible electronics kits make building mini machines a snap -- literally -- with magnetic connectors and interlocking pins that match up with LEGO blocks. The mCookie family of DIY modules, sensors and accessories was Kickstarted back in 2015 and began shipping to consumers at the end of the year. Now anyone can pick up one of the various kits (Basic, Advanced or Expert) and assemble projects like a music box, voice-activated camera, paw-waving fortune cat and more. Microduino also offers additional components to expand the possibilities to keep pace with your imagination. This week, one lucky reader will win a Family Kit (including all three mCookie sets) to launch their smart-machine-making career. Just head down to the Rafflecopter widget below for up to three chances at winning.

Winner: Congratulations to Robin B. of Chico, CA!