Posts with «clock» label

Binary Clock Fit For Queen Elsa’s Ice palace

When life gives you lemons, you make lemonade. When life gives you freezing cold temperatures and a yard full of snow, you make binary clocks out of ice. At least that’s what [Dennis] does, anyway.

[Dennis’] clock is made from several cylindrical blocks of ice stacked on top of one another. There are six columns of ice blocks. The blocks were made by pouring water into empty margarine containers and freezing them. Once they were frozen, [Dennis] bore a 5/16″ hole into the bottom of each block to house an LED. Wires ran from the LEDs back into the drainage port of a cooler.

The cooler housed the main electronics. The LED controller board is of [Dennis’] own design. It contains six TLC59282 chips allowing for control of up to 96 LEDs. Each chip has its output lines running to two RJ45 connectors. [Dennis] couldn’t just use one because one of the eight wires in the connector was used as a common power line. The main CPU is an Arduino. It’s hooked up to a DS3234 Real Time Clock in order to keep accurate time. The oscillator monitors temperature in order to keep accurate time even in the dead of winter.


Filed under: Arduino Hacks, led hacks

Binary Clock Would Make Doc Brown Proud

[Brett] was looking for a way to improve on an old binary clock project from 1996. His original clock used green LEDs to denote between a one or a zero. If the LED was lit up, that indicated a one. The problem was that the LEDs were too dim to be able to read them accurately from afar. He’s been wanting to improve on his project using seven segment displays, but until recently it has been cost prohibitive.

[Brett] wanted his new project to use 24 seven segment displays. Three rows of eight displays. To build something like this from basic components would require the ability to switch many different LEDs for each of the seven segment displays. [Brett] instead decided to make things easier by using seven segment display modules available from Tindie. These modules each contain eight displays and are controllable via a single serial line.

The clock’s brain is an ATmega328 running Arduino. The controller keeps accurate time using a DCF77 receiver module and a DCF77 Arduino library. The clock comes with three display modes. [Brett] didn’t want and physical buttons on his beautiful new clock, so he opted to use remote control instead. The Arduino is connected to a 433MHz receiver, which came paired with a small remote. Now [Brett] can change display modes using a remote control.

A secondary monochrome LCD display is used to display debugging information. It displays the time and date in a more easily readable format, as well as time sync information, signal quality, and other useful information. The whole thing is housed in a sleek black case, giving it a professional look.


Filed under: Arduino Hacks
Hack a Day 09 Jan 03:00

What is the Matrix…Clock?

We’re surprised we haven’t seen this kind of clock before, or maybe we have, but forgot about it in the dark filing cabinets of our minds. The above picture of [danjhamer’s] Matrix Clock doesn’t quite do it justice, because this is a clock that doesn’t just tick away and idly update the minutes/hours.

Instead, a familiar Matrix-esque rain animation swoops in from above, exchanging old numbers for new. For the most part, the build is what you would expect: a 16×8 LED Matrix display driven by a TLC5920 LED driver, with an Arduino that uses a DS1307 RTC (real-time clock) with a coin cell battery to keep track of time when not powered through USB. [danjhamer] has also created a 3D-printed enclosure as well as added a piezo speaker to allow the clock to chime off customizable musical alarms.

You can find schematics and other details on his Hackaday.io project page, but first, swing down below the jump to see more of the clock’s simple but awesome animations.


Filed under: Arduino Hacks, clock hacks

Micro Word Clock

A word clock – a clock that tells time with words, not dials or numbers – is one of those builds that’s on every Arduino neophyte’s ‘To Build’ list. It’s a bit more complex than blinking a LED, but an easily attainable goal that’s really only listening to a real time clock and turning a few LEDs on and off in the right pattern.

One of the biggest hurdles facing anyone building a word clock is the construction of the LED matrix; each LED or word needs to be in its own light-proof box. There is another option, and it’s something we’ve never seen before: you can just buy 8×8 LED matrices, so why not make a word clock out of that? That’s what [Daniel] did, and the finished project is just crying out to be made into a word watch.

[Daniel]’s word clock only uses eight discrete components: an ATMega328p, a DS1307 real time clock, some passives, and an 8×8 LED matrix. A transparency sheet with printed letters fits over the LED matrix forming the words, and the entire device isn’t much thicker than the LED matrix itself.

All the files to replicate this build can be found on [Daniel]’s webpage, with links to the Arduino code, the EAGLE board files, and link to buy the board on OSH Park.


Filed under: clock hacks
Hack a Day 29 Nov 09:00

Master Clock Keeps Time for All Other Clocks

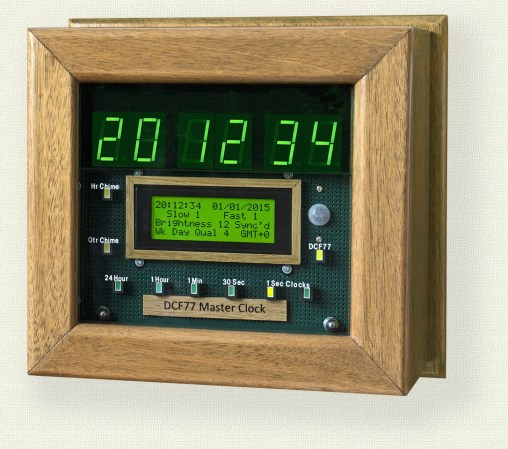
[Brett] just finished construction and long-term testing of this extremely accurate timepiece. It keeps such great time by periodically syncing with the atomic clock in Mainflingen, Germany.

The core of the project is an ATMega328 which uses the new DCF77 library for decoding the signal broadcast by an atomic clock. The libraries written by Udo Klein significantly increase the noise tolerance of the device reading the signal, but they will not work with any project that use a resonator rather than a crystal.

In the event of a complete signal loss from the atomic clock, the micro driving the clock also has a backup crystal that can keep the clock running to an accuracy of within 1 second per day. The clock can drive slave clocks as well, using pulses with various timings depending on what [Brett] needs them to do. The display is no slouch either: six seven-segment displays show the time and an LCD panel reads out data about the clock. It even has chimes for the hour and quarter hour, and is full of many other features to boot!

One of the most annoying things about timekeeping is daylight savings time corrections, and this clock handles that with a manual switch. This can truly take care of all of your timekeeping needs!


Filed under: clock hacks

Never Forget to Set an Alarm. Because This Alarm Clock Sets Itself!

Built with the Arduino Yún and using Temboo's online services, the SMART Alarm Clock automatically sets alarms based on Google Calendar events. And if you act quick and design an enclosure for this project you could win a Maker's Notebook!

Read more on MAKE

POV Display Does it on the Cheap

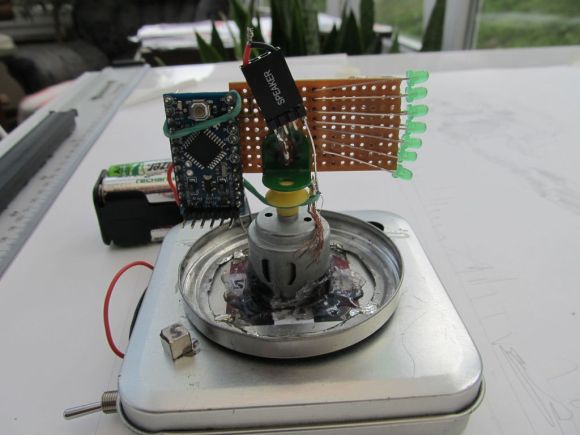
[Sholto] hacked together this ultra low-budget spinning display. He calls it a zoetrope, but we think it’s actually an LED based Persistence Of Vision (POV) affair. We’ve seen plenty of POV devices in the past, but this one proves that a hack doesn’t have to be expensive or pretty to work!

The major parts of the POV display were things that [Sholto] had lying around. A couple of candy tins, a simple brushed hobby motor, an Arduino Pro Mini, 7 green LEDs, and an old hall effect sensor were all that were required. Fancy displays might use commercial slip rings to transfer power, but [Sholto] made it work on the cheap!

The two tins provide a base for the display and the negative supply for the Arduino. The tins are soldered together and insulated from the motor, which is hot glued into the lower tin. A paper clip contacts the inside of the lid, making the entire assembly a slip ring for the negative side of the Arduino’s power supply. Some copper braid rubbing on the motor’s metal case forms the positive side.

[Sholto] chose his resistors to slightly overdrive his green LEDs. This makes the display appear brighter in POV use. During normal operation, the LEDs won’t be driven long enough to cause damage. If the software locks up with LEDs on though, all bets are off!

[Sholto] includes software for a pretty darn cool looking “saw wave” demo, and a simple numeric display. With a bit more work this could make a pretty cool POV clock, at least for as long as the motor brushes hold up!

[via Instructables]


Filed under: led hacks

New Project: S.M.A.R.T. Alarm Clock

Combine the Arduino Yún with a TFT Touch Shield to assemble a homemade alarm clock that automatically sets alarms based on calendar events and even emails with the correct code word. And it looks cool too!

Read more on MAKE

Generate Clocks with the SI5351 and an Arduino

If you’re dealing with RF, you’ll probably have the need to generate a variety of clock signals. Fortunately, [Jason] has applied his knowledge to build a SI5351 library for the Arduino and a breakout board for the chip.

The SI5351 is a programmable clock generator. It can output up to eight unique frequencies at 8 kHz to 133 MHz. This makes it a handy tool for building up RF projects. [Jason]‘s breakout board provides 3 isolated clock outputs on SMA connectors. A header connects to an Arduino, which provides power and control over I2C.

If you’re looking for an application, [Jason]‘s prototype single-sideband radio shows the chip in action. This radio uses two of the SI5351 clocks: one for the VFO and one for the BFO. This reduces the part count, and could make this design quite cheap.

The Arduino library is available on Github, and you can order a SI5351 breakout board from OSHPark.


Filed under: Arduino Hacks, radio hacks
Hack a Day 27 Jun 12:00

The 200 LED Ring Clock

There are LED clocks, and then there are LED clocks that can blind you from 30 paces. [Stiggalicious's] LED ring clock is of the latter variety. 200 WS2812B/Neopixel RGB LEDs drive the ring clock to pupil searing levels. The clock runs on ATMega1284P, with timekeeping handled by an NXP PCF8563 real-time clock chip. Code is written in Arduino’s wiring language using Adafruit’s Neopixel library.

Building the clock with a single Printed Circuit Board (PCB) would be both expensive and wasteful. [Stiggalicious] cleverly designed his clock to be built with 8 copies of the same PCB. Each board makes up a 45° pie slice of the ring. All 8 PCBs have footprints for the CPU, clock chip, and other various discrete parts, but only the “master” section has these parts populated. 7 “slave” sections simply pass clock, data, power and ground through each LED. He used Seeedstudio’s board service to get 10 copies of his PCB made, just in case there were any mistakes.

[Stiggalicious] rolled the dice by buying exactly the 200 LEDs he needed. Either he got really lucky, or the WS2812 quality testing has improved, because only one LED had a dead blue LED.

If you’d like to find out more, [Stiggalicious] gives plenty of details in his Reddit thread. He doesn’t have a webpage setup for the clock but he’s uploaded his source code (pastebin link) and Altium schematic/PCB files (mega.nz link). We may be a bit biased, but hackaday.io would be a perfect spot for this or any other project!


Filed under: clock hacks, led hacks
Hack a Day 24 Jun 12:00