Posts with «binary clock» label

Passing The Time By Reading The Time

Binary clocks are a great way to confuse your non-technical peers when they ask the time from you — not that knowing about the binary system would magically give you quick reading skills of one yourself. In that case, they’re quite a nice little puzzle, and even a good alternative to the quarantine clocks we’ve come across a lot recently, since you can simply choose not to bother trying to figure out the exact time. But with enough training, you’ll eventually get the hang of it, and you might be in need for a new temporal challenge. Well, time to level up then, and the Cryptic Wall Clock built by [tomatoskins] will definitely keep you busy with that.

Diagram of the clock showing 08:44:47

If you happen to be familiar with the Mengenlehreuhr in Berlin, this one here uses the same concept, but is built in a circular shape, giving it more of a natural clock look. And if you’re not familiar with the Mengenlehreuhr (a word so nice, we had to write it twice), the way [tomatoskins]’ clock works is to construct the time in 24-hour format by lighting up several sections in the five LED rings surrounding a center dot.

Starting from the innermost ring, each section of the rings represent intervals of 5h, 1h, 5m, 1m, and 2s, with 4, 4, 11, 4, and 29 sections per ring respectively. The center dot simply adds an additional second. The idea is to multiply each lit up section by the interval it represents, and add the time together that way. So if each ring has exactly one section lit up, the time is 06:06:02 without the dot, and 06:06:03 with the dot — but you will find some more elaborate examples in his detailed write-up.

This straightforward and yet delightfully unintuitive concept will definitely keep you scratching your head a bit, though you can always go weirder with the Roman numerals palm tree clock for example. But don’t worry, [tomatoskins] has also a more classic, nonetheless fascinating approach in his repertoire.

Hack a Day 15 May 00:00

Build a fully functional binary clock with your Uno

If you want to show everyone your computer prowess—or perhaps get a little practice—binary clocks are a great way to do so. These clocks express time in 1s and 0s instead of 0 through 9, and while the concept is pretty simple, actually creating one is less than straightforward… or used to be.

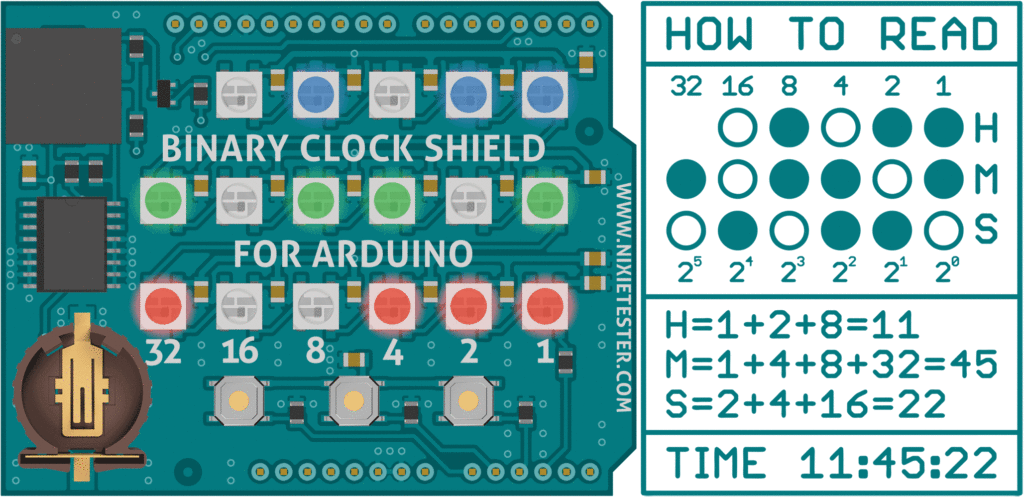
The Binary Clock Shield, now on Crowd Supply, aims to make this type of clock build extremely easy. This board plugs into an Arduino Uno and features 17 RGB LEDs to act as binary digits, along with an RTC module and backup battery socket. 

The device also includes a piezo speaker for sound output, plus three user buttons, great for setting the time or whatever other unique application you have in mind!

Nature and Arduinos combine as binary driftwood alarm clock

Binary clocks, which use a series of dots to indicate the time, are nothing new, but you’ve never seen anything like this device by Matt Wos! 

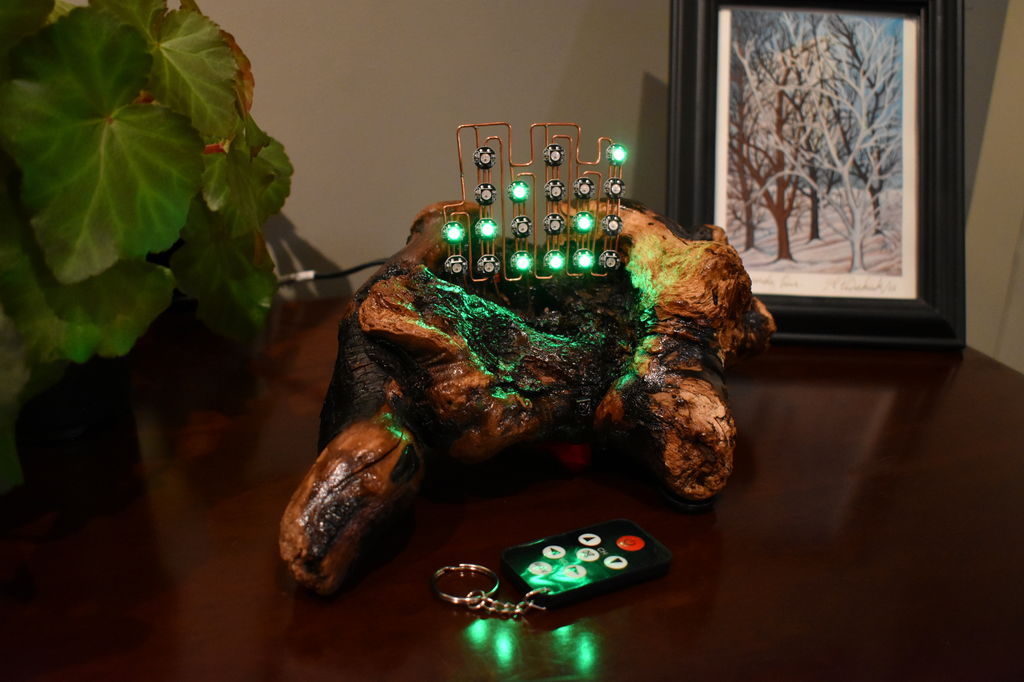
Wos’ project features a beautiful driftwood base, and WS2812B RGB LED dots that are suspended above it with copper wire to show the time.

Inside are a pair of Arduino Nanos used to control the LEDs and take input from a small infrared remote, along with an RTC module that allows it to keep accurate time. When the alarm function goes off, you’re treated not to a normal buzzer, but the “soothing” tones of a dial-up modem via an MP3 module and speaker!

Binary clocks have always attracted my attention and here is my version. There are a number of design elements that I believe sets it apart from other variants described on Instructables and other internet sites:

  • Addressable RGB LEDs have been mounted on a copper frame that is external to the body that houses the electronics.
  • An IR remote is used to set the time / alarm, snooze the alarm, select a display colour.
  • The alarm tone is able to be easily personalised.
  • Its in a piece of driftwood!!

The use of the external frame to support the LEDs was due to how much I liked the completed look of the display. The original plan was to have it mounted inside a box, behind opaque perspex but this would have been a design crime!

A Paris-inspired, Arduino-powered binary clock

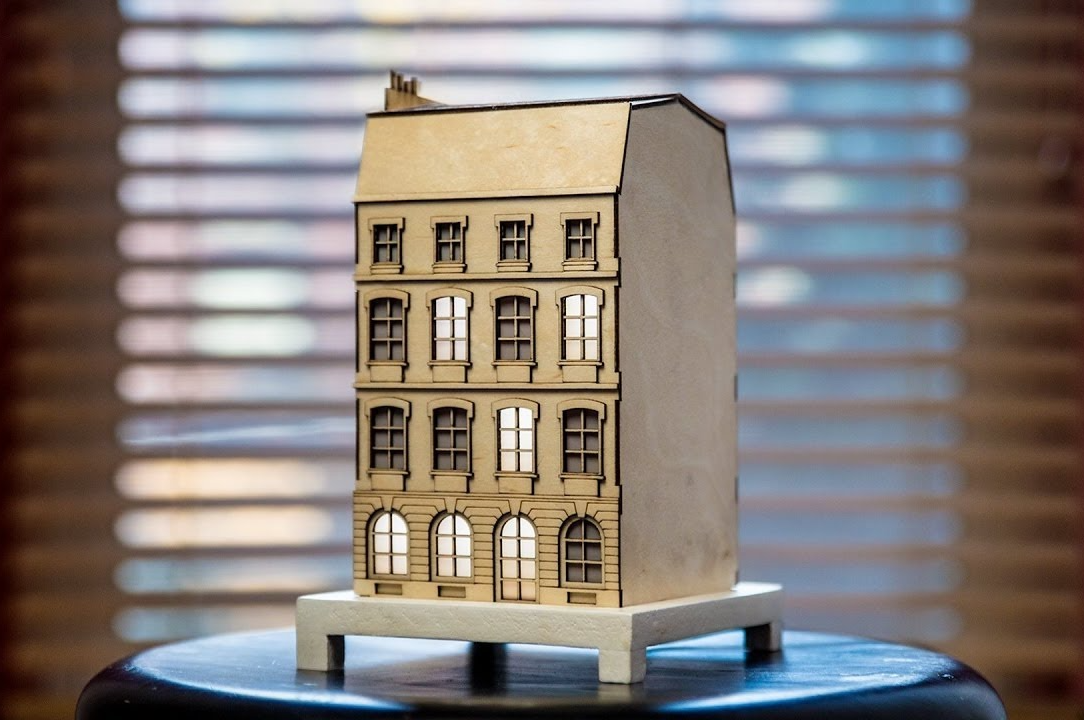
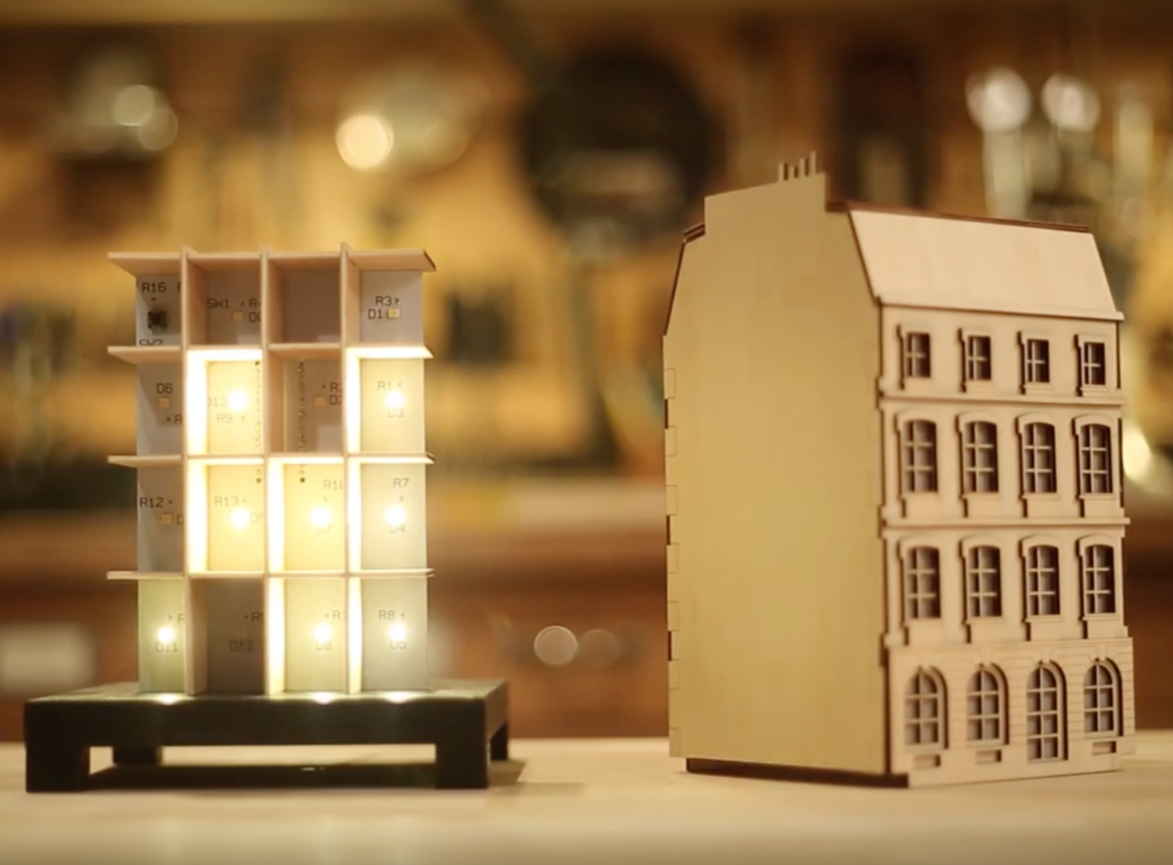
The La Fabrique DIY team has been working on a unique clock modeled after buildings seen along the Seine River in Paris. The “City Clock” is different from the others in that instead of a dial or decimal numbers, windows light up in a binary format, displaying the time in a binary sequence.

Electronics-wise, the clock can be made with an Arduino Uno, involving a fairly simple circuit with individual LEDs and resistors, as seen on this Imgur set. Also shown there is the Kickstarter version of the circuit, which amounts to a sort of gigantic shield that an Arduino Nano is plugged into.

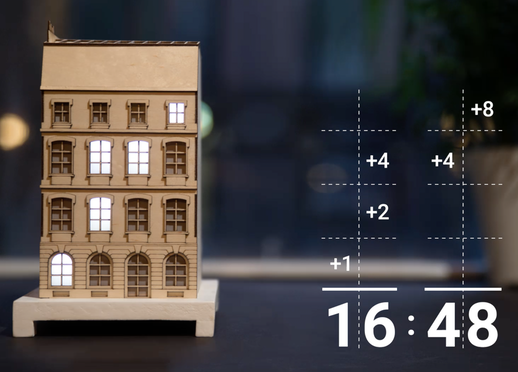
With the City Clock, you calculate the time by adding every digit vertically. The first floor equals one, second equals two, third equals four, and the top equals eight. Using this system, it’s possible to create every digit from zero to nine by adding one number to another.

These clocks are available in various kit forms, including just the electronics or frame if you’d like a head start crafting something truly your own!

Disco Flashlight Binary Analog Clock?

As multitools have lots of different functions in one case, so [Shadwan’s] clock design incorporates a multitude of features. He started the design as a binary clock using a Fibonacci spiral for the shape. However, the finished clock has four modes. The original binary clock, an analog clock, a flashlight (all lights on), and a disco mode that strobes multiple lights.

[Shadwan] used Rhino to model the case and then produced it using a laser cutter. The brains are — small wonder — an Arduino. A 3D-printed bracket holds everything together. You can see the result in the video below.

The clock was a school project and used a Neopixel ring. The students had a 16 position ring, which is not enough to do a 24-hour clock so they settled on a 12-hour design. The LED color, however, changes between AM and PM.

The paper included with the design said that research didn’t turn up any other binary clocks using Neopixels. We found that hard to believe, but it might be true. We certainly didn’t find any in our archives, although there are plenty of non-binary clocks out there.


Filed under: Arduino Hacks, clock hacks

Binary Clock Would Make Doc Brown Proud

[Brett] was looking for a way to improve on an old binary clock project from 1996. His original clock used green LEDs to denote between a one or a zero. If the LED was lit up, that indicated a one. The problem was that the LEDs were too dim to be able to read them accurately from afar. He’s been wanting to improve on his project using seven segment displays, but until recently it has been cost prohibitive.

[Brett] wanted his new project to use 24 seven segment displays. Three rows of eight displays. To build something like this from basic components would require the ability to switch many different LEDs for each of the seven segment displays. [Brett] instead decided to make things easier by using seven segment display modules available from Tindie. These modules each contain eight displays and are controllable via a single serial line.

The clock’s brain is an ATmega328 running Arduino. The controller keeps accurate time using a DCF77 receiver module and a DCF77 Arduino library. The clock comes with three display modes. [Brett] didn’t want and physical buttons on his beautiful new clock, so he opted to use remote control instead. The Arduino is connected to a 433MHz receiver, which came paired with a small remote. Now [Brett] can change display modes using a remote control.

A secondary monochrome LCD display is used to display debugging information. It displays the time and date in a more easily readable format, as well as time sync information, signal quality, and other useful information. The whole thing is housed in a sleek black case, giving it a professional look.


Filed under: Arduino Hacks
Hack a Day 09 Jan 03:00

Hard Drive Clock is Simple and Elegant

[Aaron] has been wanting to build his own binary desk clock for a while now. This was his first clock project, so he decided to keep it simple and have it simply display the time. No alarms, bells, or whistles.

The electronics are relatively simple. [Aaron] decided to use on of the ATMega328 chips he had lying around that already had the Arduino boot loader burned into them. He first built his own Arduino board on a breadboard and then re-built it on a piece of protoboard as a more permanent solution. The Arduino gets the time from a real-time clock (RTC) module and then displays it using an array of blue and green LED’s. The whole thing is powered using a spare 9V wall wort power supply.

[Aaron] chose to use the DS1307 RTC module to keep time. This will ensure that the time is kept accurately over along period of time. The RTC module has its own built-in battery, which means that if [Aaron's] clock should ever lose power the clock will still remember the time. The RTC battery can theoretically last for up to ten years.

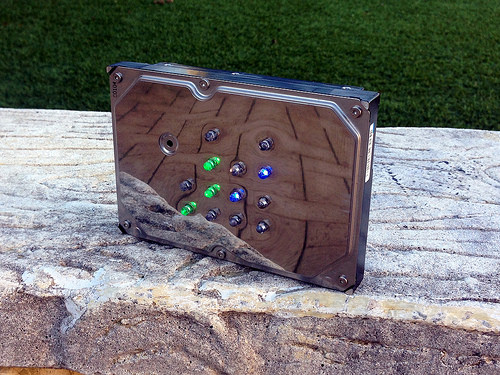
[Aaron] got creative for his clock enclosure, upcycling an old hard drive. All of the hard drive guts were removed and replaced with his own electronics. The front cover had 13 holes drilled out for the LED’s. There are six green LED’s to display the hour, and seven blue LED’s for the minute. The LED’s were wired up as common cathode. Since the hard drive cover is conductive, [Aaron] covered both sides of his circuit board with electrical tape and hot glue to prevent any short circuits. The end result is an elegant binary clock that any geek would be proud of.


Filed under: Arduino Hacks

Connect 4 binary clock

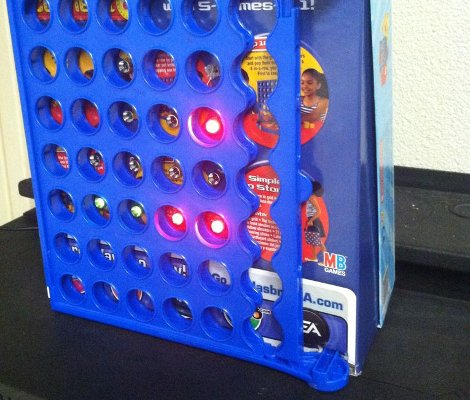
As part of a class at University, [Emacheen22] and his teammates turned an old Connect 4 game into a binary clock. This image shows the device nearing completion, but the final build includes the game tokens which diffuse the LED light. We enjoy the concept, but think there are a few ways to improve on it for the next iteration. If you’re interested in making your own we’d bet you can find Connect 4 at the thrift store.

Instead of using the free-standing game frame the team decided to use the box to host the LEDs and hide away the electronics. Since they’re using a breadboard and an Arduino this is a pretty good option. But it means that the game frame needs to be on its side as the tokens won’t stay in place without the plastic base attached. They used a panel mount bracket for each LED and chose super glue to hold all of the parts together.

We think this would be a lot of fun if the frame was upright. The LEDs could be free-floating by hot glueing the leads to either side of the opening. Using a small box under the base, all of the electronics can be hidden from view. After all, if you solder directly and use just a bare AVR chip there won’t be all that much to hide. Or you could get fancy and go with logic chips instead of a uC.


Filed under: clock hacks, toy hacks