Posts with «arm» label

Open Source Prosthetic Hands Focus on Function and Personality

A reddit user asked for workouts for his brother, who lost his hands. Another user responded with a 3D printed prosthetic.

Read more on MAKE

The post Open Source Prosthetic Hands Focus on Function and Personality appeared first on Make: DIY Projects, How-Tos, Electronics, Crafts and Ideas for Makers.

MAKE » Arduino 16 Jun 16:00

Hackaday Links: BSAPEDWLOVKTUB.YBKAB

Here’s something that’s just a design study, but [Ivan]‘s Apple IIe phone is a work of art. You’re not fitting a CRT in there, but someone out there has a 3D printer, an old LCD, and a GSM module. Make it happen. See also: the Frog Design Apple phone.

A few days ago we posted something on an old ‘286 machine that was able to load up the Hackaday retro site. For a few people, this was the first they’ve heard about our CSS and Javascript-less edition designed specifically for old computers. They dragged out some hardware, and [WTH] pulled up the site on a Dell Axim.It’s actually somewhat impressive that these machines have SD cards…

[Arduino Enigma] created a touchscreen Enigma machine. Why haven’t we seen an Arduino Colossus yet?

The crew at Adafruit now have a Flying Toaster OLED, which means we now have flying toaster bitmaps for all your OLED/graphic display projects.

[Ian] had an old rackmount programmable voltage standard. This was the remote programmable voltage standard, without front panel controls. No problem, just get an Arduino, shift register, and a few buttons. Video right here.

A few months ago, [Jan] released a neat device that stuffs a modelling synth inside a MIDI plug. He’s selling them now, and we’d love to see a few videos of this.


Filed under: Hackaday links

Stepping Through Code on a Pace 4000 Set Top Box

[Lee] wrote in to tell us about a Set Top Box he hacked. Before the cable industry lawyers get out their flaming swords… he’s not stealing cable, or really doing much of anything. This is a hack just for the adventure and thrill of making someone else’s hardware design do your bidding without any kind of instructions.

He posted about the adventure in two parts. The first is finding the JTAG header and identifying the pins. Arduino to the rescue! No really, and this is the type of Arduino use we love. Using a package called JTAGenum the board becomes a quick tool for probing and identifying JTAG connections.

The image above shows a different piece of hardware. From looking at it we’re pretty sure this is a Bus Blaster which is specifically designed for JTAG debugging with ARM processors. This is the beginning of the second part of his documentation which involves code dumping and stepping through lines code (or instructions) using OpenOCD and GDB. It’s a chore to follow all that [Lee] discovered just to write his name to the display of the box. But we certainly found it interesting. The display has a convoluted addressing scheme. We assume that there are cascading shift registers driving the segments and that’s why it behaves the way it does. Take a look for yourself and let us know what you think in the comments.


Filed under: ARM, classic hacks

First Look at the new Arduino Zero

Hinted at yesterday by Massimo Banzi during his keynote speech at MakerCon yesterday, Arduino has just officially announced their latest board—the Arduino Zero.

Read more on MAKE

MAKE » Arduino 15 May 14:39

Exploring the TI Stellaris platform with Energia Arduino-compatible IDE

Introduction

In the same manner as their MSP430 development board, Texas Instruments also have another LaunchPad board with their powerful Stellaris LM4F120H5QR microcontroller. It’s an incredibly powerful and well-featured MCU – which offers an 80 MHz, 32-bit ARM Cortex-M4 CPU with floating point, 256 Kbytes of 100,000 write-erase cycle FLASH and many peripherals such as 1MSPS ADCs, eight UARTs, four SPIs, four I2Cs, USB & up to 27 timers, some configurable up to 64-bits.

That’s a bucket of power, memory and I/O for not much money – you can get the LaunchPad board for around $15. This LaunchPad has the in-circuit debugger, two user buttons, an RGB LED and connectors for I/O and shield-like booster packs:
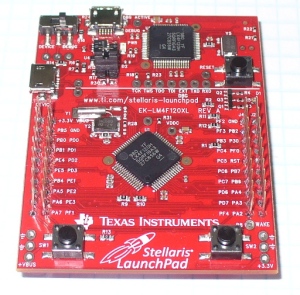
and the other side:

However the good news as far as we’re concerned is that you can now use it with the Energia Arduino-compatible IDE that we examined previously. Before rushing out to order your own Stellaris board, install Energia and examine the available functions and libraries to make sure you can run what you need. And if so, you’re set for some cheap Arduino power.

Installation

Installation is simple, just get your download from here. If you’re running Windows 7 – get the USB drivers from here. When you plug your LaunchPad into the USB for the first time, wait until after Windows attempts to install the drivers, then install drivers manually after download via Device manager … three times (JTAG, virtual serial port and DFU device). Use the debug USB socket (and set the switch to debug) when installing and uploading code. If you get the following warning from Windows, just click “Install this driver software anyway”:

Once the drivers are installed, plug in your LaunchPad, wait a moment – then run Energia. You can then select your board type and serial port just like the Arduino IDE. Then go ahead and upload the “blink” example…

Awesome – check out all that free memory space. In the same manner as the MSP430, there are some hardware<>sketch differences you need to be aware of. For example, how to refer to the I/O pins in Energia? A map has been provided for front:

… and back:

As you can imagine, the Stellaris MCUs are different to an AVR, so a lot of hardware-specific code doesn’t port over from the world of Arduino. One of the first things to remember is that the Stellaris is a 3.3V device. Code may or may not be interchangeable, so a little research will be needed to match up the I/O pins and rewrite the sketch accordingly. For example, instead of digital pins numbers, you use PX_Y – see the map above. So let’s say you want to run through the RGB LED… consider the following sketch:

int wait = 500;
void setup() 
{ 
 // initialize the digital pin as an output.
 pinMode(PF_1, OUTPUT); // red 
 pinMode(PF_3, OUTPUT); // green
 pinMode(PF_2, OUTPUT); // blue
}
void loop() 
{
 digitalWrite(PF_1, HIGH); 
 delay(wait); 
 digitalWrite(PF_1, LOW); 
 digitalWrite(PF_3, HIGH); 
 delay(wait); 
 digitalWrite(PF_3, LOW); 
 digitalWrite(PF_2, HIGH); 
 delay(wait); 
 digitalWrite(PF_2, LOW); 
}

Which simply blinks the red, green and blue LED elements in series. Using digital inputs is in the same vein, and again the buttons are wired so when pressed they go LOW. An example of this in the following sketch:

void setup() 
{ 
 // initialize the digital pins
 pinMode(PF_1, OUTPUT); // red 
 pinMode(PF_3, OUTPUT); // green
 pinMode(PF_2, OUTPUT); // blue

 pinMode(PF_4, INPUT_PULLUP); // left - note _PULLUP
 pinMode(PF_0, INPUT_PULLUP); // right - note _PULLUP 
}
void blinkfast() 
{
 for (int i=0; i<10; i++)
 {
 digitalWrite(PF_1, HIGH); 
 delay(250); 
 digitalWrite(PF_1, LOW); 
 digitalWrite(PF_3, HIGH); 
 delay(250); 
 digitalWrite(PF_3, LOW); 
 digitalWrite(PF_2, HIGH); 
 delay(250); 
 digitalWrite(PF_2, LOW); 
 }
}
void blinkslow() 
{
 for (int i=0; i<5; i++)
 {
 digitalWrite(PF_1, HIGH); 
 delay(1000); 
 digitalWrite(PF_1, LOW); 
 digitalWrite(PF_3, HIGH); 
 delay(1000); 
 digitalWrite(PF_3, LOW); 
 digitalWrite(PF_2, HIGH); 
 delay(1000); 
 digitalWrite(PF_2, LOW); 
 }
}
void loop()
{
 if (digitalRead(PF_4)==LOW) { blinkslow(); }
 if (digitalRead(PF_0)==LOW) { blinkfast(); }
}

And for the non-believers:

Where to from here? 

Sometimes you can be platform agnostic, and just pick something that does what you want with the minimum of time and budget. Or to put it another way, if you need a fast CPU and plenty of space but couldn’t be bothered don’t have time to work with Keil, Code Composer Studio, IAR etc – the Energia/Stellaris combination could solve your problem. There’s a growing Energia/Stellaris forum, and libraries can be found here. At the time of writing we found an I2C library as well.

However to take full advantage of the board, consider going back to the TI tools and move forward with them. You can go further with the tutorials and CCS etc from Texas Instruments own pages.

In the meanwhile have fun and keep checking into tronixstuff.com. Why not follow things on twitterGoogle+, subscribe  for email updates or RSS using the links on the right-hand column? And join our friendly Google Group – dedicated to the projects and related items on this website. Sign up – it’s free, helpful to each other –  and we can all learn something.

The post Exploring the TI Stellaris platform with Energia Arduino-compatible IDE appeared first on tronixstuff.

Stellarino brings Wiring-style coding to the Stellaris Launchpad

[Sultan Qasim] wrote in to tell us about the work he’s been doing on the Stellarino library. It’s goal is to break down the coding barriers present for those looking to move from Arduino to ARM. This is accomplished by facilitating Wiring-stlye code for the Stellaris Launchpad ARM development board.

Right off the bat [Sultan] mentions that the interface is Wiring-like, but is not compatible with it. This means you can’t just plop your existing sketches into a C file and get them to work with the addition of a simple include file. But what it does do is provide access to the functions to which seasoned Arduino users have grown accustomed. You can see some examples above, including analogWrite(), digitalRead(), and a simple delay function.

We had a quick look at the library. It uses StellarisWare components which are stored in the ROM of the chip (these are all preceded by ‘ROM_’). The one thing missing is the UARTstudio library which apparently carries a license incompatible with GPL.


Filed under: ARM

Drawing Arm with Arduino


Can you imagine to build a robotic arm that can draw? Actually [acorv] realized a good prototype.

I wanted to build a drawing arm that could write. My first version wasn’t good enough, so I built this one. I used timing belts and pulleys to improve the resolution. Stepper motors are driven by a Motor Shield on top of an Arduino UNO. On the tip, a servo motor allows the pen to go up and down. For input, I used a touch pad.

A more detailed description can be found on the [website].

Arduino Blog 10 Dec 17:40
arduino  arm  draw  drawing arm  drawings  gallery  robot  

Meet the Arduino Due, the 32-bit board that'll let your projects fly (really)

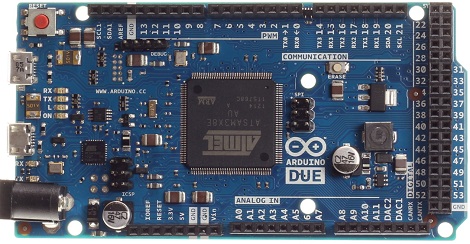
As much as we love the Arduino Uno, it's not the most powerful of hobbyist microcontrollers. Fortunately, the folks in Turin have just put the finishing touches on a 32-bit upgrade with buckets of potential. At the heart of the Arduino Due is an 84MHz Atmel CPU, based on ARM's Cortex M3 Architecture, which is capable of being the brains inside your own flying drone or homemade 3D printer. It should start trickling out onto shelves from today, setting you back $49, but hey, that's a small price to pay to automate your drinking adventures.

Continue reading Meet the Arduino Due, the 32-bit board that'll let your projects fly (really)

Filed under: Misc

Meet the Arduino Due, the 32-bit board that'll let your projects fly (really) originally appeared on Engadget on Mon, 22 Oct 2012 09:22:00 EST. Please see our terms for use of feeds.

Permalink | Email this | Comments

The Arduino Due is finally here

After a years-long wait, an ARM powered Arduino is finally due. The Arduino Due will finally be released this coming Monday.

On board the Arduino Due is an Atmel-sourced ARM Cortex M3 microcontroller running at 84 MHz. The Due has an impressive list of features including a USB 2.0 host, compatibility with the Android ADK (lest you still need an IOIO), 12 analog inputs with 12-bit resolution, 2 analog outputs running at 12 bits, a CAN interface, and more input pins than you can shake a stick at.

For a full list of features, you can grab this PDF we picked up when we saw the Due at Maker Faire NYC

This hardware update to the Arduino platform makes a lot of very cool builds very possible for even the beginner hardware hacker. Of course the Due will be used for controlling drones and UAVs, laser cutters and 3D printers, and playing WAV files from the analog outputs. The much improved hardware opens up a lot of other possible builds including making your own guitar pedals – DSP is a wonderful thing – and reading the telemetry from your car in real-time via the CAN bus.

Although it’s not available right now, you will be able to buy an Arduino Due for $49 USD this coming Monday at your favorite electronics retailers. 


Filed under: arduino hacks, ARM
Hack a Day 20 Oct 16:00

Arduino shields on the raspberry pi

Flicking through hackaday as you do and found an article that may be of interest to those using the raspberry pi.


http://hackaday.com/2012/10/10/using-arduino-shields-with-the-raspi/


The article then links here:

http://www.cooking-hacks.com/index.php/documentation/tutorials/raspberry-pi-to-arduino-shields-connection-bridge

Let's Make Robots 10 Oct 17:51
arduino  arm  other  pi  raspberry  shield