Posts with «arm» label

Robo-Flute Whistles MIDI

We aren’t sure this technically qualifies as music synthesis, but what else do you call a computer playing music? In this case, the computer is a Teensy, and the music comes from a common classroom instrument: a plastic recorder. The mistaken “flute” label comes from the original project. The contraption uses solenoids to operate 3D printed “fingers” and an air pump — this is much easier with a recorder since (unlike a flue) it just needs reasonable air pressure to generate sound.

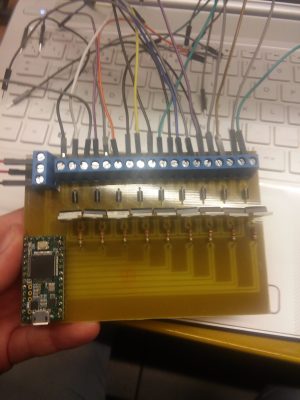
A Teensy 3.2 programmed using the Teensyduino IDE drives the solenoids. The board reads MIDI command sent over USB from a PC and translates them into the commands for this excellent driver board. It connects TIP31C transistors, along with flyback diodes, to the solenoids via a terminal strip.

On the PC, a program called Ableton sends the MIDI messages to the Teensy. MIDI message have three parts: one sets the message type and channel, another sets the velocity, and one sets the pitch. The code here only looks at the pitch.

This is one of those projects that would be a lot harder without a 3D printer. There are other ways to actuate the finger holes, but being able to make an exact-fitting bracket is very useful. Alas, we couldn’t find a video demo. If you know of one, please drop the link in the comments below.

We have seen bagpipe robots (in fact, we’ve seen several). We’ve also seen hammering shotguns into flutes, which is certainly more melodious than plowshares.


Filed under: Arduino Hacks, ARM, musical hacks

The Open-V, World’s First RISC-V-based Open Source Microcontroller

A fully open source, Arduino-compatible microcontoller based on the RISC-V architecture.

Read more on MAKE

The post The Open-V, World’s First RISC-V-based Open Source Microcontroller appeared first on Make: DIY Projects and Ideas for Makers.

Hackaday Prize Entry: Explore M3 ARM Cortex M3 Development Board

Even a cursory glance through a site such as this one will show you how many microcontroller boards there are on the market these days. It seems that every possible market segment has been covered, and then some, so why on earth would anyone want to bring another product into this crowded environment?

This is a question you might wish to ask of the team behind Explore M3, a new ARM Cortex M3 development board. It’s based around an LPC1768 ARM Cortex M3 with 64Mb of memory and 512k of Flash running at 100MHz, and with the usual huge array of GPIOs and built-in peripherals.

The board’s designers originally aimed for it to be able to be used either as a bare-metal ARM or with the Arduino and Mbed tools. In the event the response to their enquiries with Mbed led them to abandon that support. They point to their comprehensive set of tutorials as what sets their board apart from its competition, and in turn they deny trying to produce merely another Arduino or Mbed. Their chosen physical format is a compact dual-in-line board for easy breadboarding, not unlike the Arduino Micro or the Teensy.

If you read the logs for the project, you’ll find a couple of videos explaining the project and taking you through a tutorial. They are however a little long to embed in a Hackaday piece, so we’ll leave you to head on over if you are interested.

We’ve covered a lot of microcontroller dev boards here in our time. If you want to see how far we’ve come over the years, take a look at our round up, and its second part, from back in 2011.


Filed under: ARM, Microcontrollers, The Hackaday Prize

Discover the latest Arduino build for ARM Linux

As many of you already noticed, we recently released a new “Linux ARM” version of the Arduino IDE available for download on our website together with the usual “Linux 32bit” and “Linux 64bit.”

This release enables you to run the Arduino Software (IDE) on many of the mini PC boards based on ARM6+ processors currently on the market, including Raspberry Pi, C.H.I.P., BeagleBone, UDOO… just to name a few.


The Linux ARM release has been strongly supported by our community and we would like to thank all the people that helped to make this happen: GitHub handles @CRImier, @NicoHood, @PaulStoffregen, @ShorTie8, and to everyone that patiently tested and reported problems.

If you are interested (and brave!), you can read the full story and explore the complete list of collaborators below:

https://github.com/arduino/Arduino/pull/3549
https://github.com/arduino/arduino-builder/issues/105
https://github.com/arduino/Arduino/pull/4457
https://github.com/arduino/Arduino/pull/4517

Disclaimer: The release is “experimental,” meaning that it mostly works but some boards do not work or may not produce the desired result… enjoy imperfection and give us feedback on Github!

Arduino Comes To The Raspberry Pi, Linux ARM Devices

Arduino is the perfect introduction to microcontrollers and electronics. The recent trend of powerful, cheap, ARM-based single board Linux computers is the perfect introduction to computer science, programming, and general Linux wizardry. Until now, though, Arduino and these tiny ARM computers have been in two different worlds. Now, finally, there are nightly builds of Arduino IDE on the Raspberry Pi and other single board Linux computers.

The latest Arduino build for ARM Linux popped up on the arduino.cc downloads page early this week. This is the result of an incredible amount of work from dozens of open source developers across the Arduino project. Now, with just a simple download and typing ‘install’ into a terminal, the Arduino IDE is available on just about every single board Linux computer without having to build the IDE from source. Of course, Arduino has been available on the Raspberry Pi for a very long time with sudo apt-get install arduino, but this was an older version that cannot work with newer Arduino boards.

Is this distribution of the Arduino IDE the same you would find on OS X and Windows? Yep, everything is the same:

While this is really just arduino.cc improving their automated build process and putting a link up on their downloads page, it does make it exceptionally easy for anyone to set up a high school electronics lab exceptionally easy. The Raspberry Pi is almost a disposable computing device, and combining it with Arduino makes for a great portable electronics lab.


Filed under: Arduino Hacks, linux hacks, Raspberry Pi

Cartesio – low cost cartesian plotter robot

Primary image

What does it do?

Plotter robot arm

Recently the famous site evilmadscientist introduced the new art robot called Axidraw.I saw the robot in action and it is very similar to the robot I built in the 2015, called Cartesio, a 3d printed cartesian robot.

Cost to build

$60, 00

Embedded video

Finished project

Complete

Number

Time to build

Type

URL to more information

Weight

read more

The Internet of Linux Things

The Linux Foundation is a non-profit organization that sponsors the work of Linus Torvalds. Supporting companies include HP, IBM, Intel, and a host of other large corporations. The foundation hosts several Linux-related projects. This month they announced Zephyr, an RTOS aimed at the Internet of Things.

The project stresses modularity, security, and the smallest possible footprint. Initial support includes:

  • Arduino 101
  • Arduino Due
  • Intel Galileo Gen 2
  • NXP FRDM-K64F Freedom

The project (hosted on its own Website) has downloads for the kernel and documentation. Unlike a “normal” Linux kernel, Zephyr builds the kernel with your code to create a monolithic image that runs in a single shared address space. The build system allows you to select what features you want and exclude those you don’t. You can also customize resource utilization of what you do include, and you define resources at compile time.

By default, there is minimal run-time error checking to keep the executable lean. However, there is an optional error-checking infrastructure you can include for debugging.

The API contains the things you expect from an RTOS like fibers (lightweight non-preemptive threads), tasks (preemptively scheduled), semaphores, mutexes, and plenty of messaging primitives. Also, there are common I/O calls for PWM, UARTs, general I/O, and more. The API is consistent across all platforms.

You can find out more about Zephyr in the video below. We’ve seen RTOS systems before, of course. There’s even some for robots. However, having a Linux-heritage RTOS that can target small boards like an Arduino Due and a Freedom board could be a real game changer for sophisticated projects that need an RTOS.


Filed under: Arduino Hacks, ARM, linux hacks, news
Hack a Day 25 Feb 16:30

Using A TeensyLC To Emulate The XBOX 360 Controller

After the release of Mortal Kombat X, [Zachery’s] gaming group wanted to branch out into the fighter genre. They quickly learned that in order to maximize their experience, they would need a better controller than a standard gamepad. A keyboard wasn’t going to cut it either. They wanted a fight stick. These are large controllers that look very much like arcade fighting controls and include a joystick and large buttons. [Zachery’s] group decided to build their own fight stick for use with a PC.

[Zachery] based his build around the TeensyLC, which is a 32 bit development board with an ARM processor. It’s also compatible with Arduino. The original version of his project setup the controller as a HID, essentially emulating a keyboard. This worked for a while until they ran into compatibility issues with some games. [Zachery] learned that his controller was compatible with DirectInput, which has been deprecated. The new thing is Xinput, and it was going to require more work.

Using Xinput meant that [Zachery] could no longer use the generic Microsoft HID driver. Rather than write his own drivers, he decided to emulate the XBOX 360 controller. When the fight stick is plugged into the computer, it shows up as an XBOX 360 controller and Windows easily installs the pre-built driver. To perform the emulation, [Zachery] first had to set the VID and PID of the device to be identical to the XBOX controller. This is what allows the Microsoft driver to recognize the device.

Next, the device descriptor and configuration descriptor had to be added to the Teensy’s firmware. The device descriptor includes information such as USB version, device class, protocol, etc. The configuration descriptor includes additional information about the device configuration. [Zachery] used Microsoft Message Analyzer to pull the configuration descriptor from a real XBOX 360 controller, then used the same data in his own custom controller.

[Zachery] programmed the TeensyLC using the Arduino IDE. He ran into some trouble here because the IDE did not include the correct device type for an Xinput device. [Zachery] had to edit the boards.txt file and add three lines of code in order to add a new hardware device to the IDE’s menu. Several other files also had to be modified to make sure the compiler knew what an Xinput device type was.  With all of that out of the way, [Zachery] was finally able to write the code for his controller.


Filed under: Arduino Hacks, ARM
Hack a Day 15 Jul 03:00

New Project: Building a Robot Arm Part 4: Adding Control with an Arduino

This project is part 4 in the building a robot arm tutorial. In the first part I show how to design the arm, the second part shows how to design the base, and the third shows how to design the mount. After all of the Computer Aided Drafting (CAD) and 3D modeling […]

Read more on MAKE

The post Building a Robot Arm Part 4: Adding Control with an Arduino appeared first on Make: DIY Projects, How-Tos, Electronics, Crafts and Ideas for Makers.

Open Source Prosthetic Hands Focus on Function and Personality

A reddit user asked for workouts for his brother, who lost his hands. Another user responded with a 3D printed prosthetic.

Read more on MAKE

The post Open Source Prosthetic Hands Focus on Function and Personality appeared first on Make: DIY Projects, How-Tos, Electronics, Crafts and Ideas for Makers.

MAKE » Arduino 16 Jun 16:00