Posts with «arduino» label

Controlling a Quadcopter with Gestures

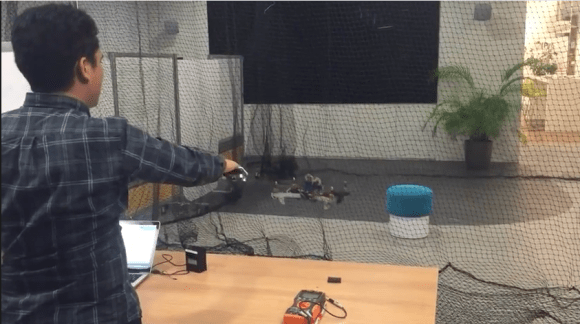
[grassjelly] has been hard at work building a wearable device that uses gestures to control quadcopter motion. The goal of the project is to design a controller that allows the user to intuitively control the motion of a quadcopter. Based on the demonstration video below, we’d say they hit the nail on the head. The controller runs off an Arduino Pro Mini-5v powered by two small coin cell batteries. It contains an accelerometer and an ultrasonic distance sensor.

The controller allows the quadcopter to mimic the orientation of the user’s hand. The user holds their hand out in front of them, parallel to the floor. When the hand is tilted in any direction, the quadcopter copies the motion and will tilt the same way. The amount of pitch and roll is limited by software, likely preventing the user from over-correcting and crashing the machine. The user can also raise or lower their hand to control the altitude of the copter.

[grassjelly] has made all of the code and schematics available via github.


Filed under: Arduino Hacks, drone hacks

Kickstarter Monitor Will Brighten Your Day

Keeping up with a kickstarter campaign can be quite a task, especially if your project is real (looking at you, Scribble Pen!) and you’re trying to keep up with product fabrication and all the other logistics involved in bringing a product to market. [macetech] are currently in the middle of a campaign themselves and built a loud, bright alert system to notify them of any new kickstarter backers.

The project uses a LED marquee to display the current number of backers, but every time a new backer contributes to the project, a blindingly bright green arrow traffic signal is illuminated and a piezo speaker plays a celebration tune. All of these devices are controlled by an Arduino Yun which, with its built-in Atheros chipset, easily connects to the network and monitors the kickstarter page for changes.

[macetech] used some interesting hardware to get everything to work together. They used a USB-to-RS232 cable with and FTDI chip to drive the LED marquee and a PowerSwitchTail 2 from Adafruit to drive the power-hungry traffic signal. Everything was put together in a presentable way for their workshop and works great! All of the source code is available on their project page, and you can check out their RGB LED Shades kickstarter campaign too.


Filed under: Arduino Hacks

Arduino Materia 101 is available for pre-order

During Maker Faire Rome we announced and gave a preview of our new project called Arduino Materia 101, the 3d printer developed in collaboration with Sharebot.

We are happy to announce that starting today the 3d printer is available for pre-order (30 days delivery time) from Arduino Store :

We can also share with you a list of documentation to learn all the details about it:

  • Product page with downloadable PDFs of
    • Use Manual in English and Italian
    • Assembly Manual (soon online in Italian and  in English)

In the next weeks we are going to post on the blog some cool hacks and user profiles to make it even easier to enjoy with the 3d printer.


Control a robot through hand gestures with Arduino Uno and Xbee

Robin Andersson shared with us the link to his Instructable to create a robot controlled by (gloved) hand gestures and running on a couple of Arduino Unos and Xbee.

You can make it yourself following the 8 steps of the tutorial and then customize the gestures as you like.

Enjoy the video below:

Arduino Blog 15 Oct 22:04

Experimenting new interfaces for Radios with wood and fabric

An Interaction and Industrial Designer studying at Carnegie Mellon University in Pittsburgh tried to re-imagine the way we interact with radios to create a more meaningful relationship between the user and the artefact.

Radios have been around since the 1920s but the devices we have at home haven’t changed much even if they were designed nearly 100 years ago and share similar elements like switches, knobs, sliders.

Yaakov Lyubetsky worked on a prototype of The Experimental Form Radio using Arduino Uno:

When The Experimental Form Radio is laying on a tabletop, it is off. To turn the radio on, you pick it up and slot it onto a wall mount. The radio leverages the elastic qualities of fabric to control stations and volume. To change stations you press lightly and slide your finger along the fabric surface. To change the volume you press firmly into the fabric, and then slide your finger along the deeper cavity in the radio. The video below showcases the interaction.

Requiring the user to pick up and wall mount the radio to turn on creates a ritualistic experience with a very simple feedback mechanism. If the radio is hanging on the wall it’s on, if the radio is laying on a flat surface then it’s off. The visual and auditory feedback allows the user to have a clear understanding of the system state.

Even cooler than the video above is the next one, showing all the “Making of” process to build the wooden piece and the soft interface:

The project uses an Arduino Uno board with a custom circuit made with three independent layers of conductive fabric and conductive thread. Touching together two layers of conductive fabric completes one of twelve circuits that then either change the radio station or the volume.

Take a look at the additional documentation on his website.

Arduino Blog 14 Oct 21:31

New Brain for an Old Washing Machine

When the washing machine at [hydronucleus]‘s place went on the fritz, he went straight to the toolbox to try to repair it. The problem was with the old mechanical control unit, so [hydronucleus] got an Arduino out of the parts bin to create a brand new electronic controller for his washing machine. (Imgur Link)

The old mechanical controller functioned like a player piano. A rotating drum with ridges actuate different cycles in the washing machine. Some of the cycles weren’t working properly so [hydronucleus] ripped them out. With the help of a schematic posted on the washing machine itself, the cycles were able to be programmed into the Arduino.

The other obstacle in this repair was getting enough relays together to switch everything in the washing machine. This was solved with a Sainsmart 16 relay block, which has more than enough relays for the job. [hydronucleus] wired up an LCD and a pushbutton to control it and his washing machine is as good as new! The cost of the repair certainly beats a new machine, too. Although if it finally gives up the ghost completely, he could always turn it into a windmill.

Want to read more about [hydronucleus]‘s washing machine hack? Check out his Reddit thread!


Filed under: home hacks

Wood Lizzie is a DIY Soap Box Cart controlled via Wi-Fi

In the following 10-minute video, the Currah team is showing us all the details of Wood Lizzie, a project experimenting with Arduino Mega and Wi-Fi Shield, a very flexible steering system and the virtually unlimited control range afforded by WiFi and Internet Protocol:

The original plan was to construct one of the two-wheeled robots very popular with hobbyists but it was eventually decided that the resulting vehicle would be of very limited application and capable only of traversing smooth surfaces. However, note that the current design can be viewed as the drive of a two-wheeled robot coupled with a trailer by means of a 360 degree pivot. A slip ring capsule within the pivot enables the heavy battery and bulky control system to be separated from the drive and located on the trailer thereby distributing weight evenly between the four wheels.

DIY soap-carts were pretty common among kids in the first part of the 20th century and built from old pram wheels, scrap wood and, typically, soap boxes. They could provide a lot of fun for the family at very low cost and in recent years there’s a new interest in them especially to those appreciating their vintage look!


BORAT: Bathroom Monitor for the Future

A recent company move has left [kigster] and his 35 coworkers in a frustrating situation. Their new building only has two single occupancy bathrooms. To make matters worse, the bathrooms are located on two different floors. Heading to one bathroom, finding it occupied, then running upstairs to find the second bathroom also occupied became an all to common and frustrating occurrence at the office.

It was obvious the office needed some sort of bathroom occupancy monitoring system – much like those available on commercial aircraft. [kigster] asked for a budget of about $200 to build such a system. His request was quickly granted it by office management. They must have been on their way to the bathroom at the time.

[kigste
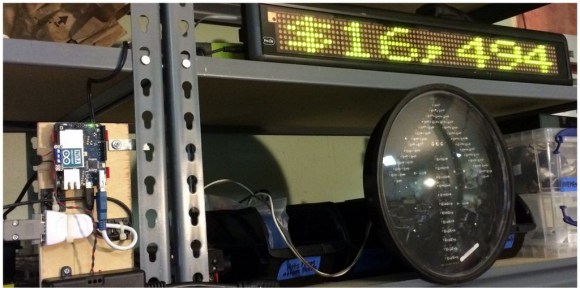
r] began work on BORAT: Bathroom Occupancy Remote Awareness Technology. The initial problem was detecting bathroom occupancy. The easiest method would be to use door locks with embedded switches, much those used in aircraft. Unfortunately, modifying or changing the locks in a rented office space is a big no-no. Several other human detection systems were suggested and rejected. The final solution was a hybrid. Sonar, Passive Infrared (PIR), and light sensors work in concert to detect if a person is in the bathroom. While we think the final “observer unit” is rather cool looking, we’re sure unsuspecting visitors to the office may be wondering why a two eyed robot is staring at them on the throne.

The display side of the system was easy. The entire system communicates with the venerable nRF24L01+ radio modules, so the display just needed a radio module, an arduino, and a way of displaying bathroom status. Two LED matrices took care of that issue.

We really like this hack. Not only is it a great use of technology to solve a common problem, but it’s also an open source system. BORAT’s source code is available on [kigster's] github.

Want to know more about BORAT? Kigster is answering questions over on his thread in the Arduino subreddit.


Filed under: Arduino Hacks

A Simple Floppy Music Controller

While playing music with floppy drives has been done many times over, making any device with a stepper motor play music still appeals to the hacker in all of us. [Tyler] designed an Arduino shield and a library which lets you get up and running in no time. [Tyler]‘s shield includes pin headers to connect 4 floppy drives, which plug directly into the shield. The drives don’t need any modification before being used.

While you could simply wire a few floppy drives up to an Arduino with some jumpers, this breakout shield makes connecting your drives trivial. In addition to designing the shield, [Tyler] released an Arduino library to make things even easier. The library lets you simply set the frequency you want each drive to play, which saves a bit of legwork.

The floppy-controlling Arduino library is available on GitHub and a video of the controller is included after the break.


Filed under: musical hacks
Hack a Day 12 Oct 12:00

Build Your Own Stand Alone Web Radio


If you’re the type who enjoys passing idle time by keeping up with podcasts or listening to web stations but don’t always want to occupy your laptop or tablet, this Arduino based radio player will provide a base station for tunes.

The Web Radio project by [Vassilis Serasidis] outlines in a pleasing amount of detail exactly how to wire up a short list of four modules. These including an Ethernet shield, LCD screen, MP3 decoder, and USB serial converter, with an Arduino Mini in order to bookmark and play fourteen of your favorite channels. His hand-soldered board couples everything into one neatly stacked package. The instructional video shows this off and he even explains how to locate your favorite stations on internet-radio.com and copy their port and IP number directly into an example sketch which is provided for use. If you’ve been wanting to build a self contained radio node for your desk free of extra baggage, this is a no-sweat project for both the hardware savvy and those more oriented with code writing.

If you’re going to build your own radio, it’s always cool to disguise your high-tech creation as something more rustic. Check out this project by [Dominic Buchstaller] for a great example of a vintage radio given a second calling.


Filed under: Arduino Hacks, radio hacks